Are you a Node.js developer looking to explore the world of GPIO programming? In this blog post, we will walk you through a step-by-step guide on how to blink an LED on a Brainy Pi using Node.js. Whether you’re a beginner or an experienced developer, we aim to explain the code in a simple and straightforward manner. Lets explore GPIO programming using nodeJS on Brainy Pi
Hardware Requirements
Before we dive into the programming aspect, let’s take a quick look at the hardware requirements for this project. To follow along, you will need the following:
Brainy Pi board
LED
Resistor (around 220 ohms)
Jumper wires
Make sure you have these components ready before moving on to the next section.
Installing Node.js on BrainyPi
To begin programming GPIO using Node.js on the Brainy Pi, you need to have Node.js installed on your device. If you haven’t already installed Node.js, follow these steps:
Open the terminal on your Brainy Pi.
Run the following command to update the package list:
sudo apt update
Install Node.js using the following command:
sudo apt install nodejs
That’s it! Node.js is now installed on your Brainy Pi. You can verify the installation by running node -v in the terminal, which should display the Node.js version.
Coding the GPIO
Now that you have Node.js installed, let’s jump into the code.
Download the code, by cloning
git clone https://github.com/brainypi/brainypi-gpio-examples.git
cd using-gpio-lib/nodejs
The folder contains 2 files
gpiolib.js – This contains the core gpio functions
main.js – This is the example which uses the core gpio functions to blink the led
Below is the explanation of the main.js code:
var fs = require('fs');
var GPIO = require('./gpiolib');

var blink_period = 500; // in milliseconds

var gpio_154 = new GPIO.NewGpio('154', 'out', '0');
The code begins by importing the
fsmodule, which provides access to the file system.It also imports a custom module
gpiolibusingrequire('./gpiolib'). This module likely contains functions for GPIO manipulation.The variable
blink_periodis set to 500 milliseconds, indicating the duration of each blink.A new GPIO object is created using the
NewGpioconstructor from thegpiolibmodule. It takes three parameters: the pin number (‘154’), the direction (‘out’ for output), and the initial state (‘0’).
GPIO.pinMode(gpio_154, function(err, pin) {
    if (err) throw err; // Error occurred during pin export
    setInterval(function() {
        gpio_154.value == '0' ? GPIO.digitalWrite(gpio_154, '1') : GPIO.digitalWrite(gpio_154, '0');
    }, blink_period);
});
The
GPIO.pinModefunction is called, passing thegpio_154object and a callback function. This function is responsible for setting the pin mode of the GPIO pin.Inside the callback function, an interval is set using
setInterval. This interval repeatedly executes the provided function at the specifiedblink_period.The function inside
setIntervalchecks the current value ofgpio_154.value. If it is ‘0’, it callsGPIO.digitalWritewith thegpio_154object and ‘1’ as arguments. If it is not ‘0’, it callsGPIO.digitalWritewith thegpio_154object and ‘0’ as arguments.The
GPIO.digitalWritefunction is responsible for writing the given value to the GPIO pin.
Overall, this code sets up a GPIO pin with number ‘154’ as an output pin, and then repeatedly blinks the LED connected to that pin by toggling the value between ‘0’ and ‘1’ at the specified blink_period.
Physical pins to GPIO number
From the above code it accepts GPIO number and not the physical gpio pins. To convert the physical gpio pins to GPIO number use the image below.
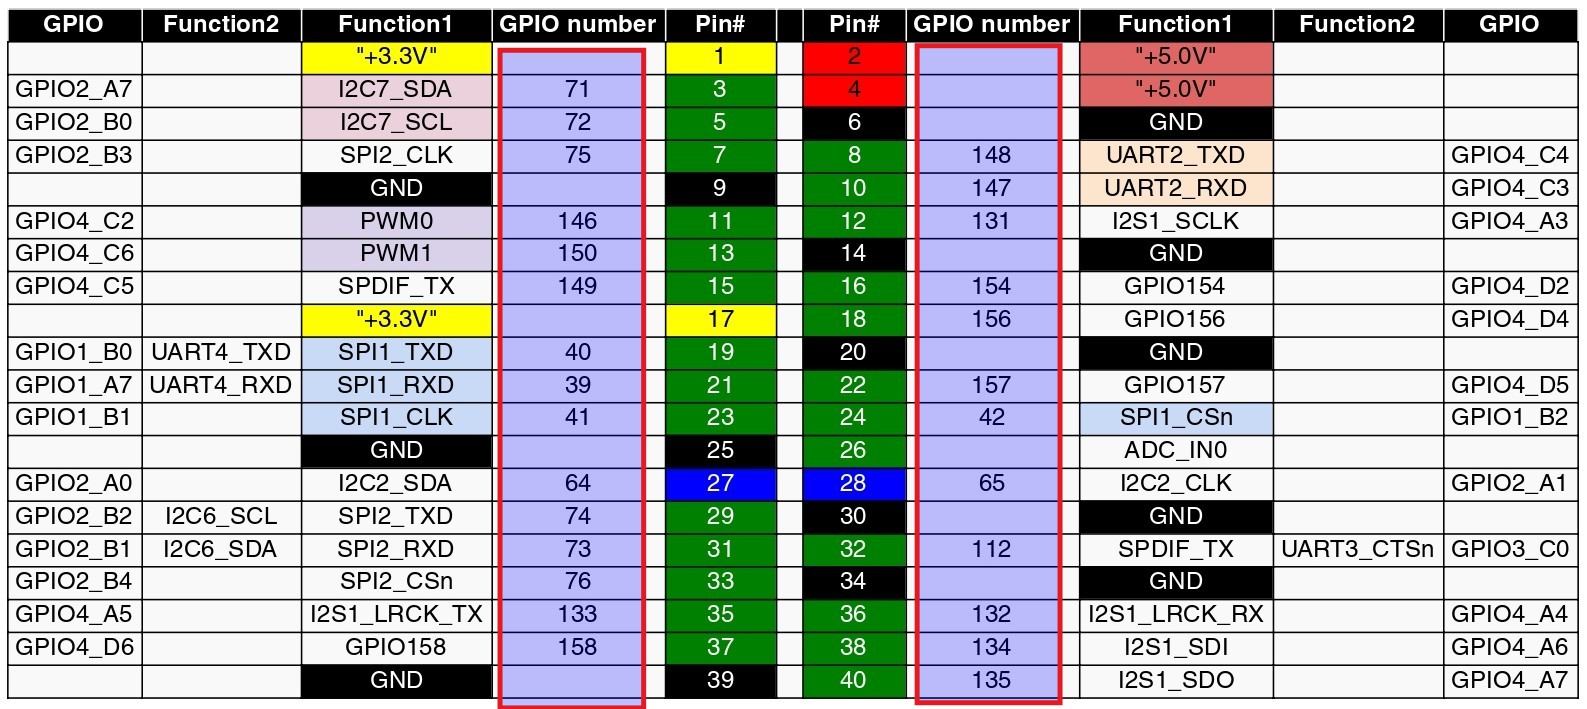
For example: Physical pin number 16 is GPIO number 154
Running the Program
To run the program and see the LED blink, follow these steps:
Connect the LED to the Brainy Pi board using the appropriate GPIO pin.
Open a terminal and navigate to the directory.
cd using-gpio-lib/nodejs
Run the program using the following command:
sudo node main.js.Observe the LED blinking at regular intervals.


