Brainy Pi

Available to select audience (currently beta)

AWS IoT with Brainy Pi
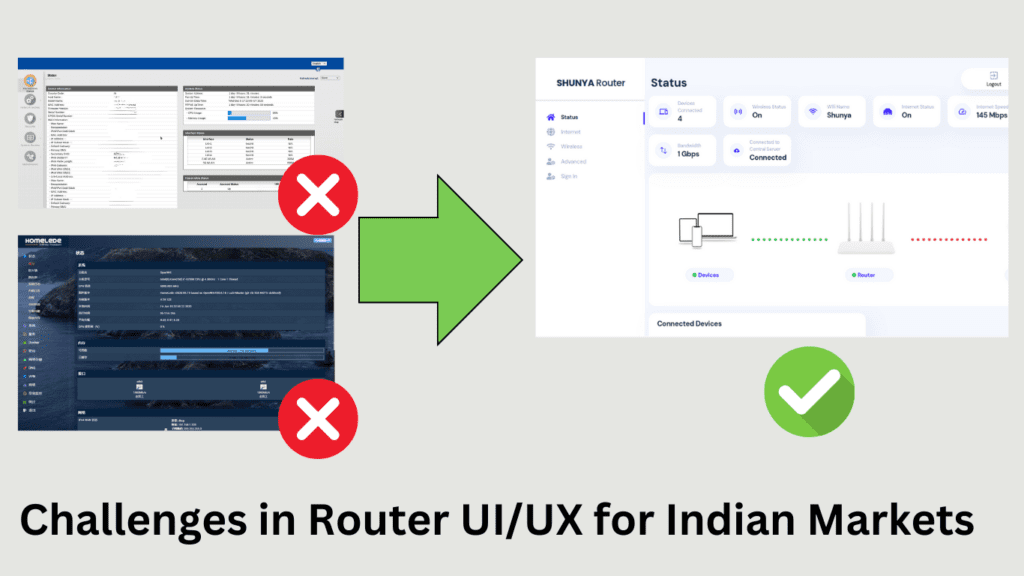
Brainy Pi is a powerful platform for building IoT solutions, and with AWS IoT Core, developers can easily connect Brainy Pi devices to the cloud for data processing and analytics. In this step-by-step guide, we’ll show you how to provision your Brainy Pi device with AWS IoT Core, send and receive data from the cloud, and display that data on an AWS Quicksight dashboard. Let’s get started with AWS IoT with Brainy Pi !

Section 1: Provisioning using Claim Certificates

To get started with AWS IoT Core on your Brainy Pi device, you’ll need to provision it with a claim certificate. This process ensures that the device can securely connect to AWS IoT Core and start sending and receiving data. Here’s how to do it:
  1. Generate a claim certificate for all your Brainy Pi devices using the AWS IoT console.
  2. Then create a Provisioning Template using AWS IoT console.
  3. Run the AWS provisioner script to provision the device.

Generate a claim certificate for all your Brainy Pi devices using the AWS IoT console

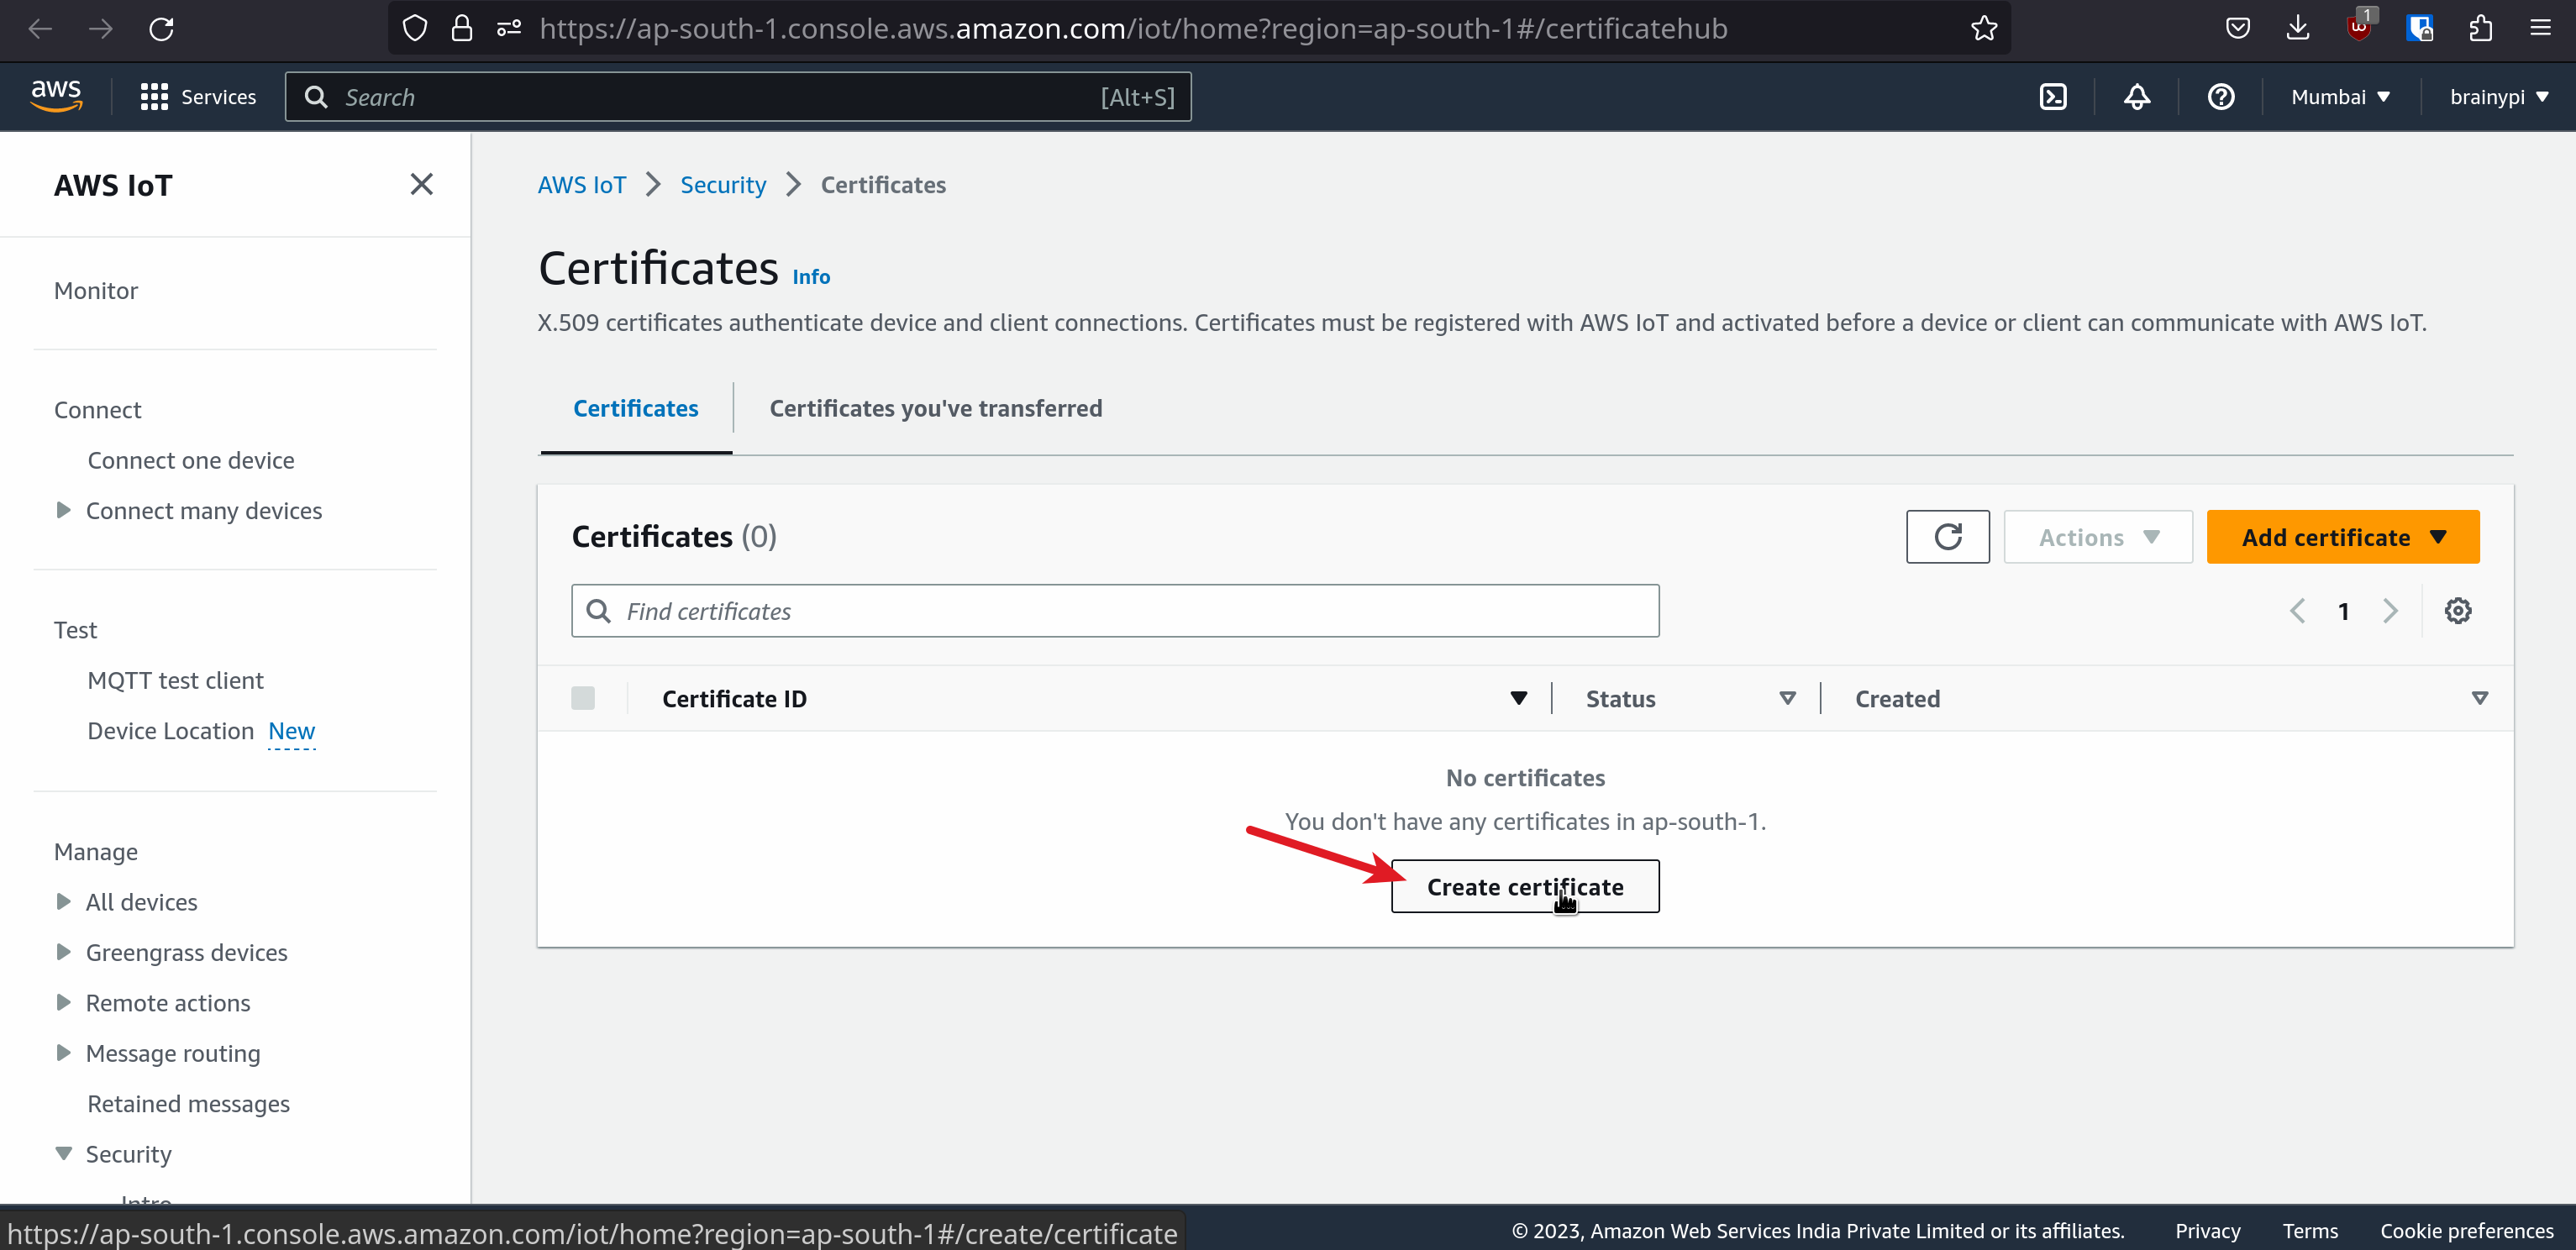
  1. Go to AWS IoT –> Security –> Certificates
  2. Then click on Create a certificate

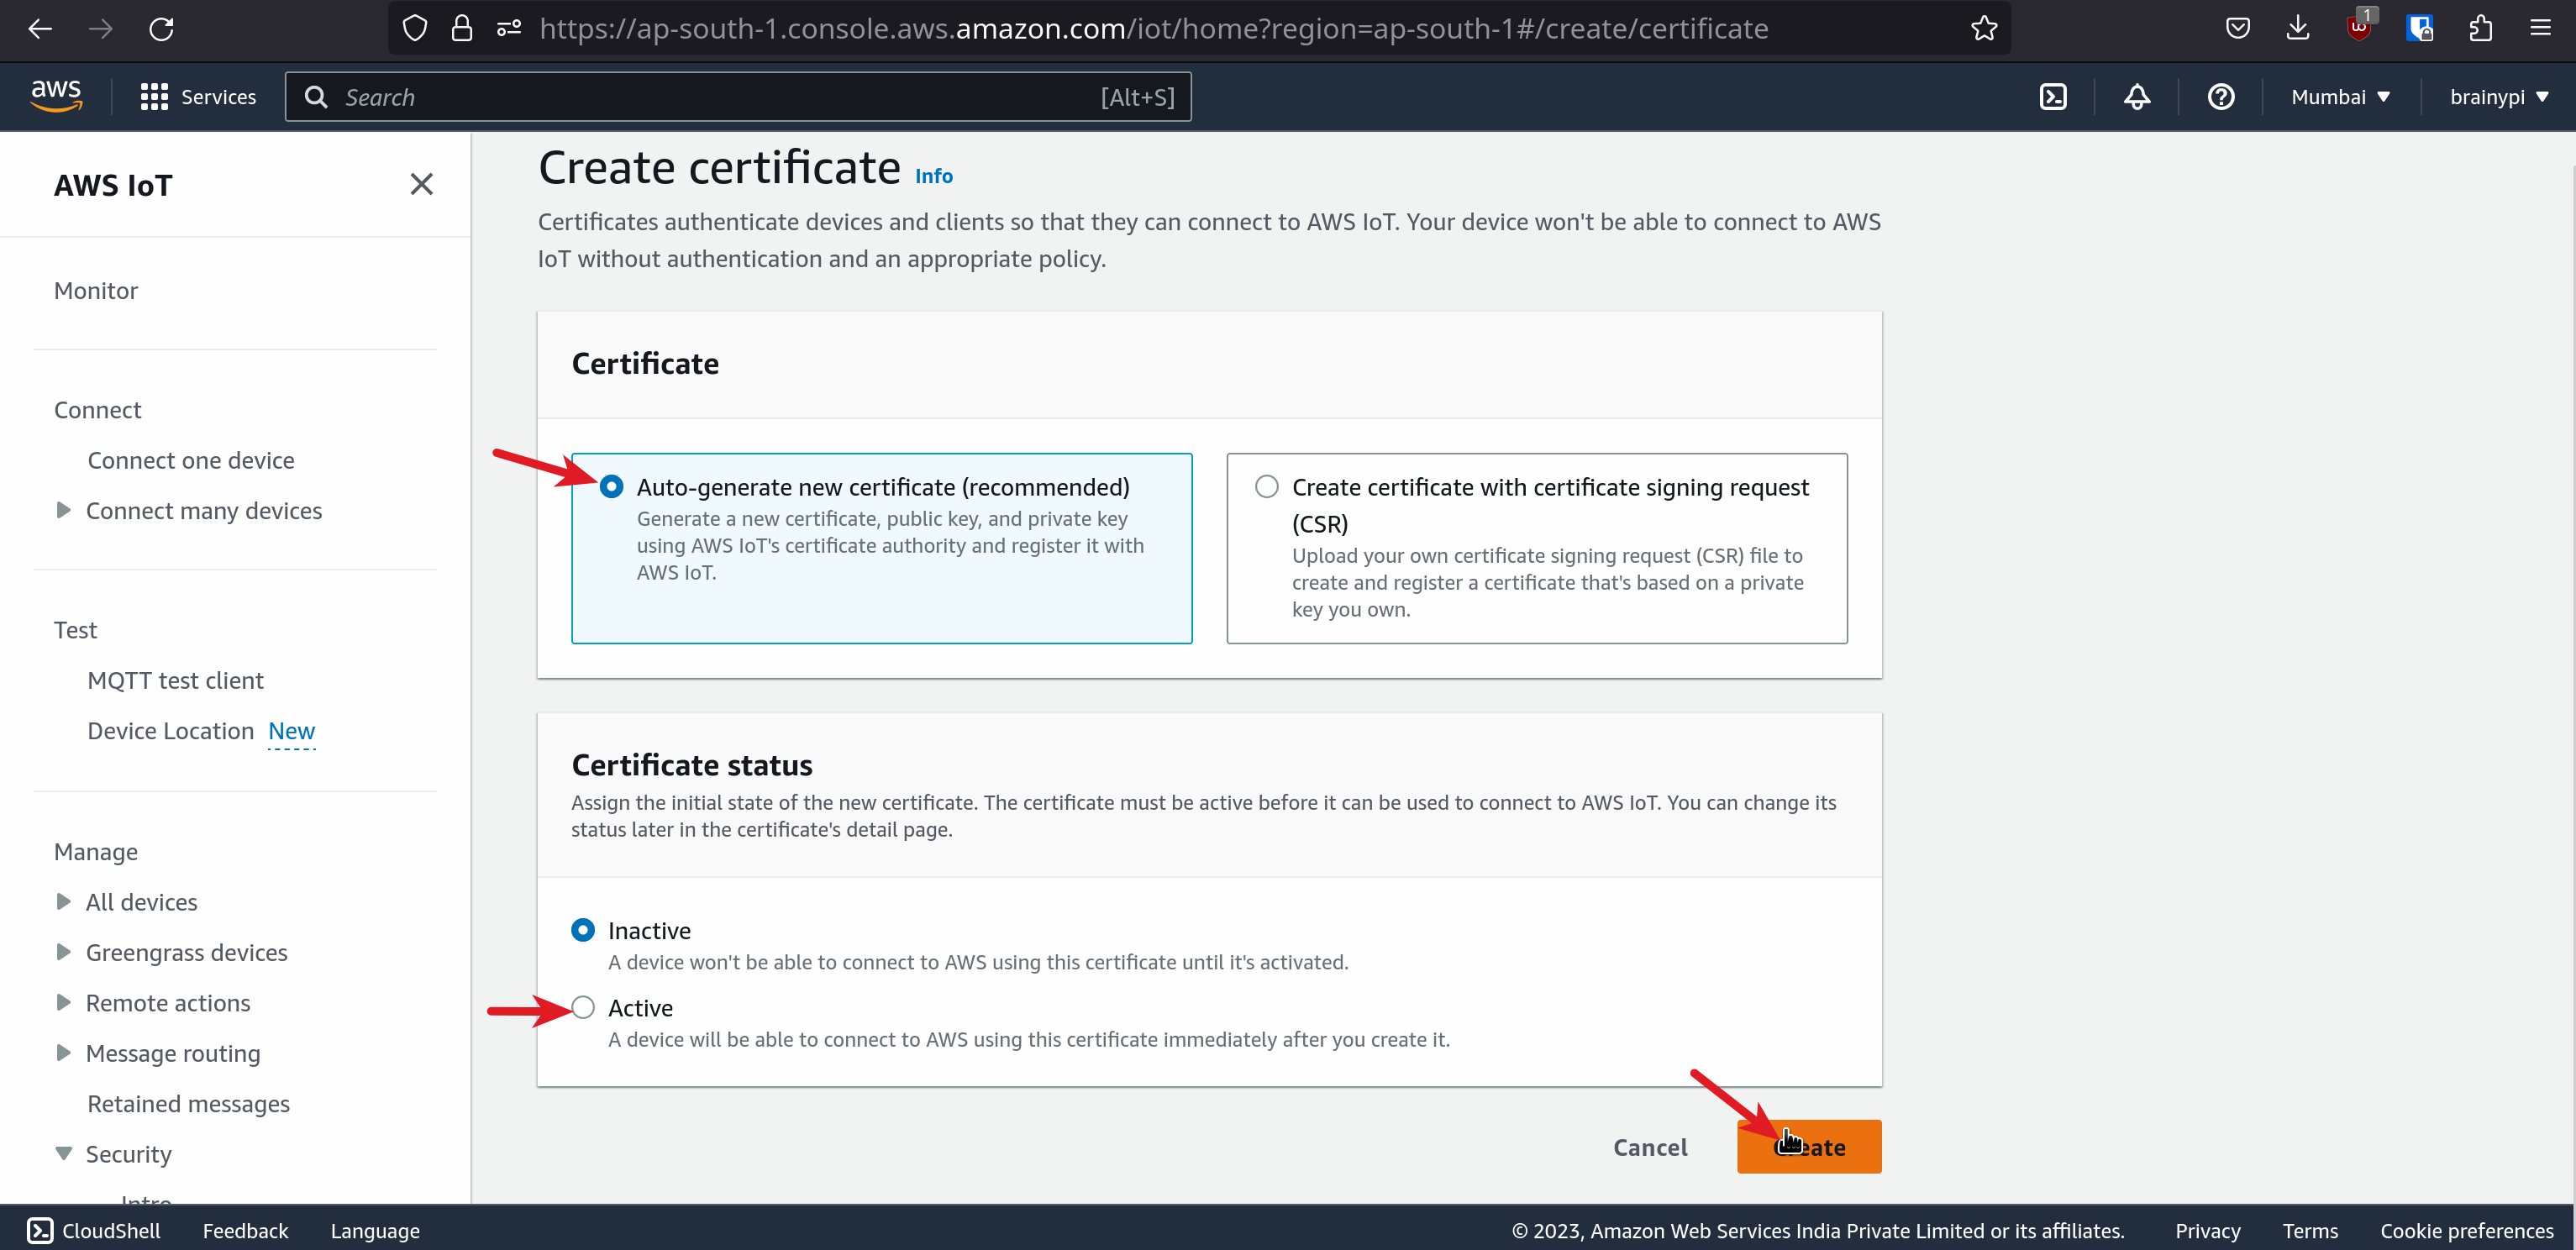
  3. Now, choose to auto generate a certificate, Set the certificate status as “Active”

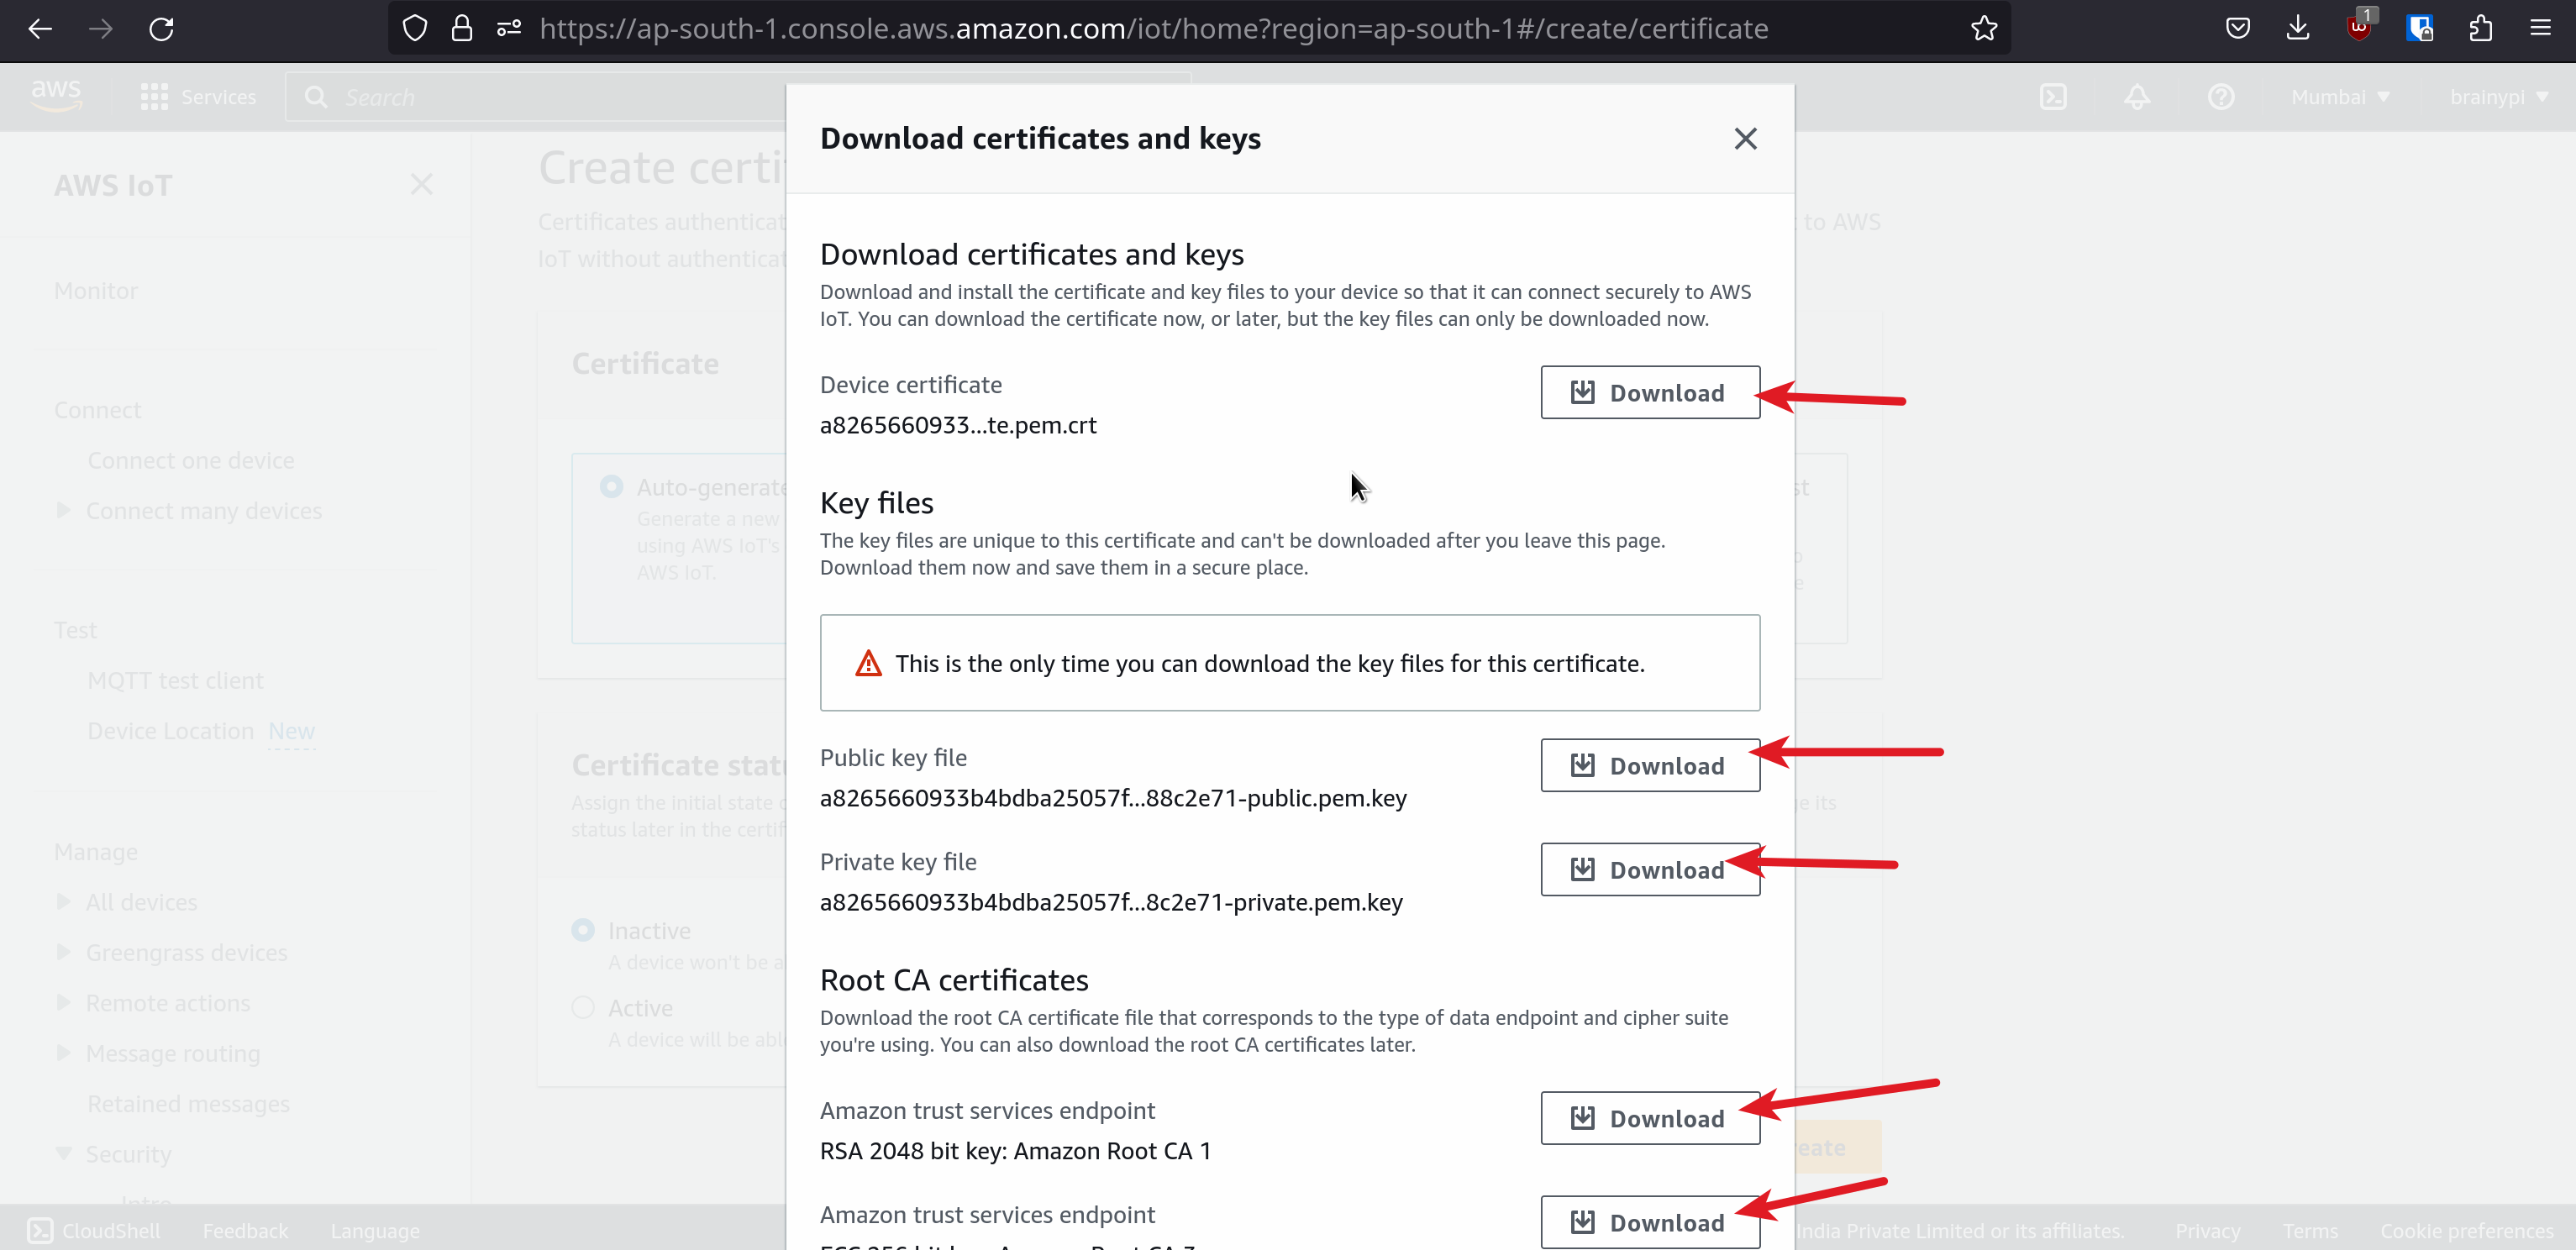
  4. Download the certificates

  5. Hence the certificate that you generated will be your claim certificate.

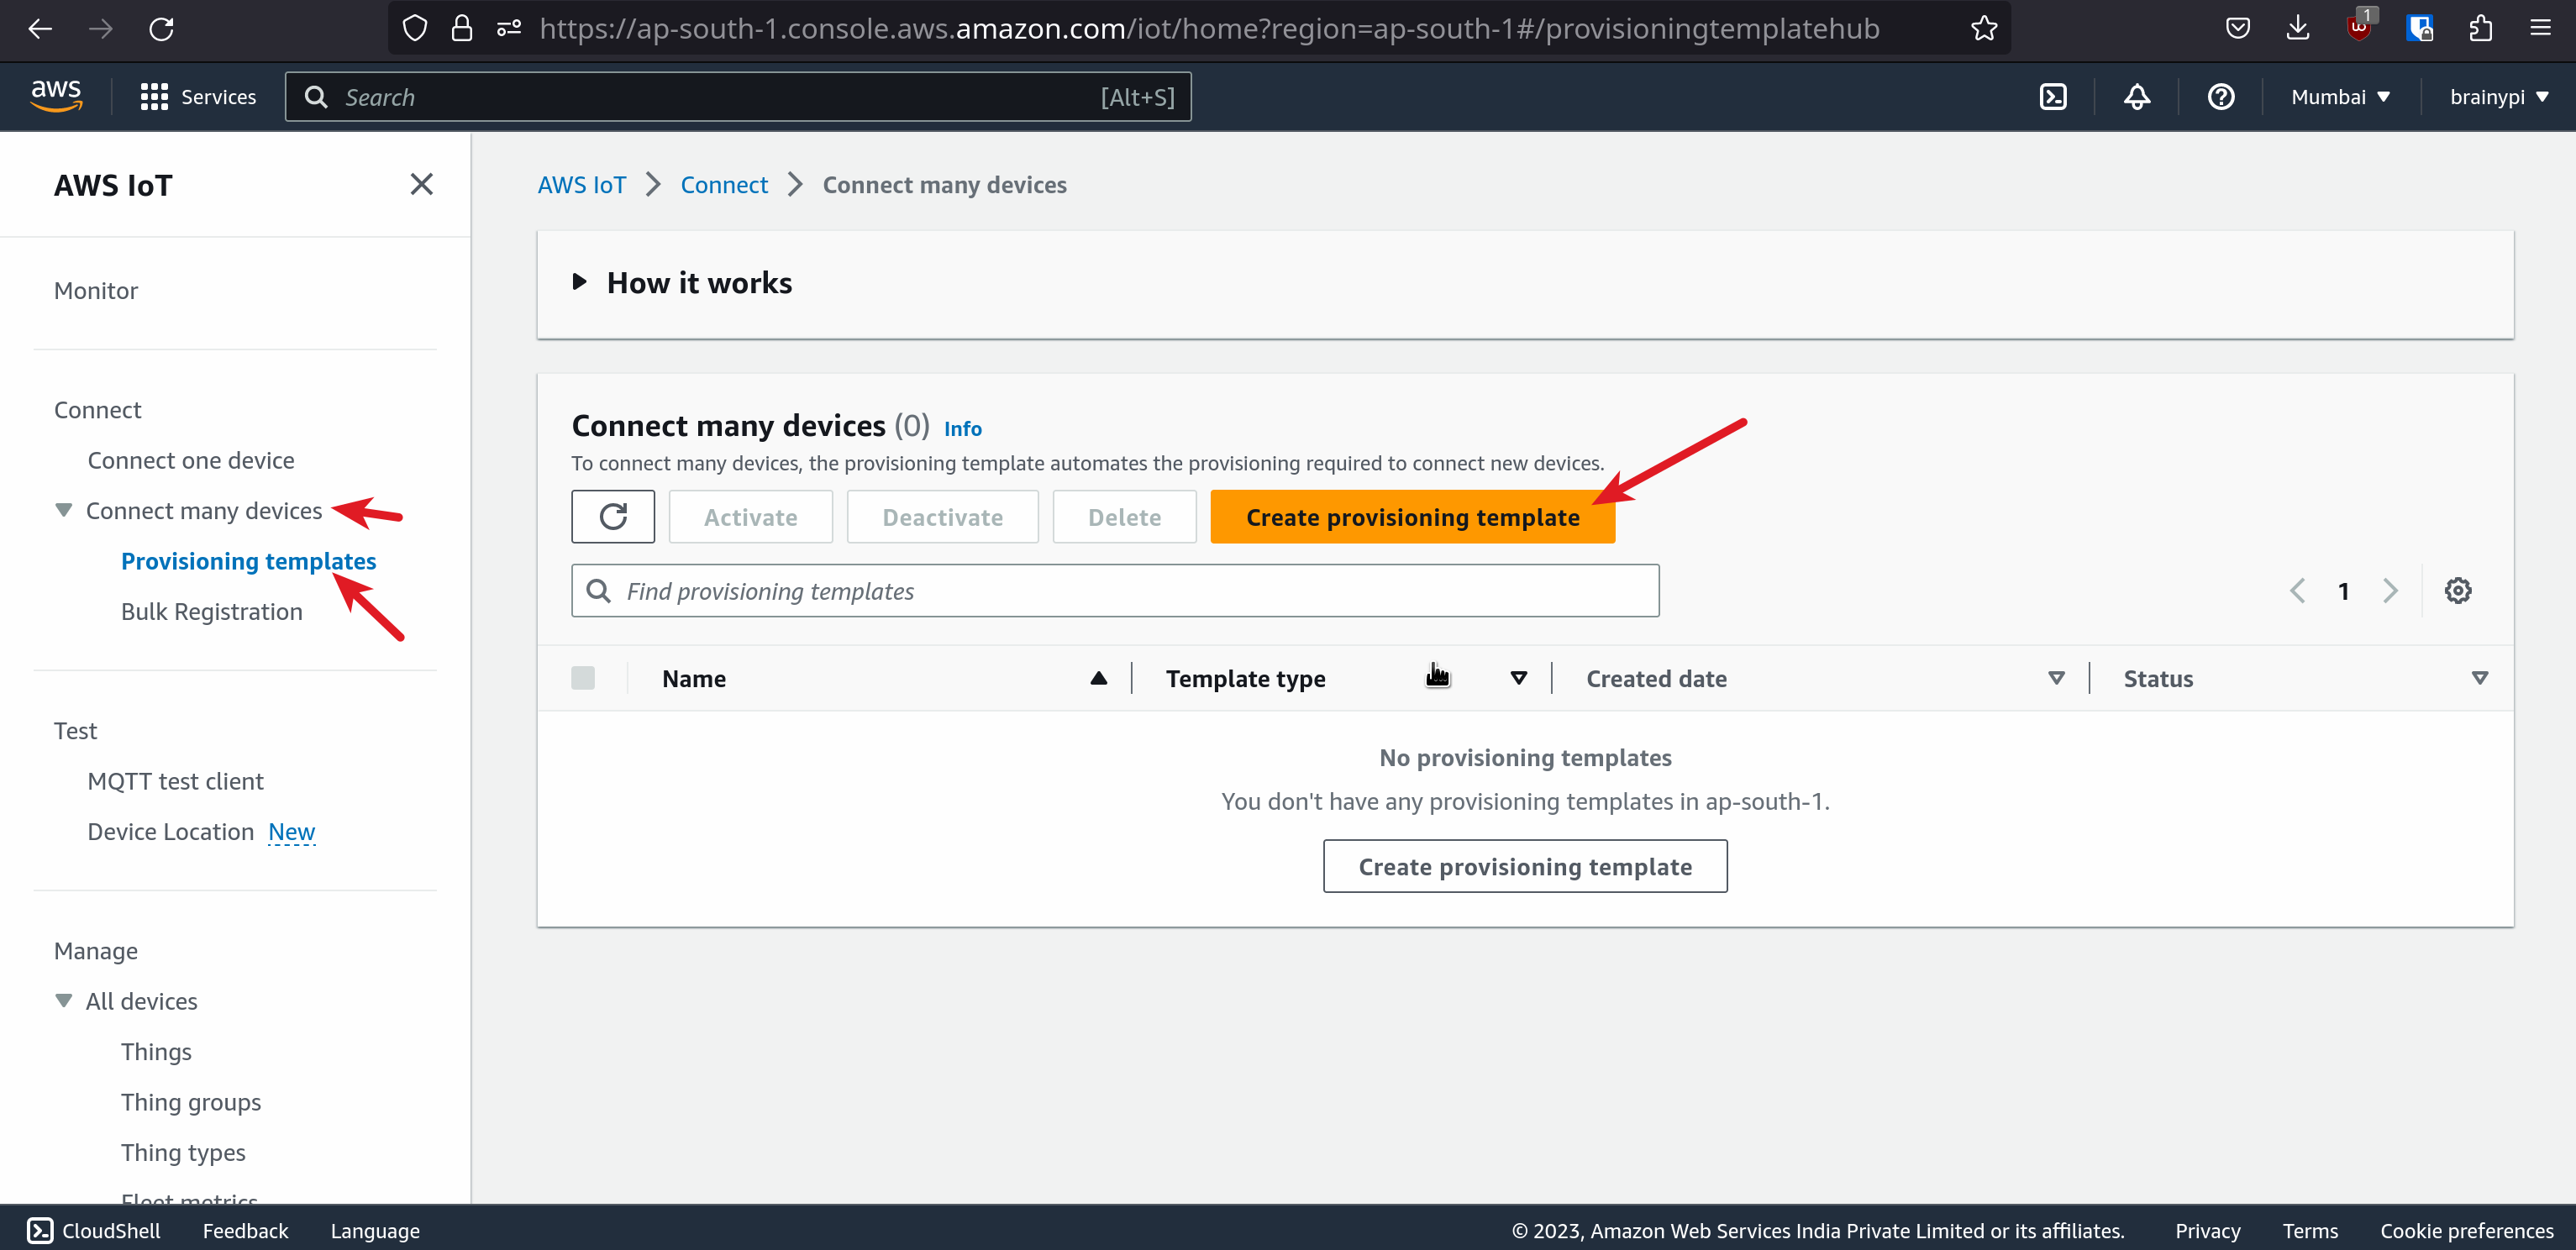
Create a Provisioning Template using AWS IoT console.

  1. Go to AWS IoT Core –> Connect Many devices –> Provisioning Templates

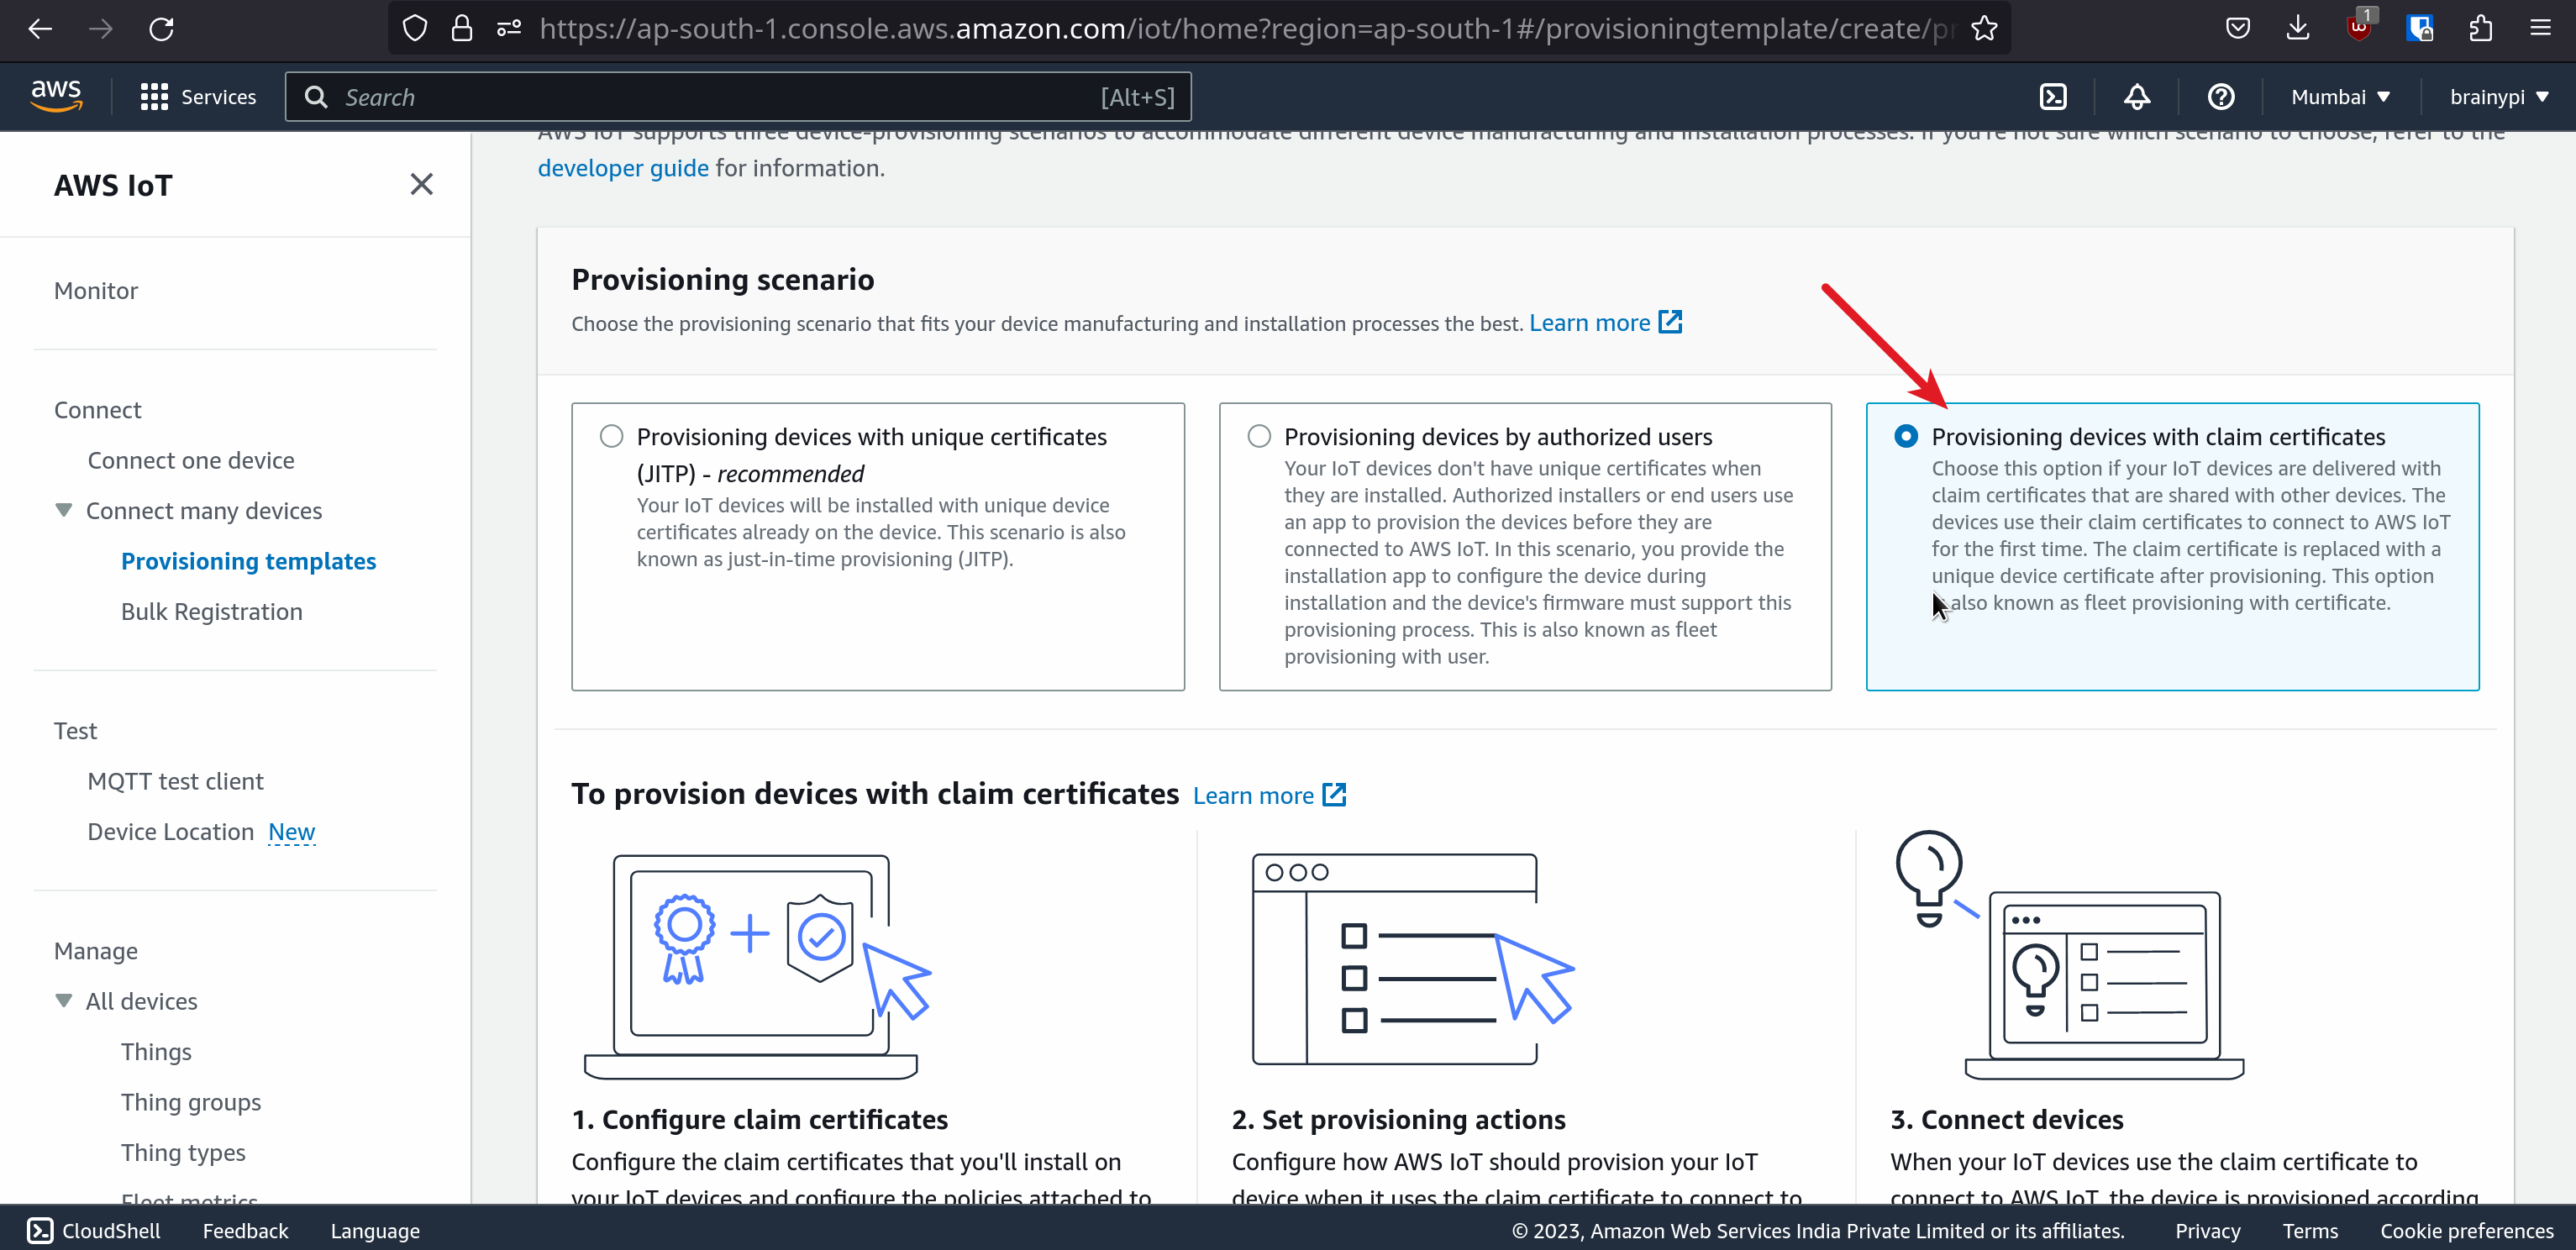
  2. Then choose Provisioning devices using claim certificates

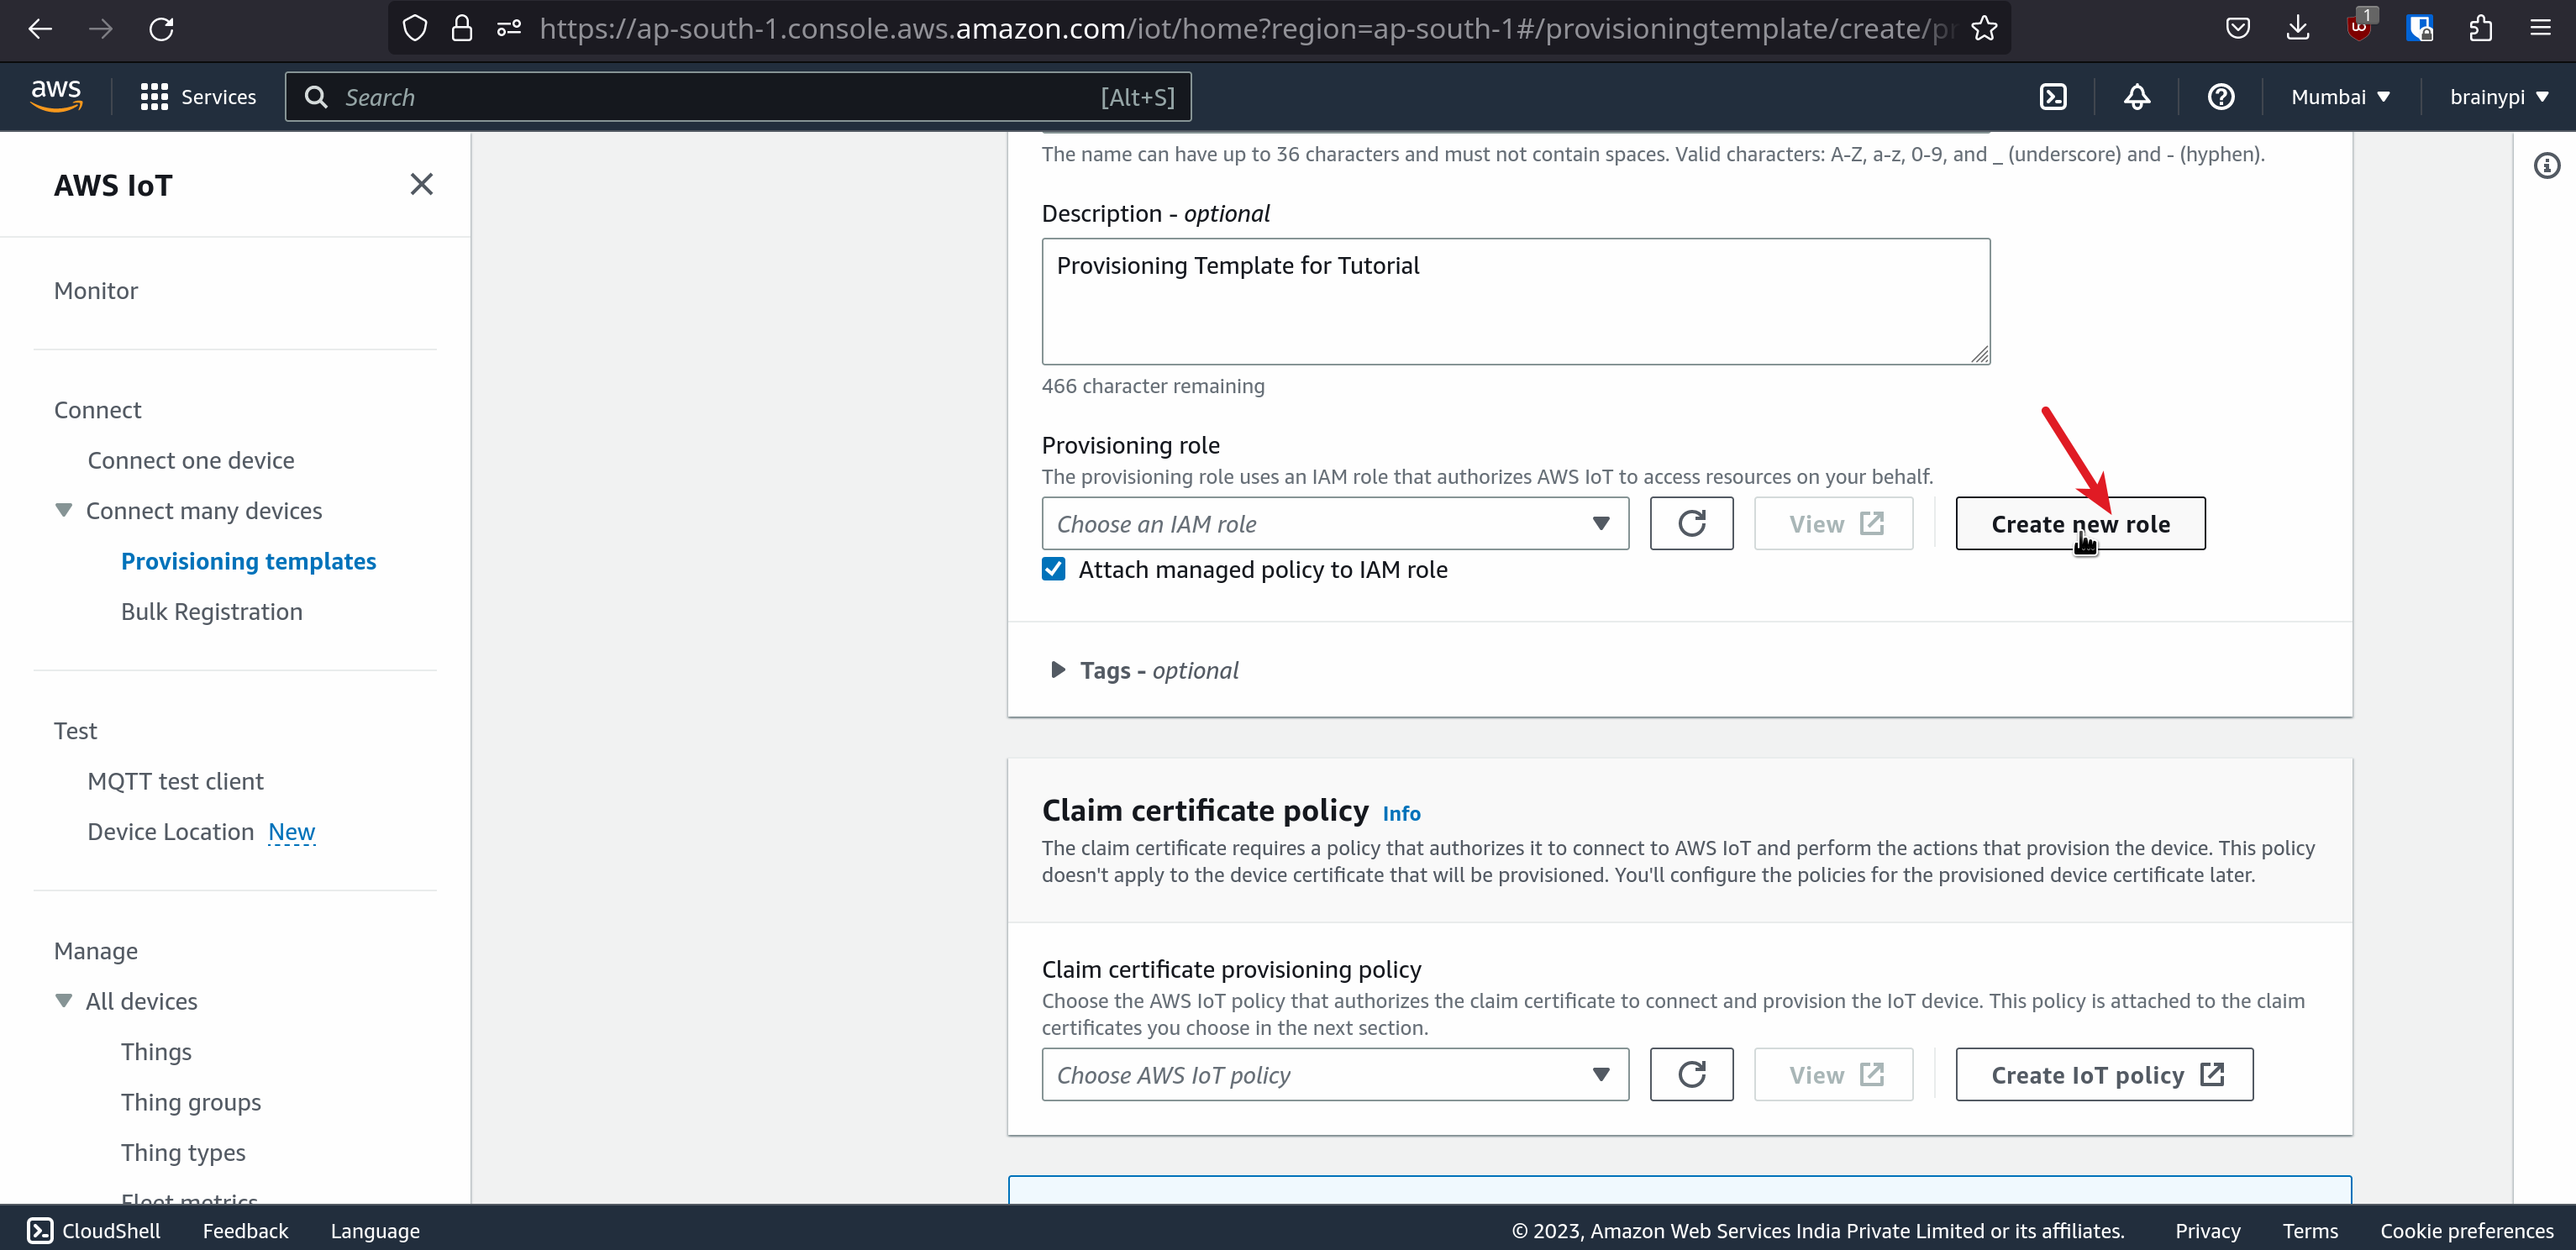
  3. Fill in the name & description of the template.
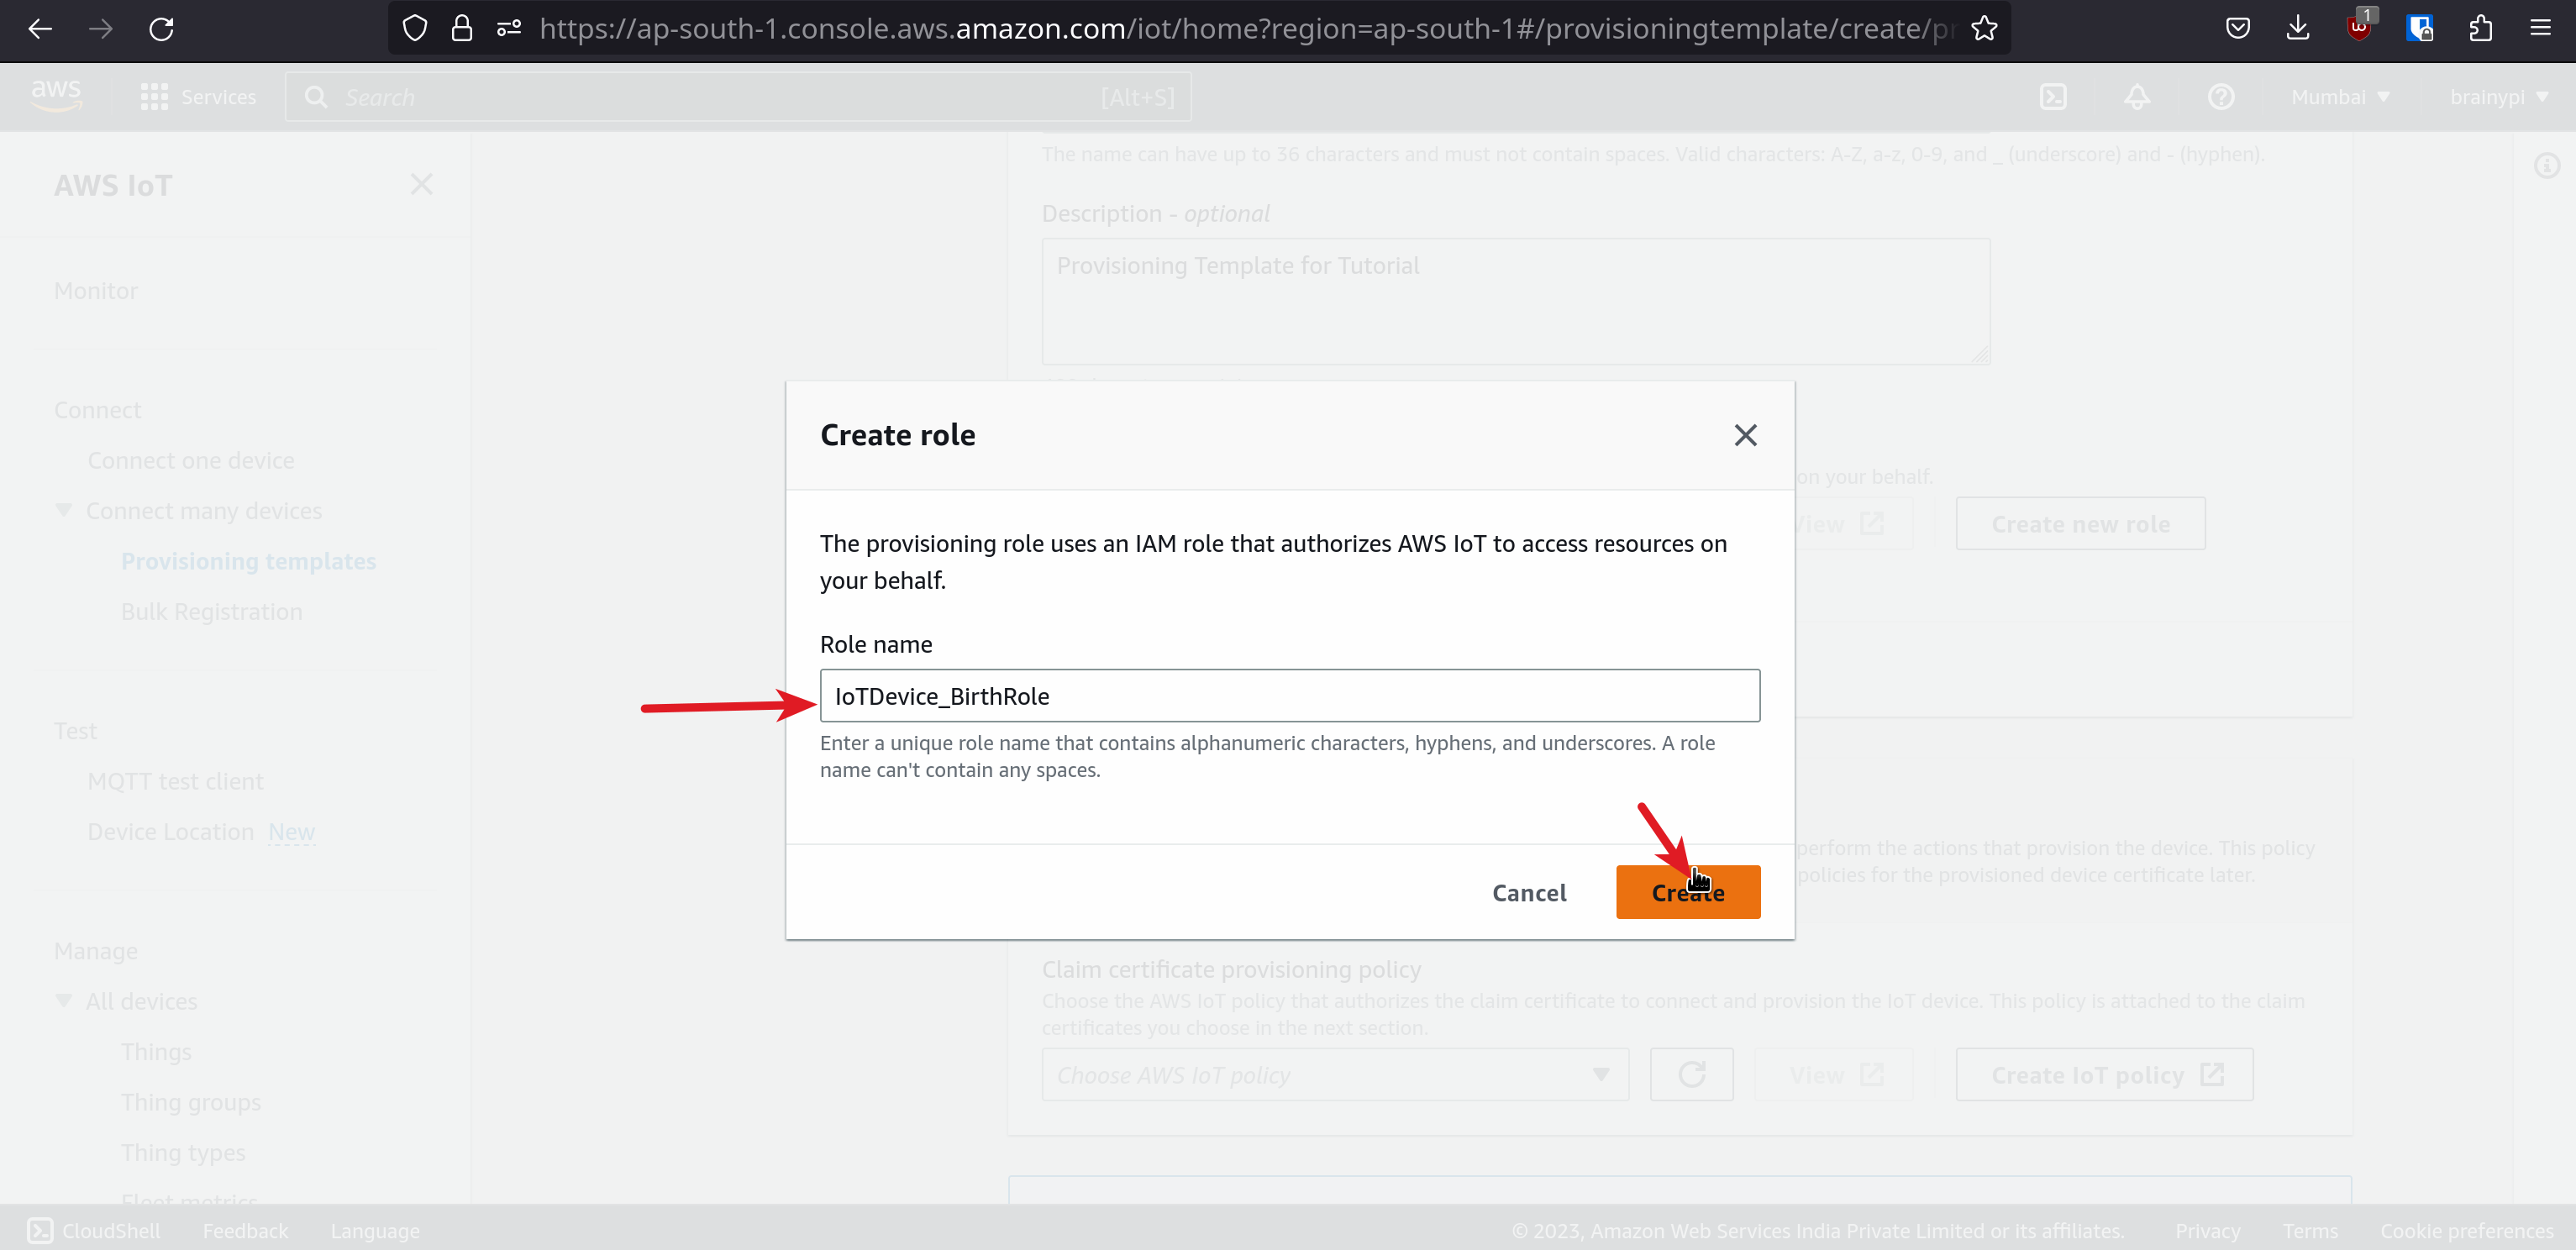
  4. Then, create a new role provisioning devices

  5. Assign the newly created role as a provisioning role in the template
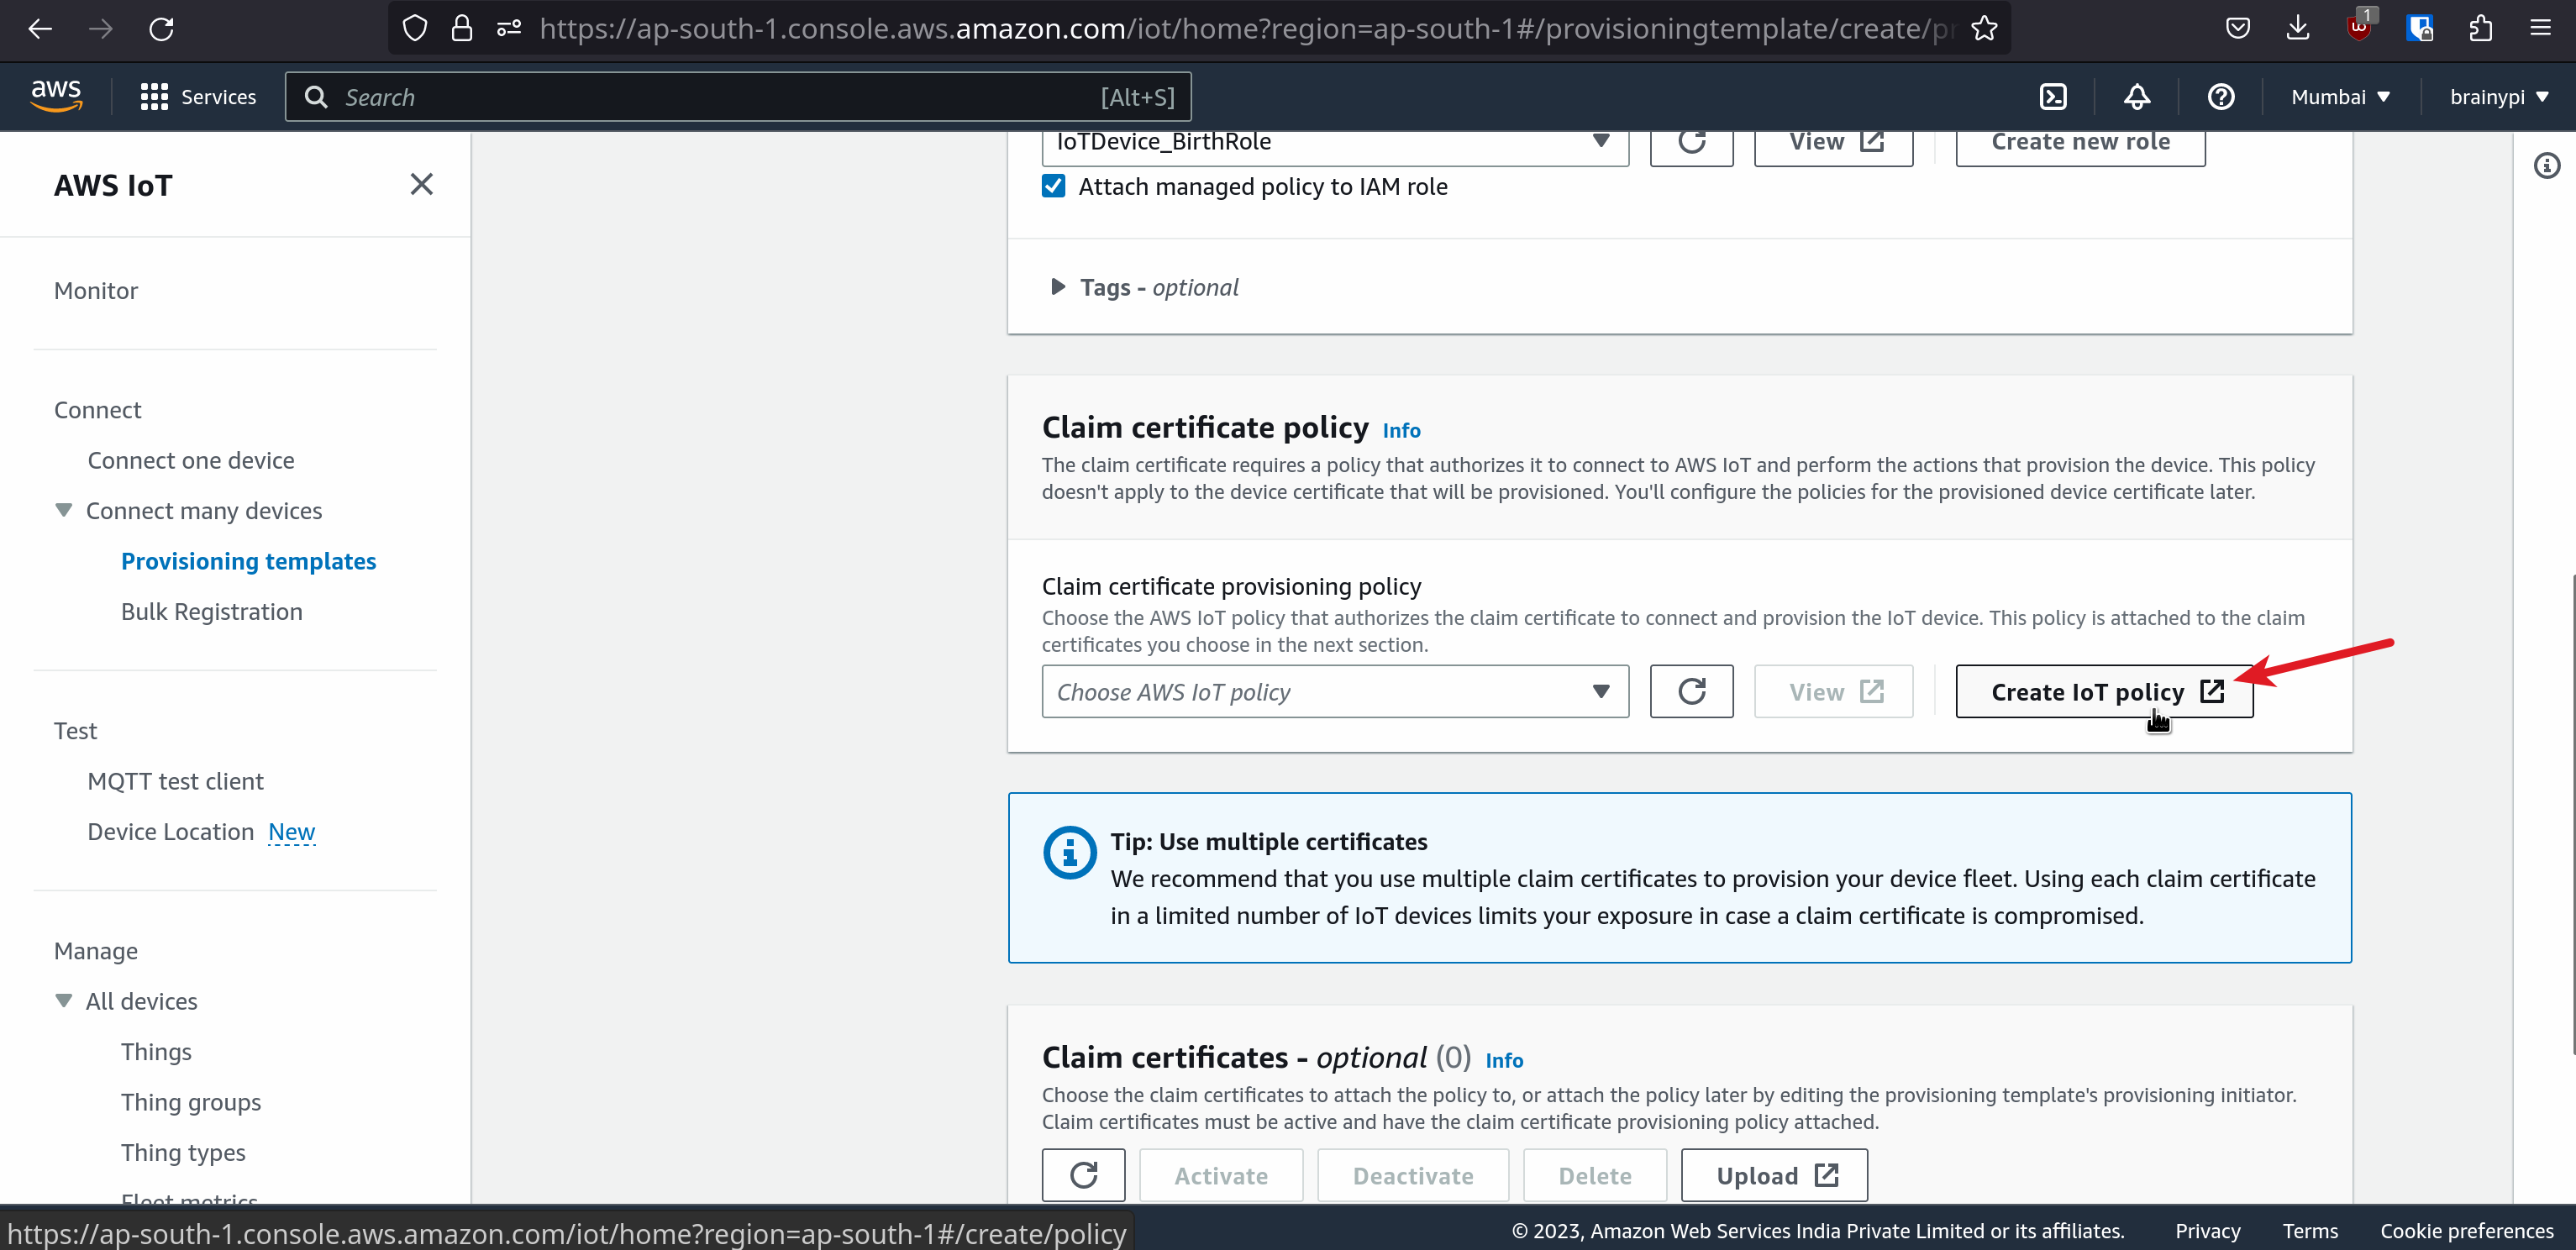
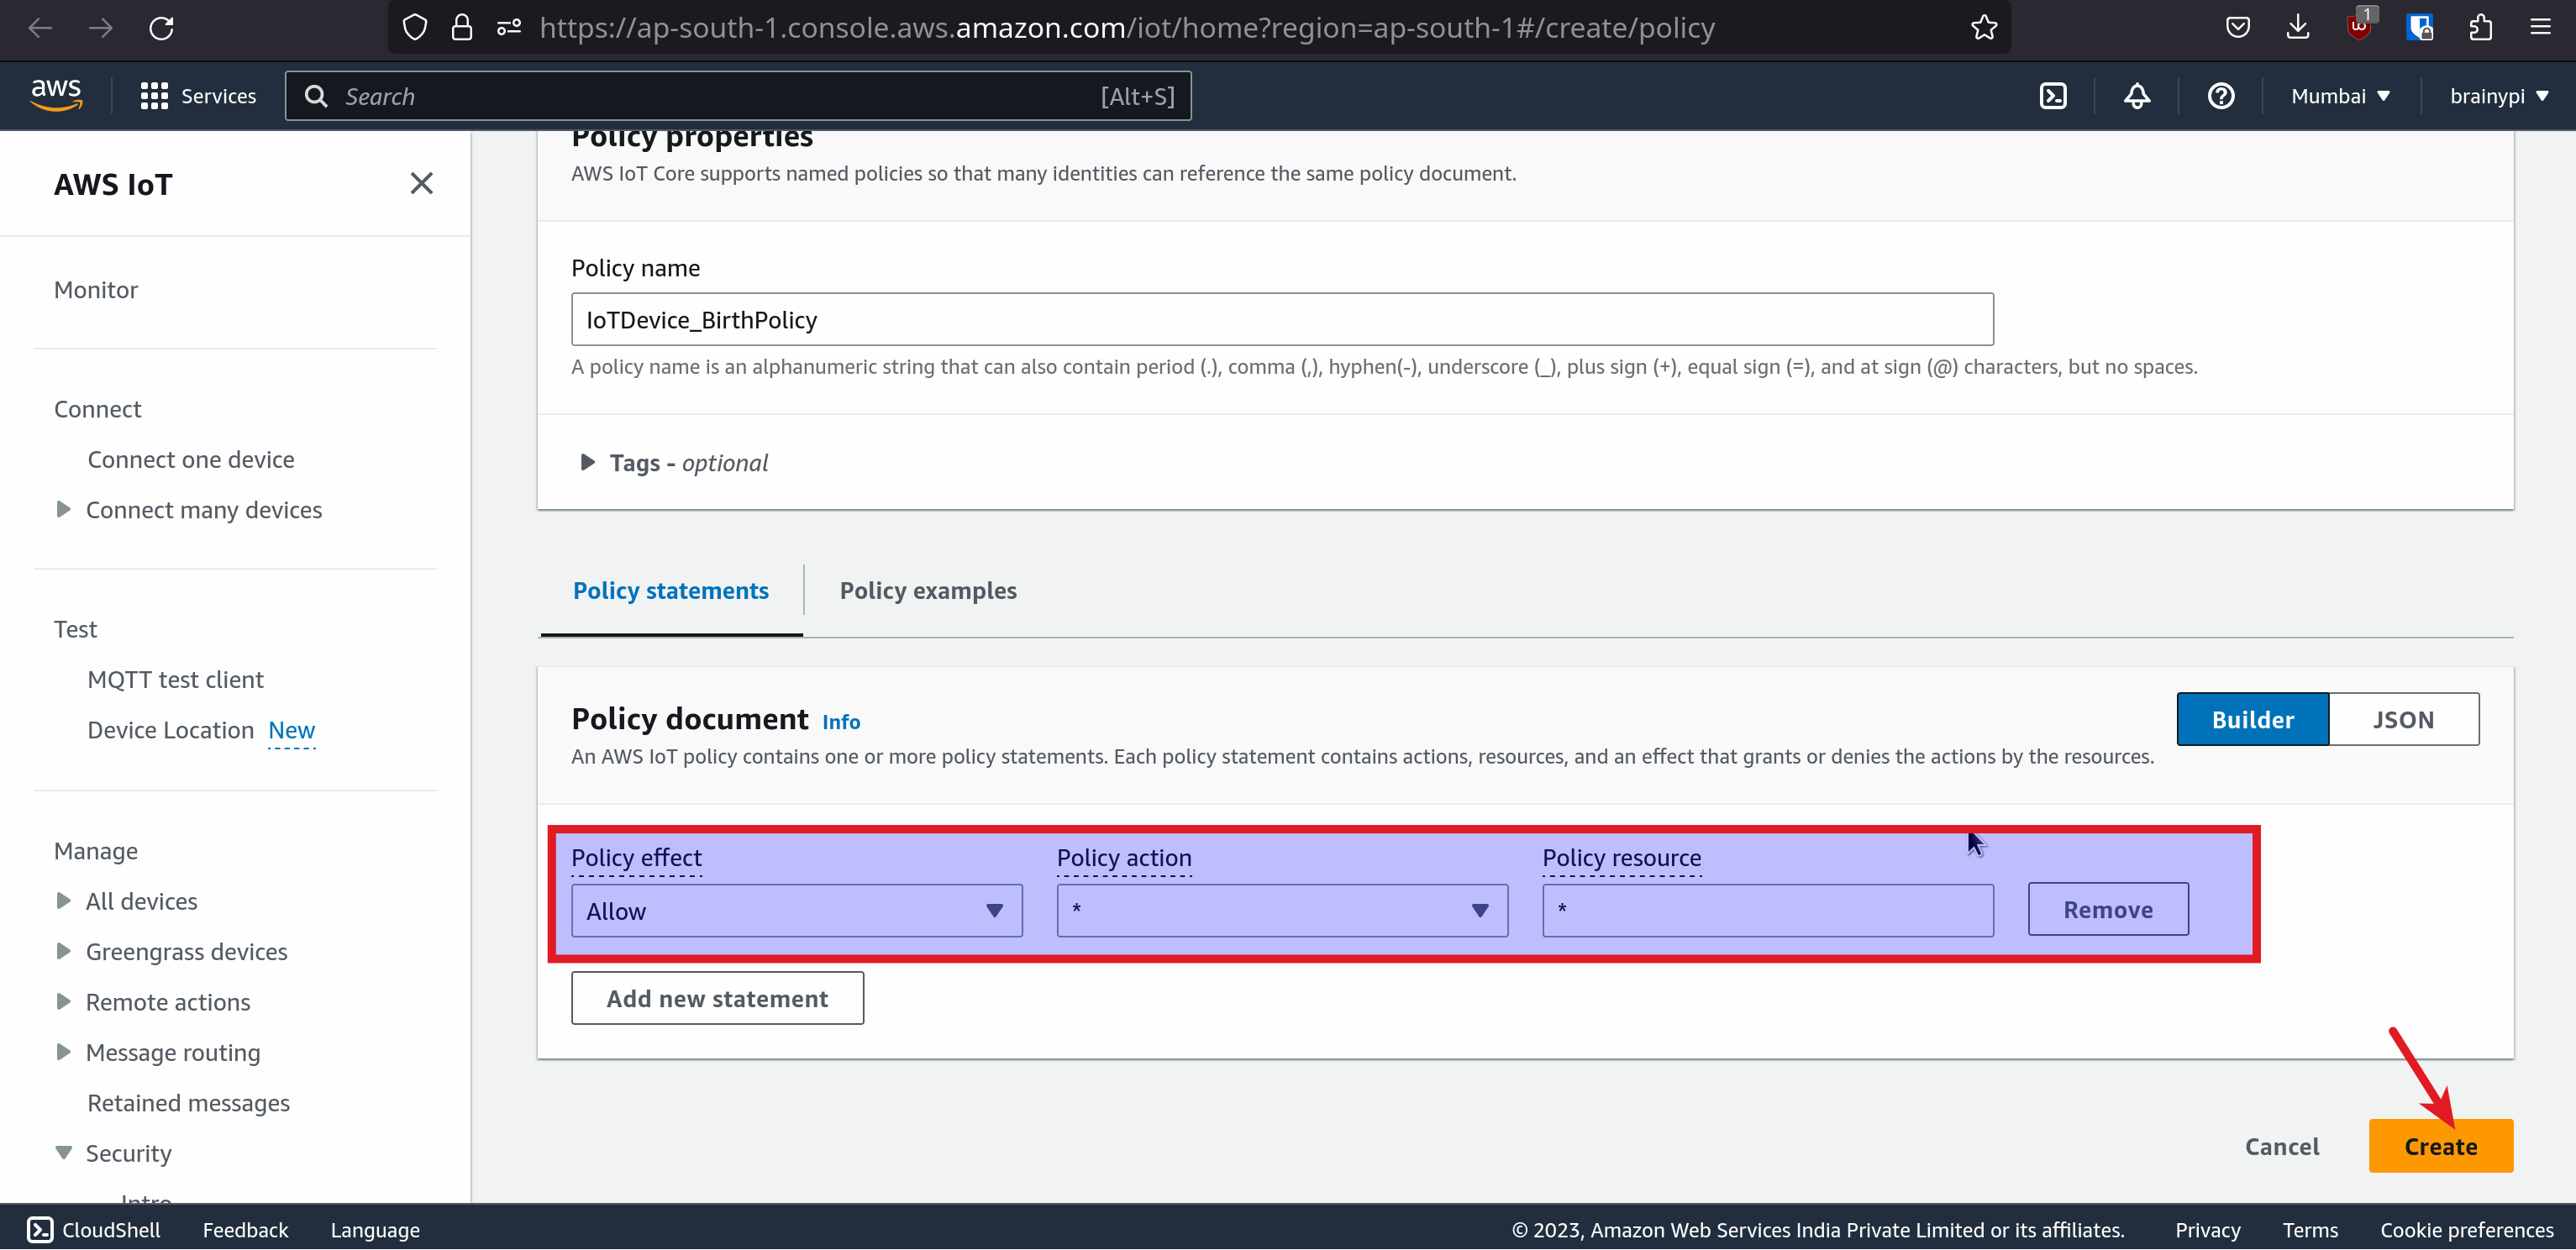
  6. Create a new policy for Claim certificates

  7. For tutorial purposes, we have created an all permissive policy, but in production it is suggested to create a more limiting policy

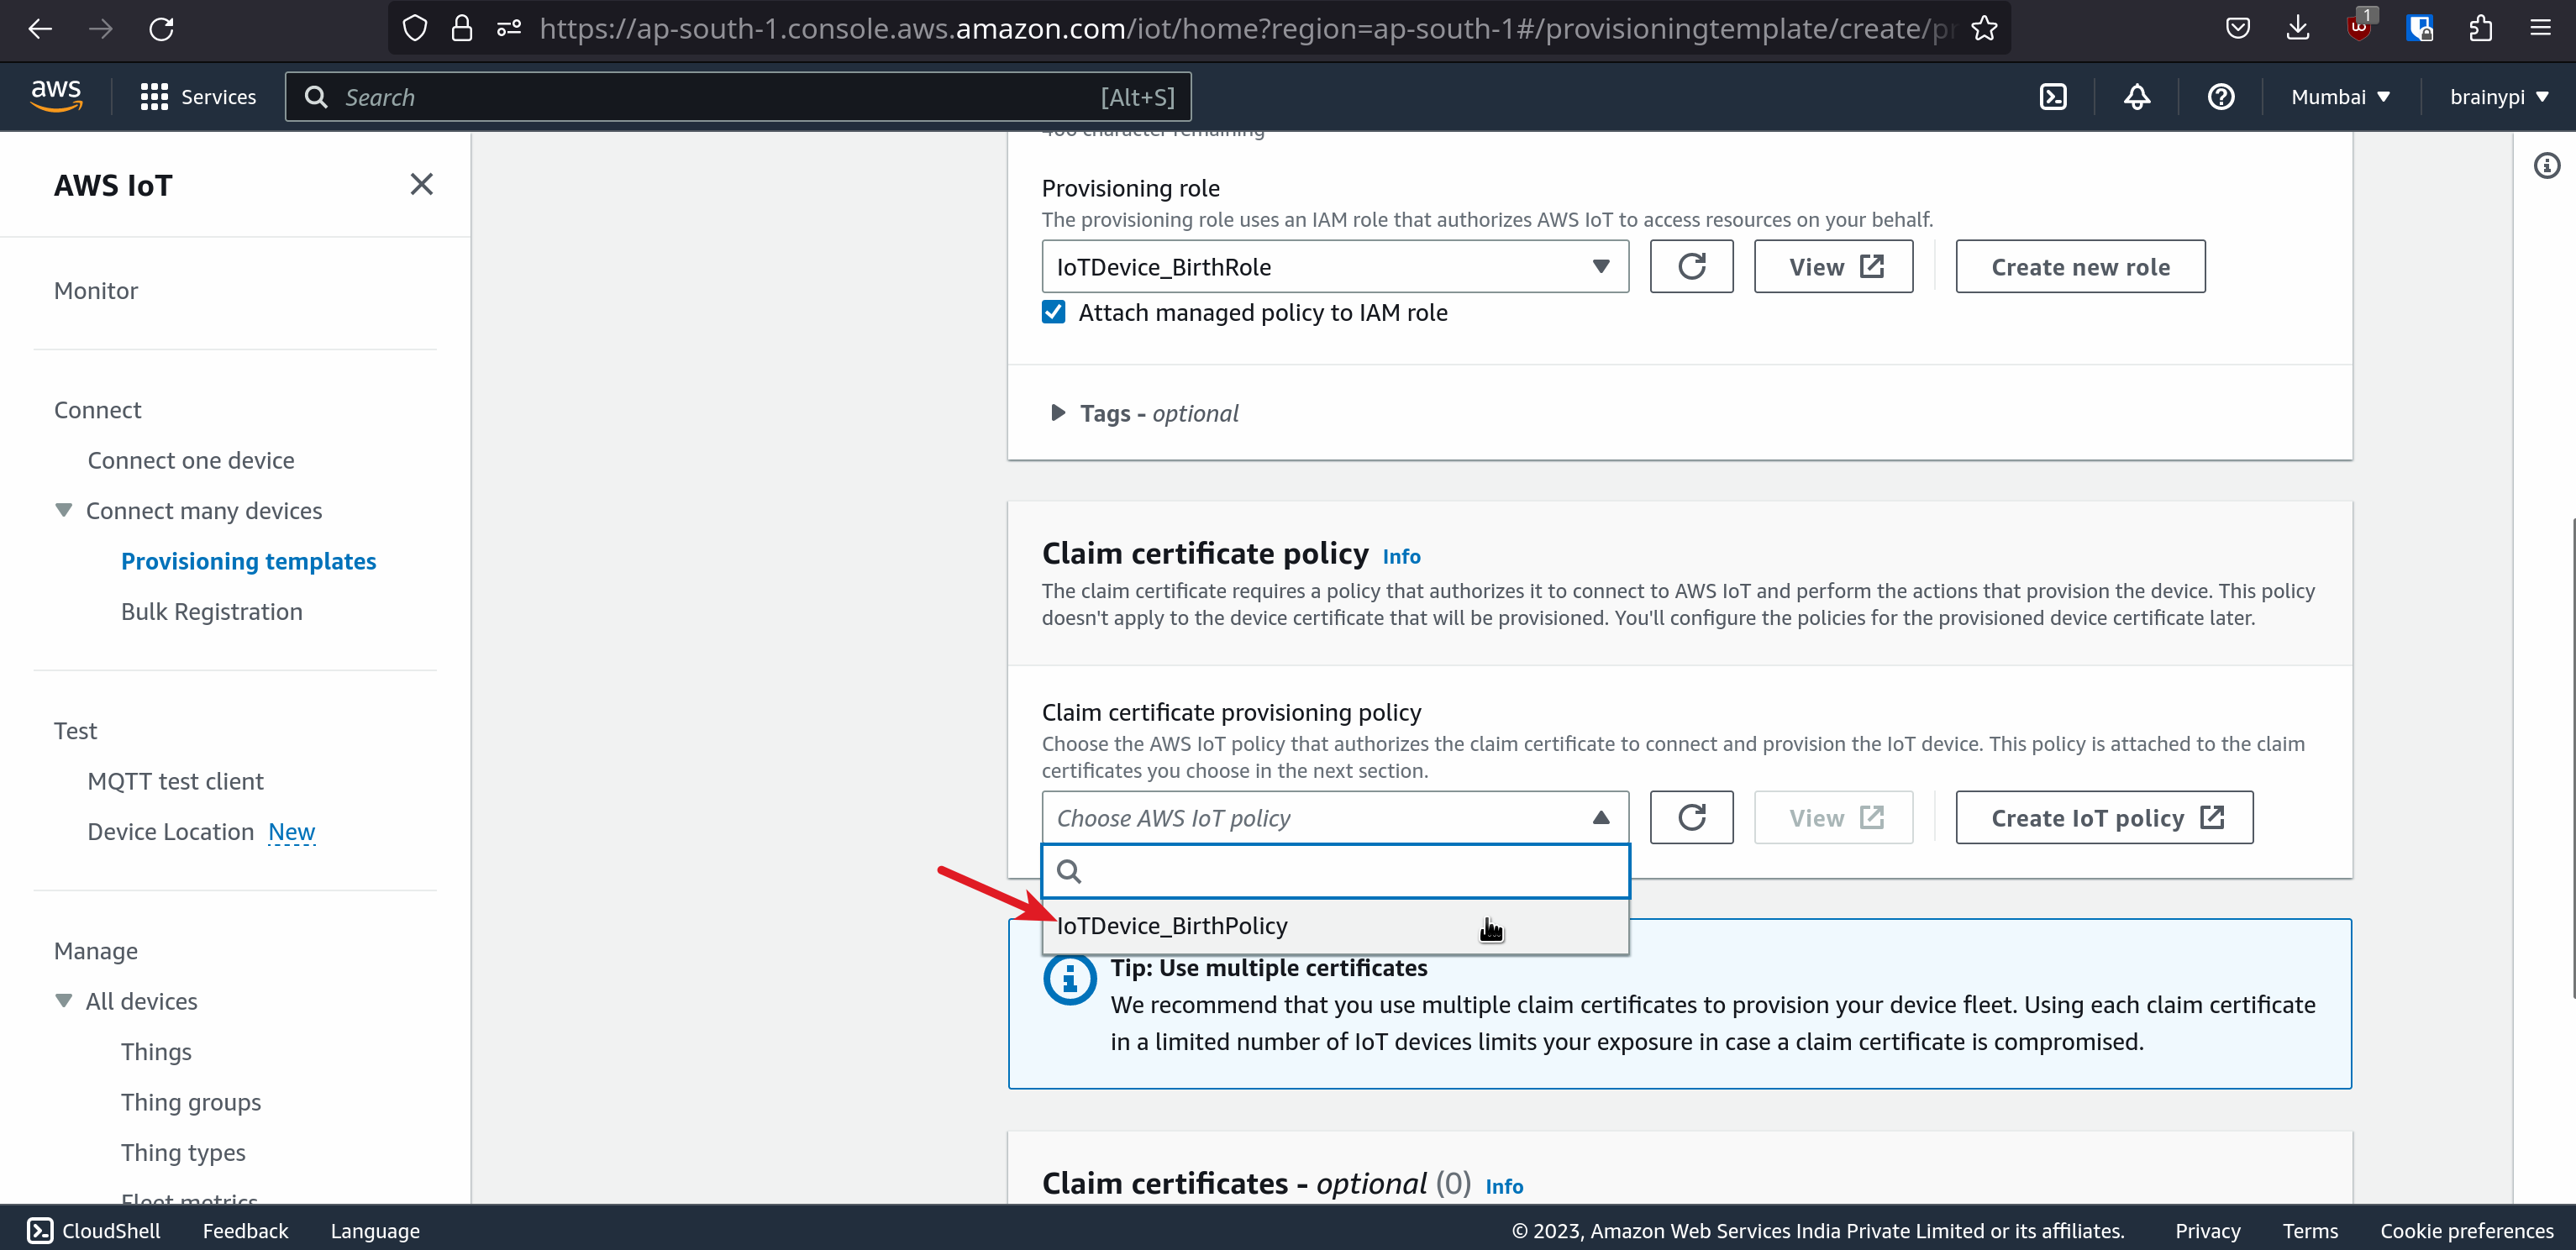
  8. Assign the newly created policy to the template

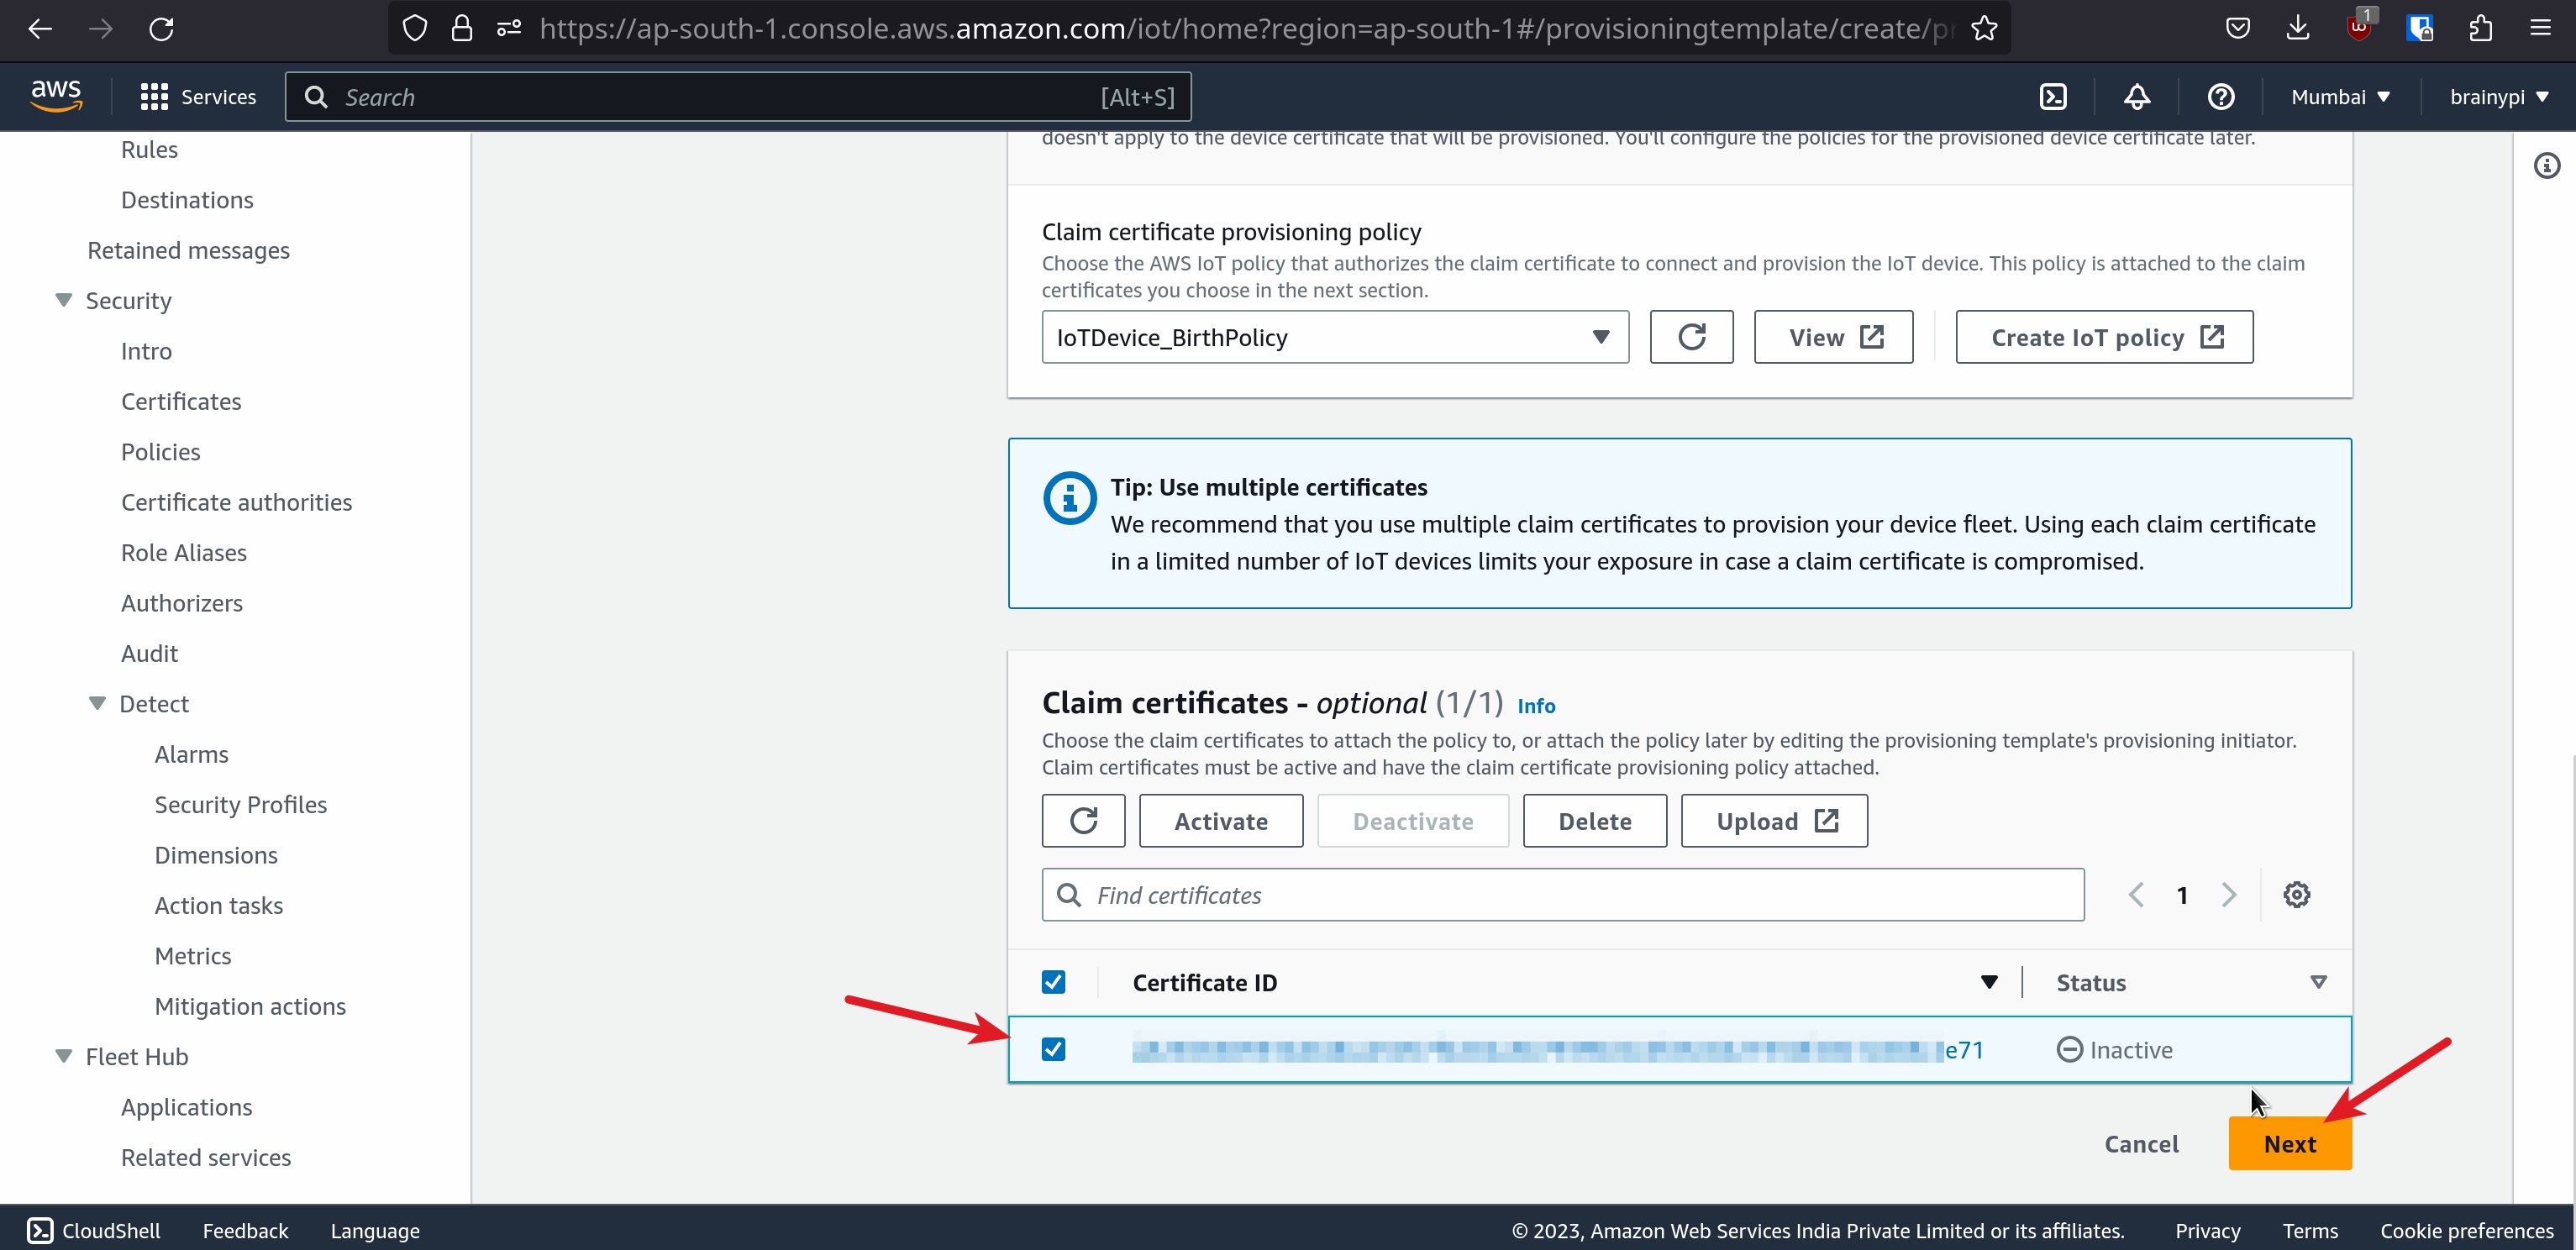
  9. Assign a Claim certificate to the template, this certificate will be used to connect to the AWS IoT.

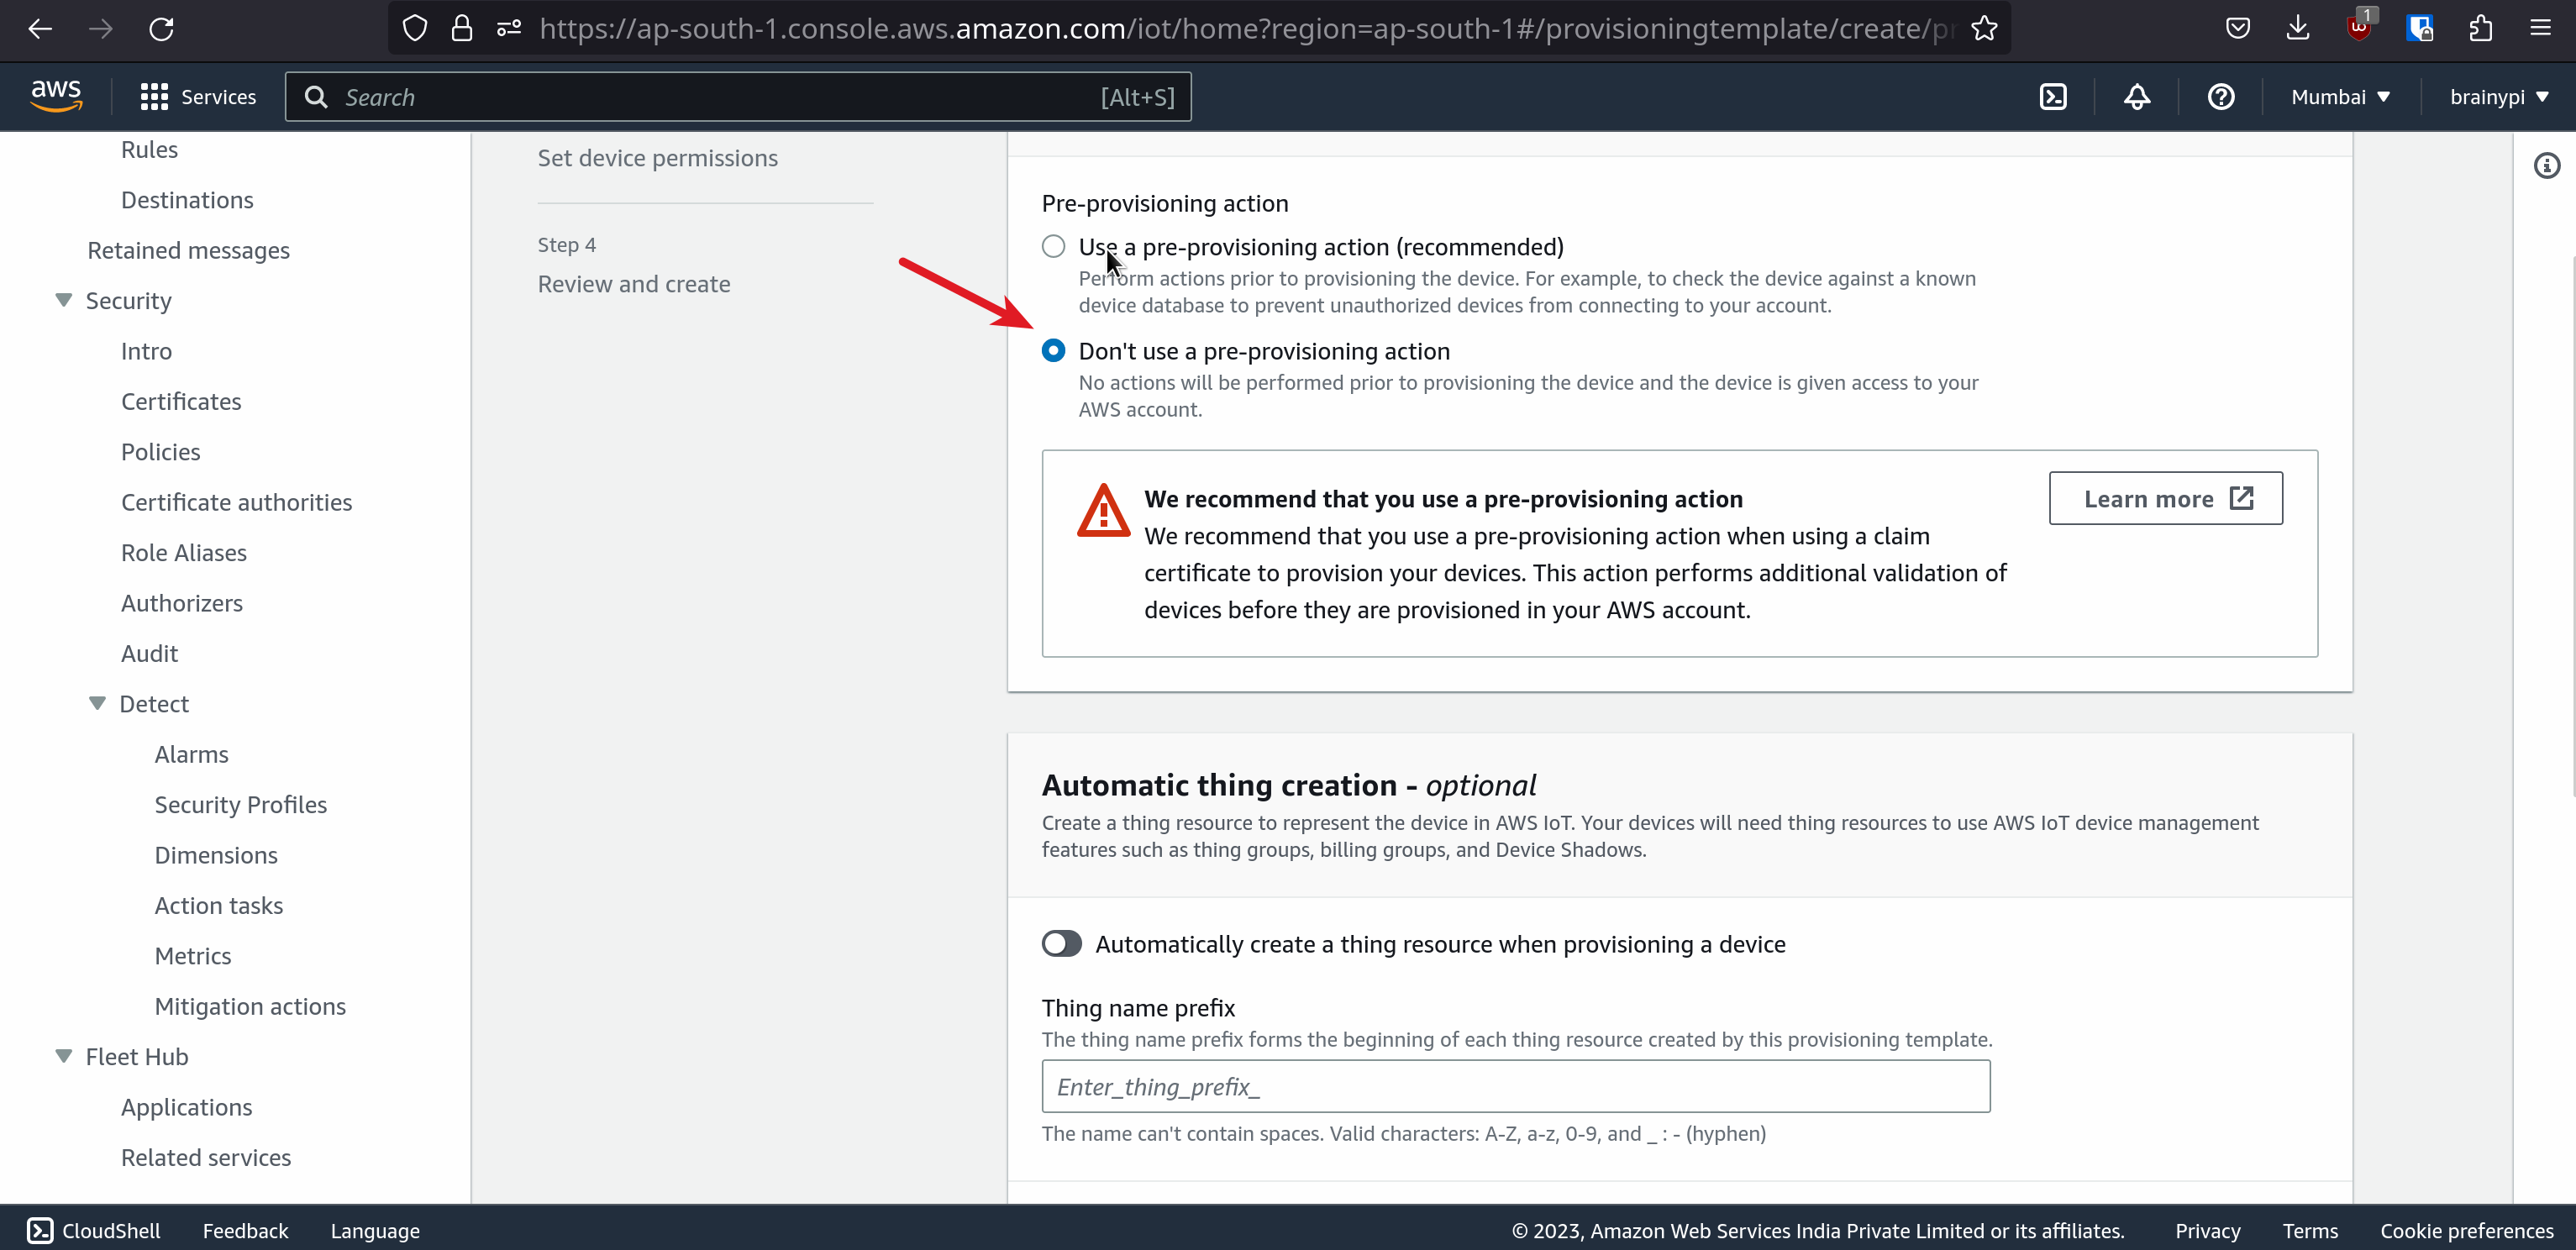
  10. Setup a pre-provisioning action, for tutorial purposes we have not chosen a pre-provisioning action, but we recommend a pre-provisioning action.

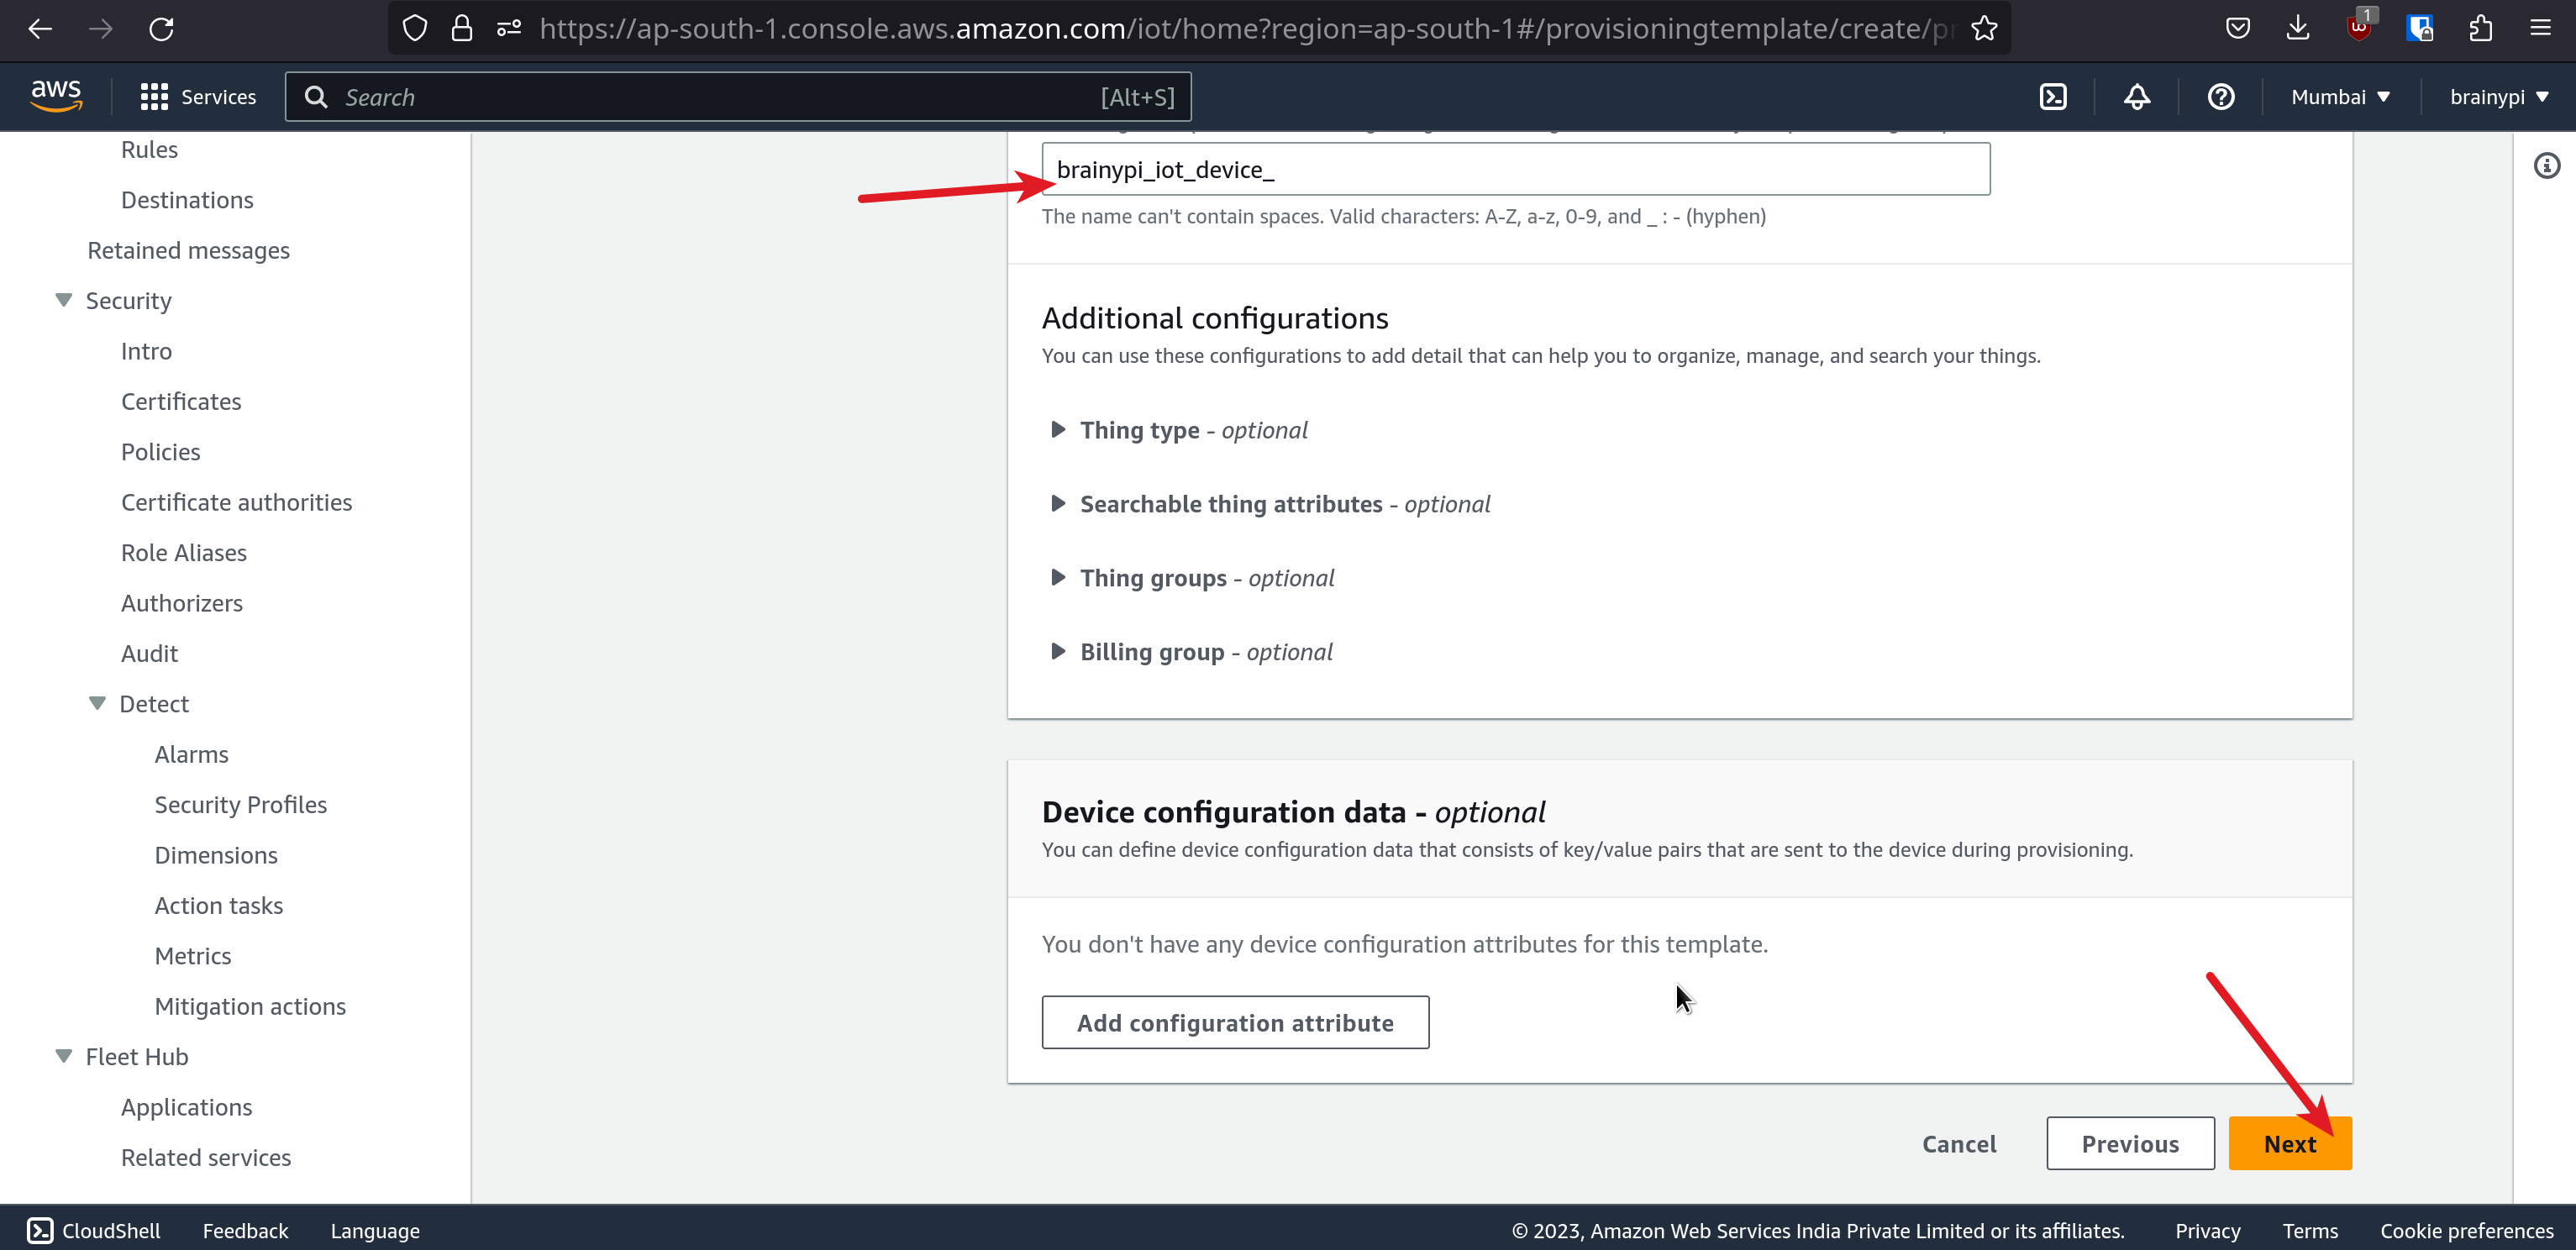
  11. Set prefix for your device names, the click Next.

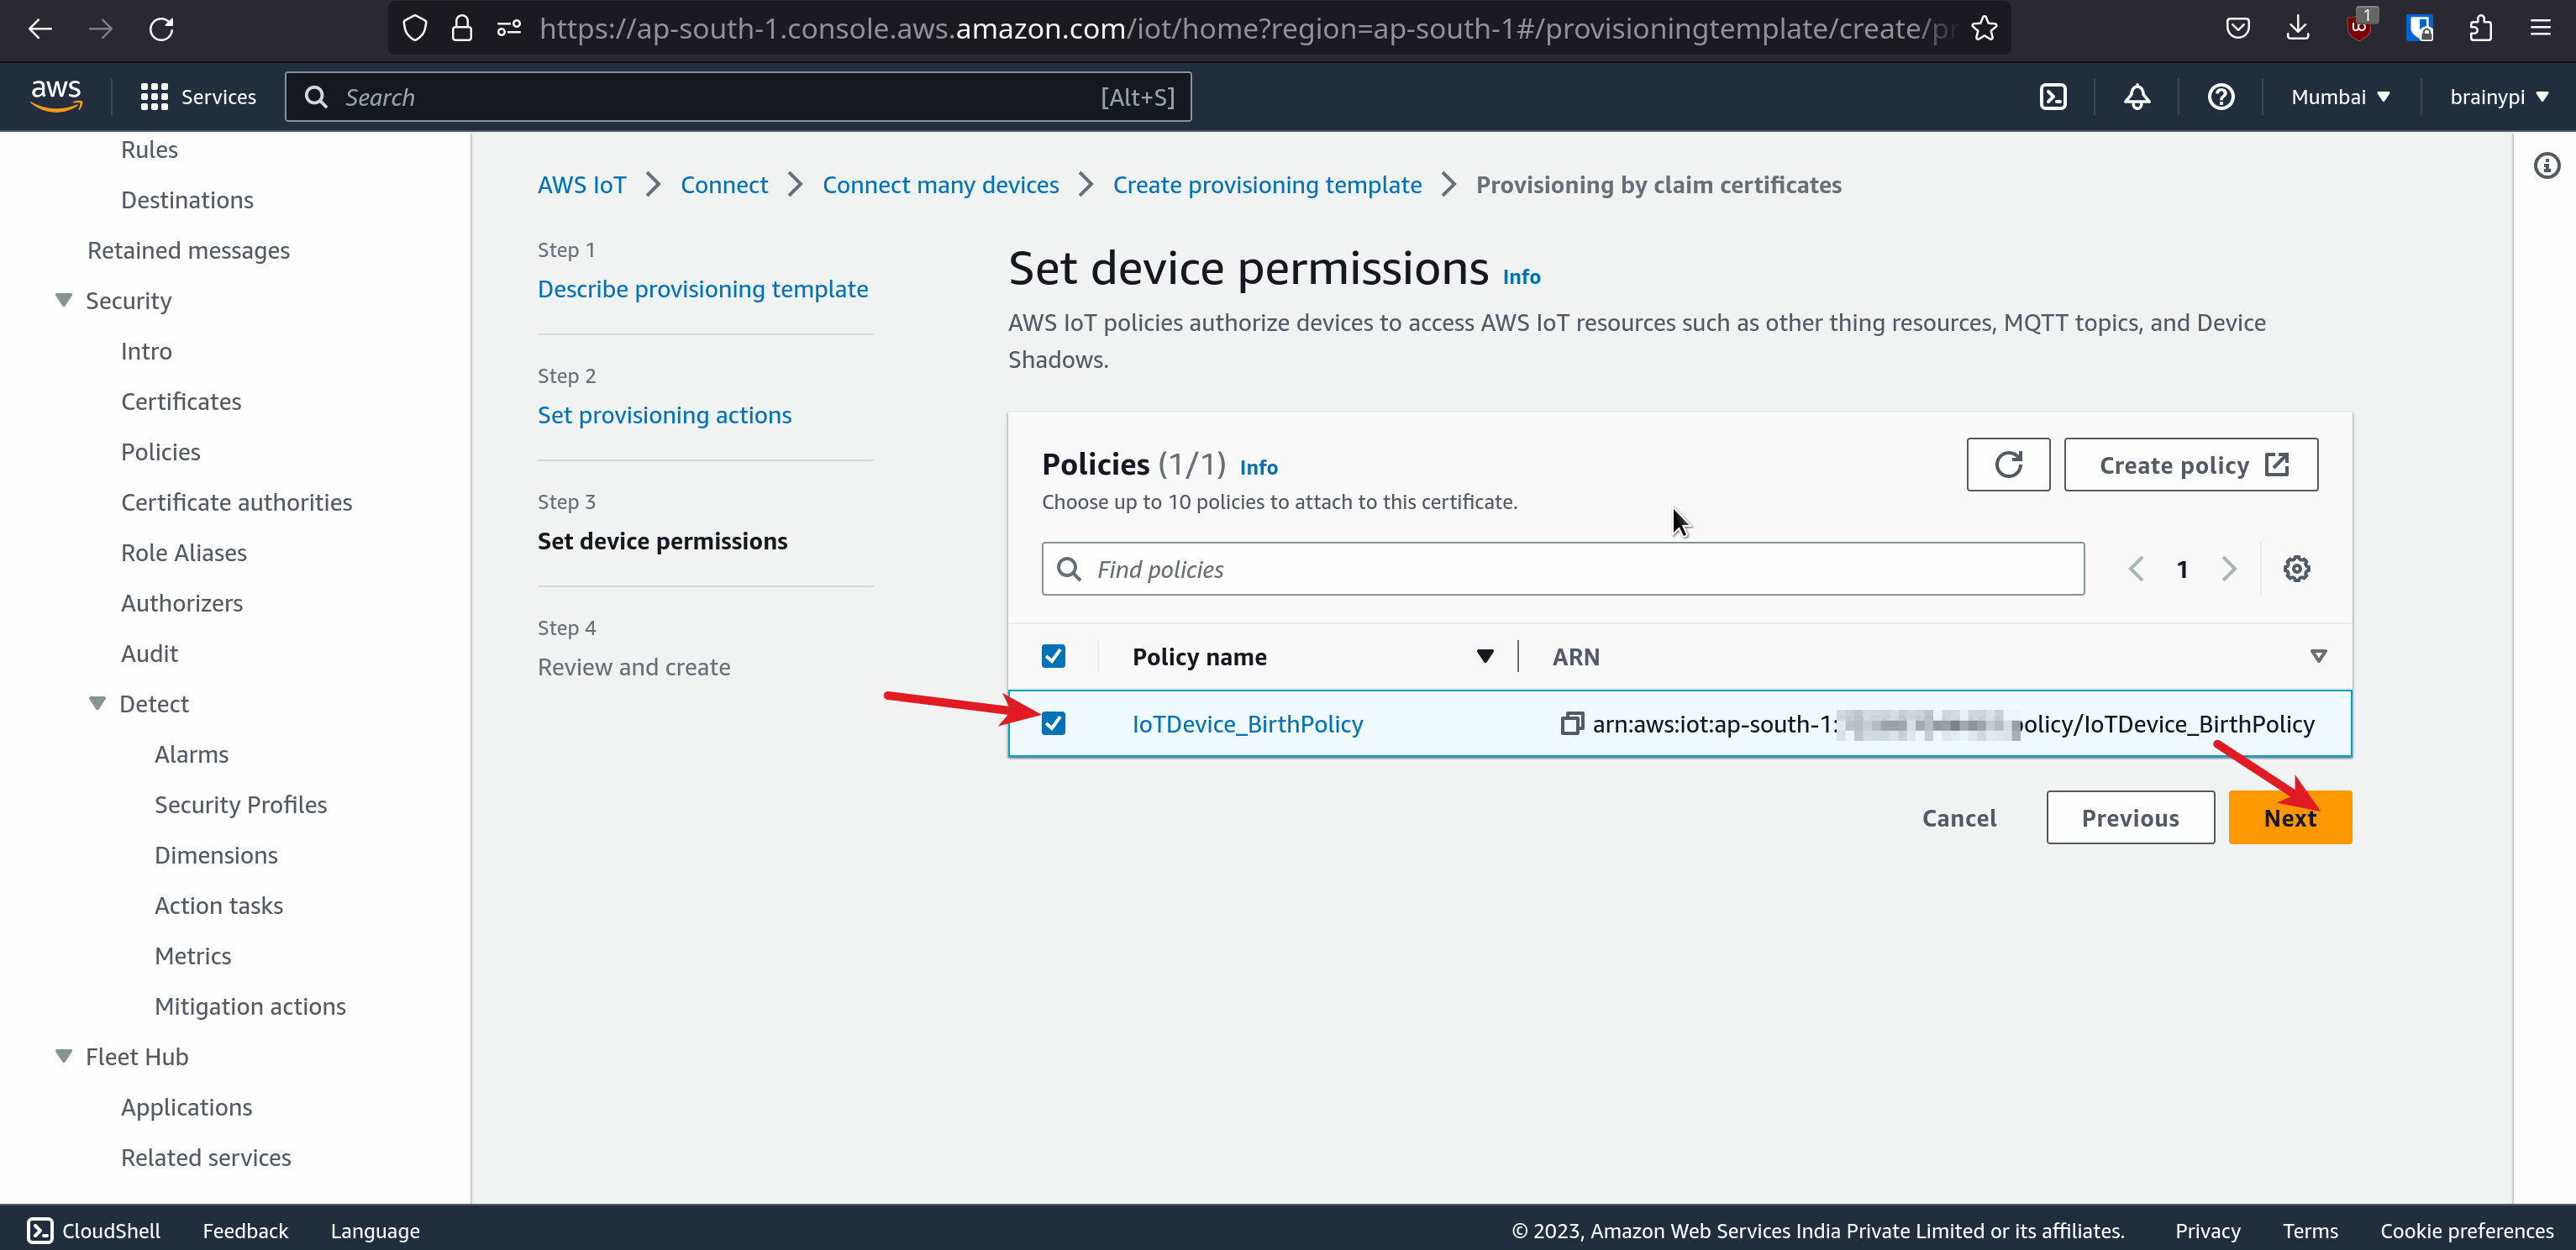
  12. Choose the IoT Policy for the devices getting provisioned, we have used the same permissive policy used for the claim certificate, but you can change this to another policy in production.

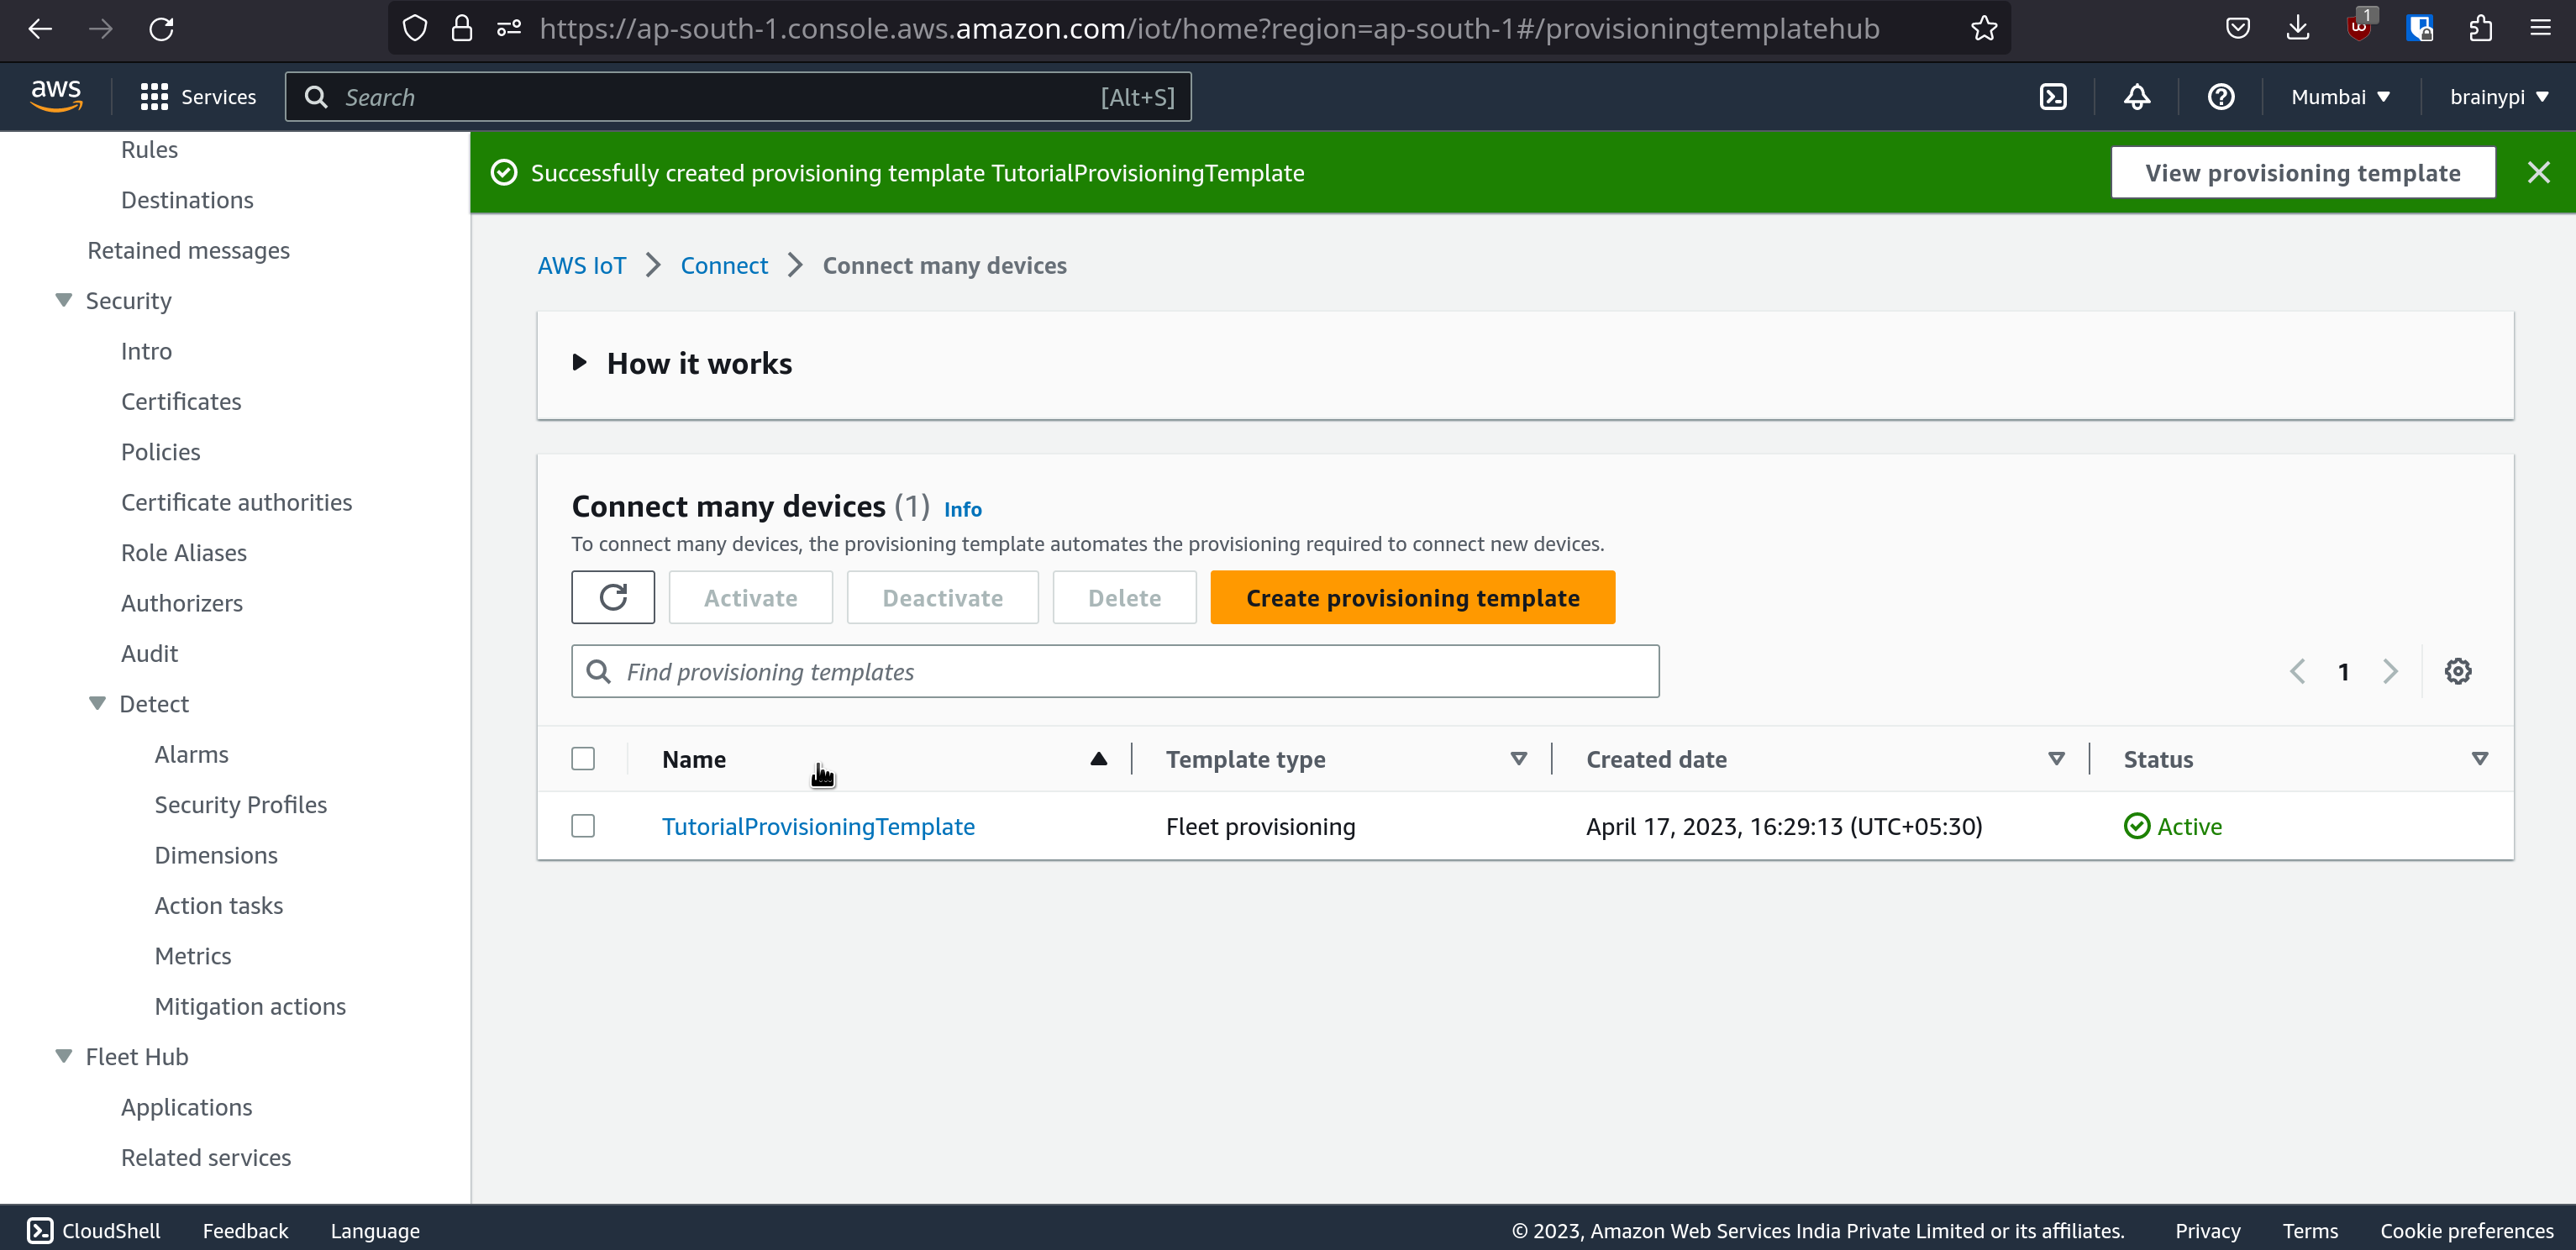
  13. Now your provisioning template should be ready.

Run the AWS provisioner script to provision the device.

AWS provisioner is a script created to provision Brainy Pi devices, using this script you can provision multiple devices, by simply running this script once on the device.
  1. Install the aws provisioner script
    sudo apt update
    sudo apt install -y aws-iot-device-provisioner
  2. Since we have installed dependancies now lets copy the downloaded certificates into the Brainy Pi device
  3. Create a config.ini file, by running command nano config.ini
    [SETTINGS]
    # Set the path to the location containing your certificates (root, private, claim certificate)
    SECURE_CERT_PATH = /PATH/TO/CERTS
    
    # Specify the file names for the root cert, provisioning claim cert, and the private key.
    ROOT_CERT = root.ca.pem
    CLAIM_CERT = bootstrap-certificate.pem.crt
    SECURE_KEY = bootstrap-private.pem.key
    
    # Set the name of your IoT Endpoint
    IOT_ENDPOINT = xxxxxxxxxxxxxx-ats.iot.{REGION}.amazonaws.com
    
    # Include the name for the provisioning template that was created in IoT Core
    PRODUCTION_TEMPLATE = production_template
    CERT_ROTATION_TEMPLATE = cert_rotation
    For example: A configuration file should look like this
    SETTINGS]
    # Set the path to the location containing your certificates (root, private, claim certificate)
    SECURE_CERT_PATH = /home/pi/iot
    
    # Specify the names for the root cert, provisioning claim cert, and the private key.
    ROOT_CERT = AmazonRootCA1.pem
    CLAIM_CERT = a82656609209384jd8u9823479390c609n43je4fd3e042193df20b1ed88c2e71-certificate.pem.crt
    SECURE_KEY = a82656609209384jd8u9823479390c609n43je4fd3e042193df20b1ed88c2e71-private.pem.key
    
    # Set the name of your IoT Endpoint
    IOT_ENDPOINT = a1m53p8s4qqus-cts.iot.ap-south-1.amazonaws.com
    
    # Include the name for the provisioning template that was created in IoT Core
    PRODUCTION_TEMPLATE = TutorialProvisioningTemplate
    CERT_ROTATION_TEMPLATE = cert_rotation
    Note: Cert rotation template is optional, if you don’t have a cert rotation template fill it with any dummy value.
  4. Run the aws provisioner,
    aws-iot-device-provisioner -c ./config.ini
  5. Hence, the device will get provisioned.

Section 2: Send Data from Brainy Pi to AWS IoT Core

Once your BrainyPi device is provisioned and connected to AWS IoT Core, you can start sending data from the device to the cloud. Here’s how to do it:
  1. Install dependencies
    git clone https://github.com/shunyaos/brainypi-aws-iot-example.git
    cd brainypi-aws-iot-example
    pip3 install requirements.txt
  2. Snippet code to send the data to AWS IoT Core
    from awscrt import io, mqtt
    from awsiot import mqtt_connection_builder
    import time
    import asyncio
    import json
    import random
    import argparse
    import sys
    from os.path import exists
    from utils.config_loader import Config
    
    
    def on_connection_interrupted(connection, error, **kwargs):
        """Callback function for when the connection is interrupted
        """
        print('Connection interrupted with error {}'.format(error))
    
    
    def on_connection_resumed(connection, return_code, session_present, **kwargs):
        """Callback function for when the connection is resumed
        """
        print('Connection resumed with return code {}, session present {}'.format(return_code, session_present))
    
    def on_msg_callback(topic, payload, **kwargs):
        """Callback function for when the the message from the cloud is reached
        """
        print("Received message from topic '{}': {}".format(topic, payload))
    
    
    # Parse the command line arguments
    parser = argparse.ArgumentParser()
    parser.add_argument("-c", "--config", default='/home/pi/.aws/config.ini')
    args = parser.parse_args()
    
    
    # Get config file path from arguments
    CONFIG_PATH = args.config
    
    # Check if the config file exists 
    if exists(CONFIG_PATH) == False:
        sys.exit("Configuration file {} does not exist. Aborting..".format(CONFIG_PATH))
    
    # Parse the configuration file and get the configs from the file
    config = Config(CONFIG_PATH)
    config_parameters = config.get_section('SETTINGS')
    secure_cert_path = config_parameters['PROD_CERT']
    secure_key_path = config_parameters['PROD_KEY']
    root_ca_path = config_parameters['ROOT_CERT']
    endpoint_url = config_parameters['IOT_ENDPOINT']
    cert_folder = config_parameters['SECURE_CERT_PATH']
    
    # Connect to the AWS IoT Core
    event_loop_group = io.EventLoopGroup(1)
    host_resolver = io.DefaultHostResolver(event_loop_group)
    client_bootstrap = io.ClientBootstrap(event_loop_group, host_resolver)
    
    MQTTClient = mqtt_connection_builder.mtls_from_path(
                    endpoint=endpoint_url,
                    cert_filepath="{}/{}".format(cert_folder, secure_cert_path),
                    pri_key_filepath="{}/{}".format(cert_folder, secure_key_path),
                    client_bootstrap=client_bootstrap,
                    ca_filepath="{}/{}".format(cert_folder, root_ca_path),
                    on_connection_interrupted=on_connection_interrupted,
                    on_connection_resumed=on_connection_resumed,
                    client_id=mac_address,
                    clean_session=False,
                    keep_alive_secs=6)
    
    connect_future = MQTTClient.connect()
    connect_future.result()
    print("Connected!")
    
    # Publish random values to the MQTT topic
    while True:
        value = random.randint(0, 100)
        temp_value = get_cpu_temp()
        payload = {"pressure": value, "temperature": temp_value}
    
        MQTTClient.publish(
                topic="iot/data",
                payload=json.dumps(payload),
                qos=mqtt.QoS.AT_LEAST_ONCE)
        time.sleep(1)
  3. See full code here – https://github.com/shunyaos/brainypi-aws-iot-example/blob/main/aws-iot-example.py
  4. Run the code
    python3 aws-iot-example.py -c ../config.ini
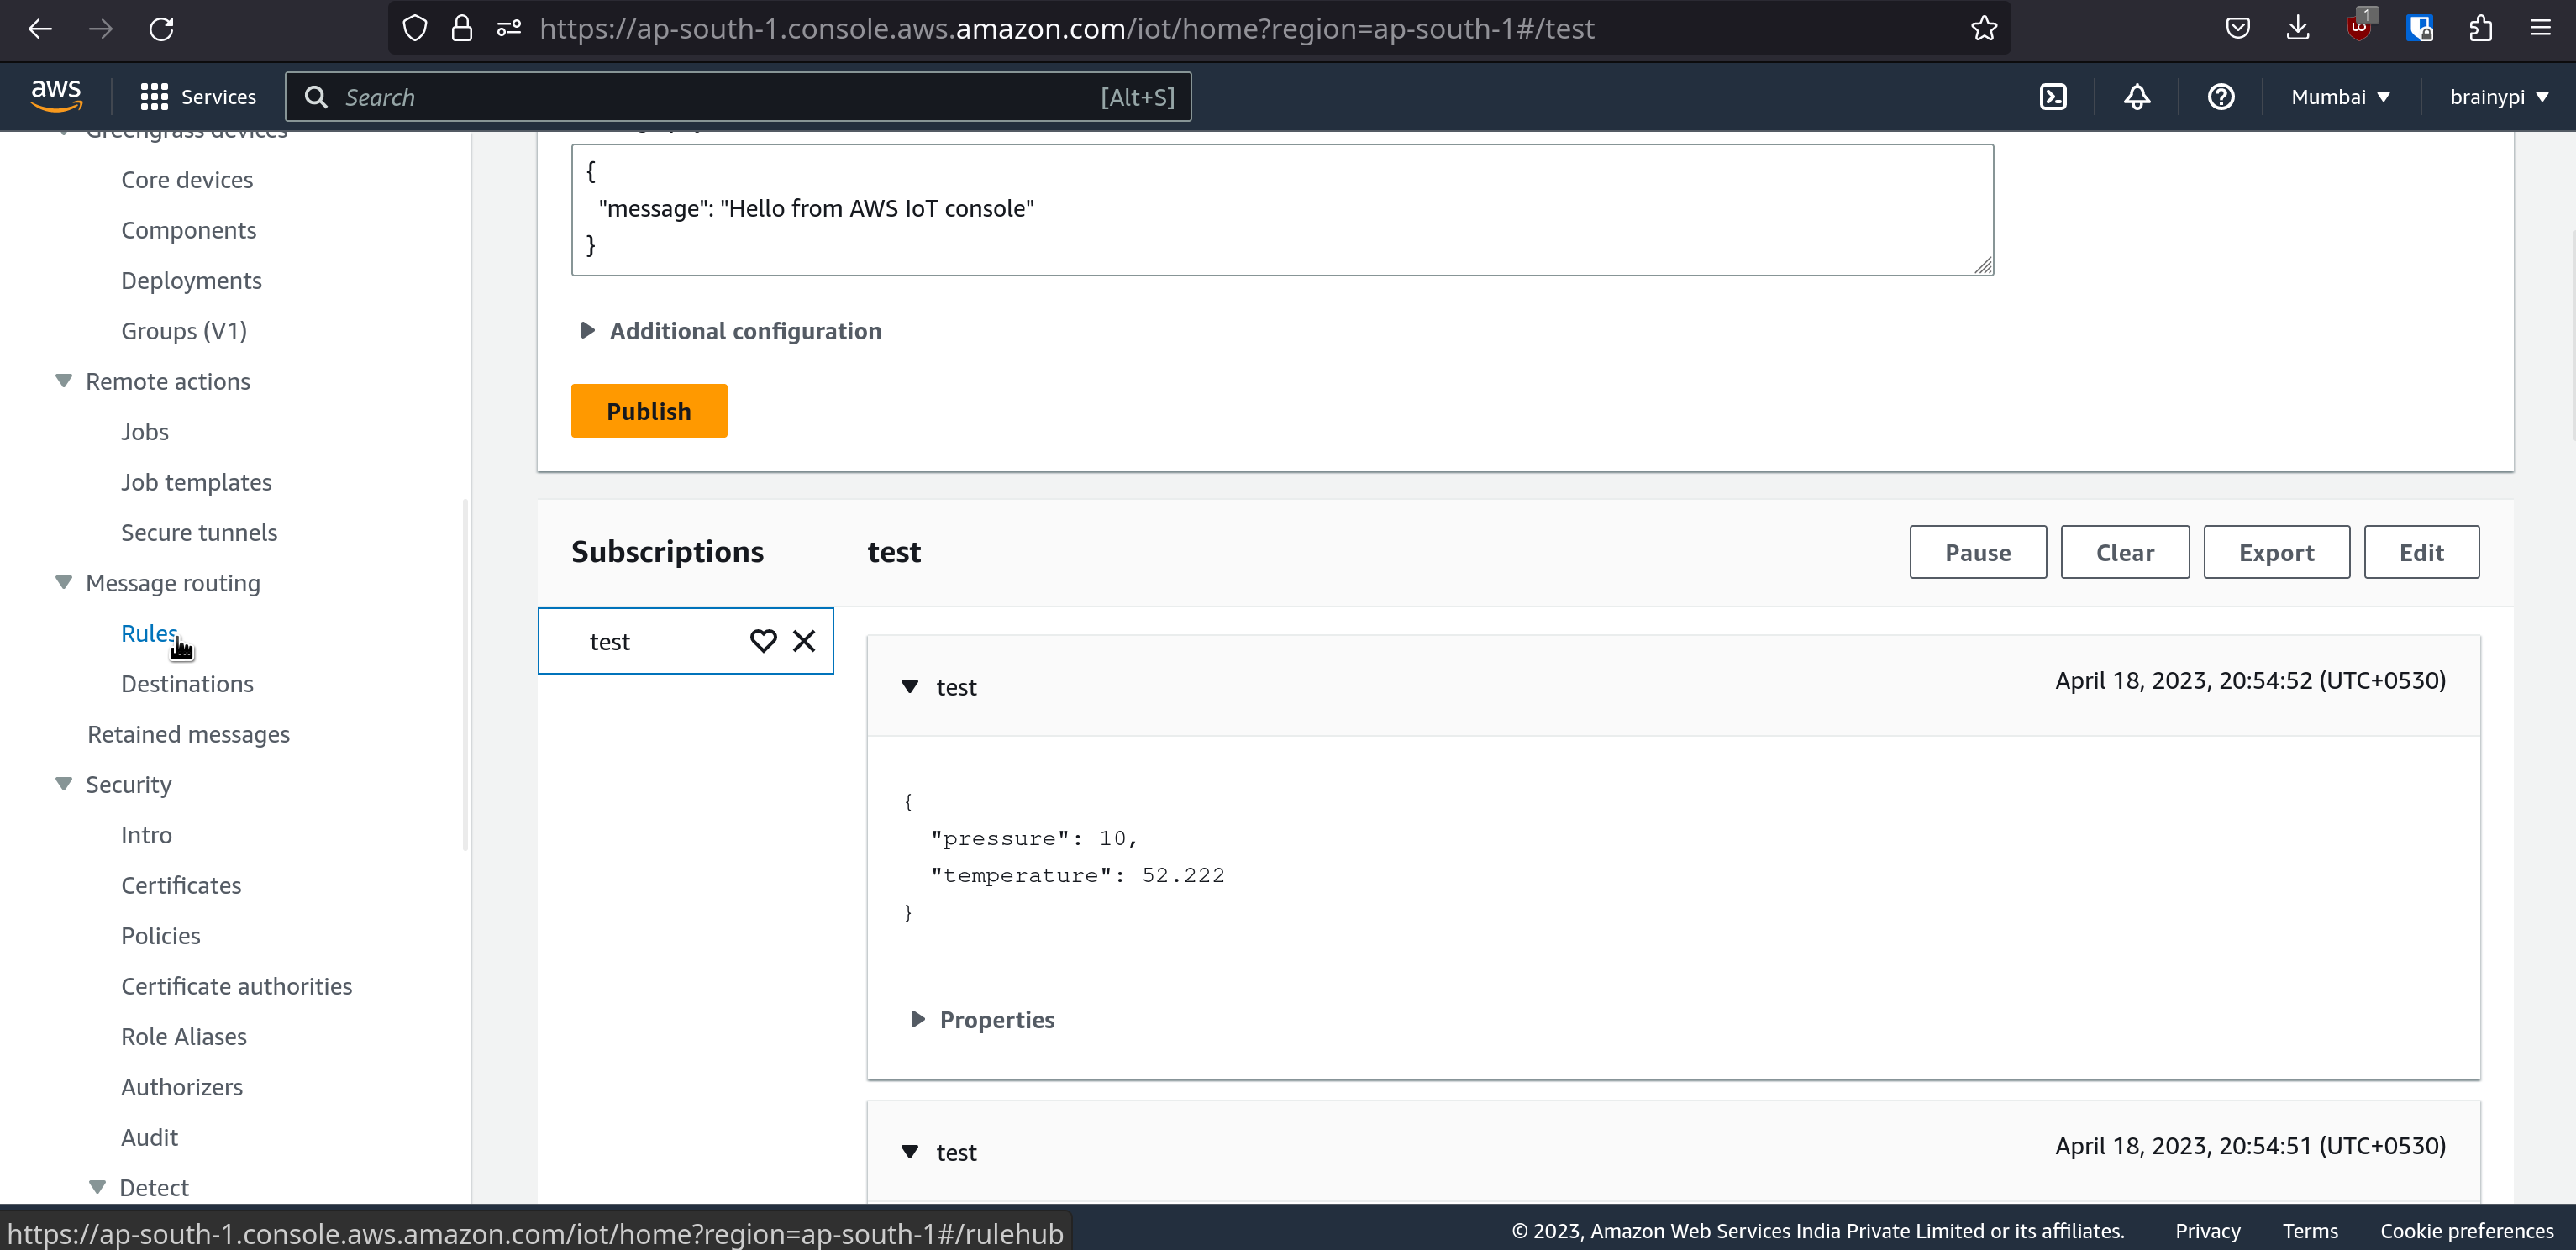
  5. Go to AWS IoT –> MQTT test Client –> Subscribe to topic iot/data, and you will see the data being sent via device.

Section 3: Receive Data from AWS IoT Core

In addition to sending data from your Brainy Pi device to AWS IoT Core, you can also receive data from the cloud on your device. Here’s how to do it:
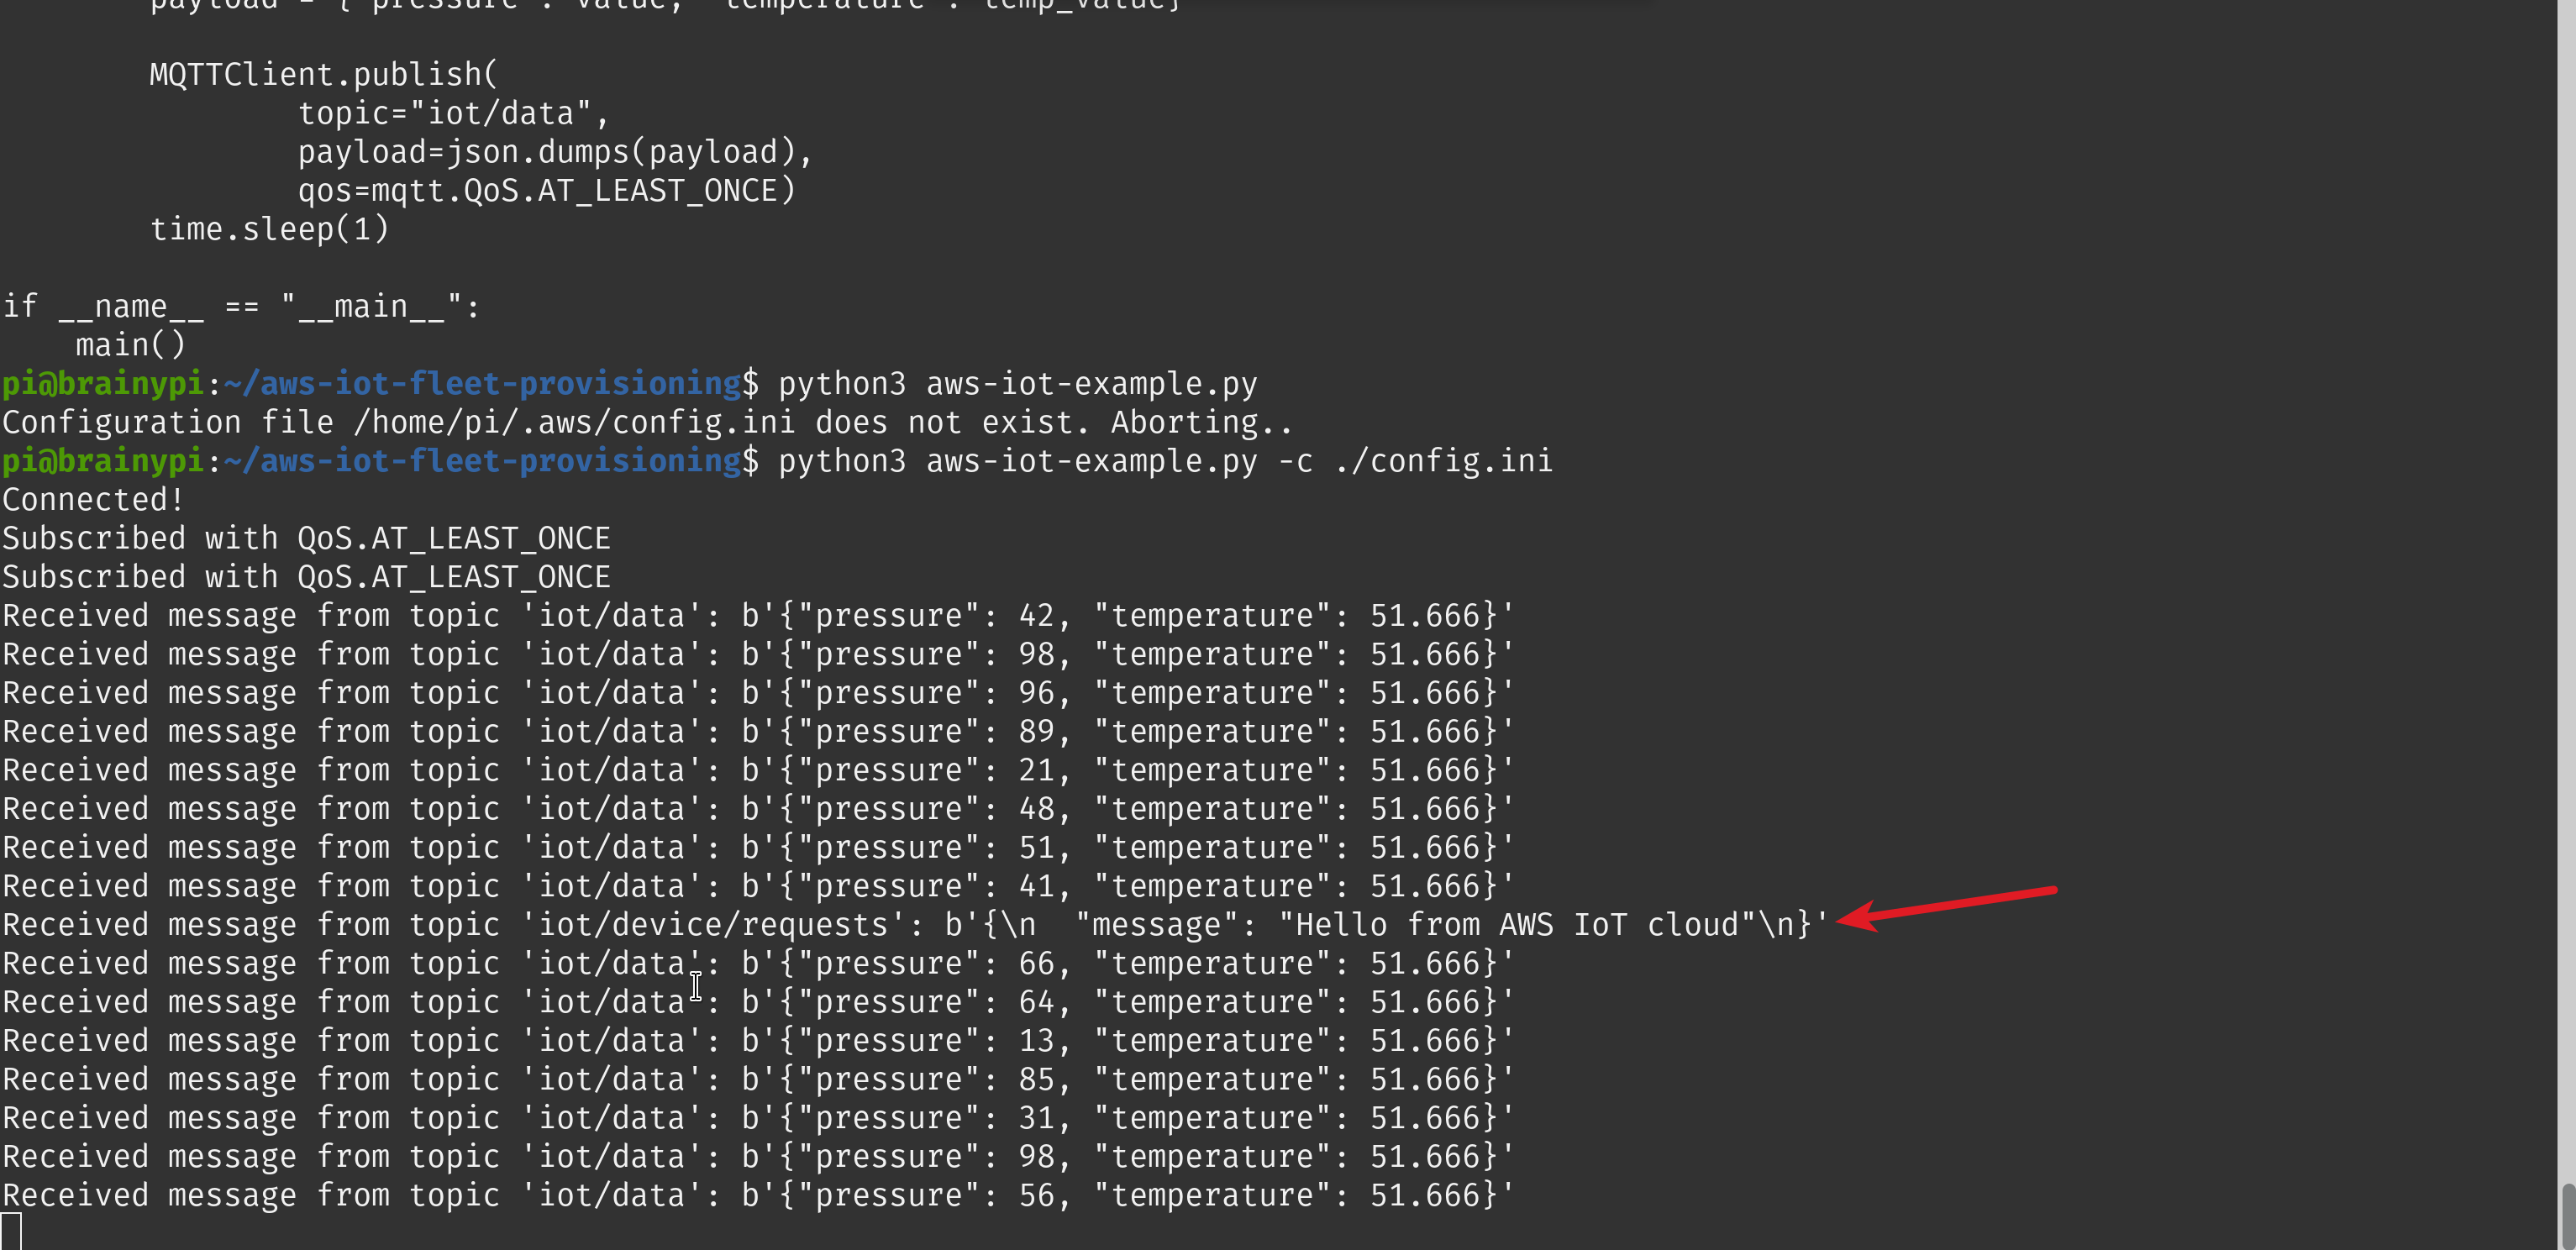
  1. Snippet code to receive the data from AWS IoT Core using the mqtt topic iot/device/requests
    # Subscribe to the cloud to device topic
    mqtt_topic2_subscribe_future, _ = MQTTClient.subscribe(
            topic="iot/device/requests",
            qos=mqtt.QoS.AT_LEAST_ONCE,
            callback=on_msg_callback)
    
    # Wait for subscription to succeed
    mqtt_topic2_subscribe_result = mqtt_topic2_subscribe_future.result()
    print("Subscribed with {}".format(str(mqtt_topic2_subscribe_result['qos'])))
  2. See full code here – https://github.com/shunyaos/brainypi-aws-iot-example/blob/main/aws-iot-example.py
  3. Run the code
    python3 aws-iot-example.py -c ../config.ini
  4. Go to AWS IoT –> MQTT test Client –> Public to topic iot/device/requests, and click on publish.
  5. So, you will see the code prints the published message.

Section 4: Display Data on AWS Quicksight Dashboard

Finally, you can display the data you’ve sent to AWS IoT Core on an AWS Quicksight dashboard. Here’s how to do it:
  1. Connect AWS IoT Analytics to AWS IoT Core and import the data that was sent from the Brainy Pi device, to AWS IoT Analytics.
  2. Set up an AWS Quicksight account and create a new dashboard using the data from AWS IoT Analytics.

Connect AWS IoT Analytics to AWS IoT Core and import the data that was sent from the Brainy Pi device, to AWS IoT Analytics

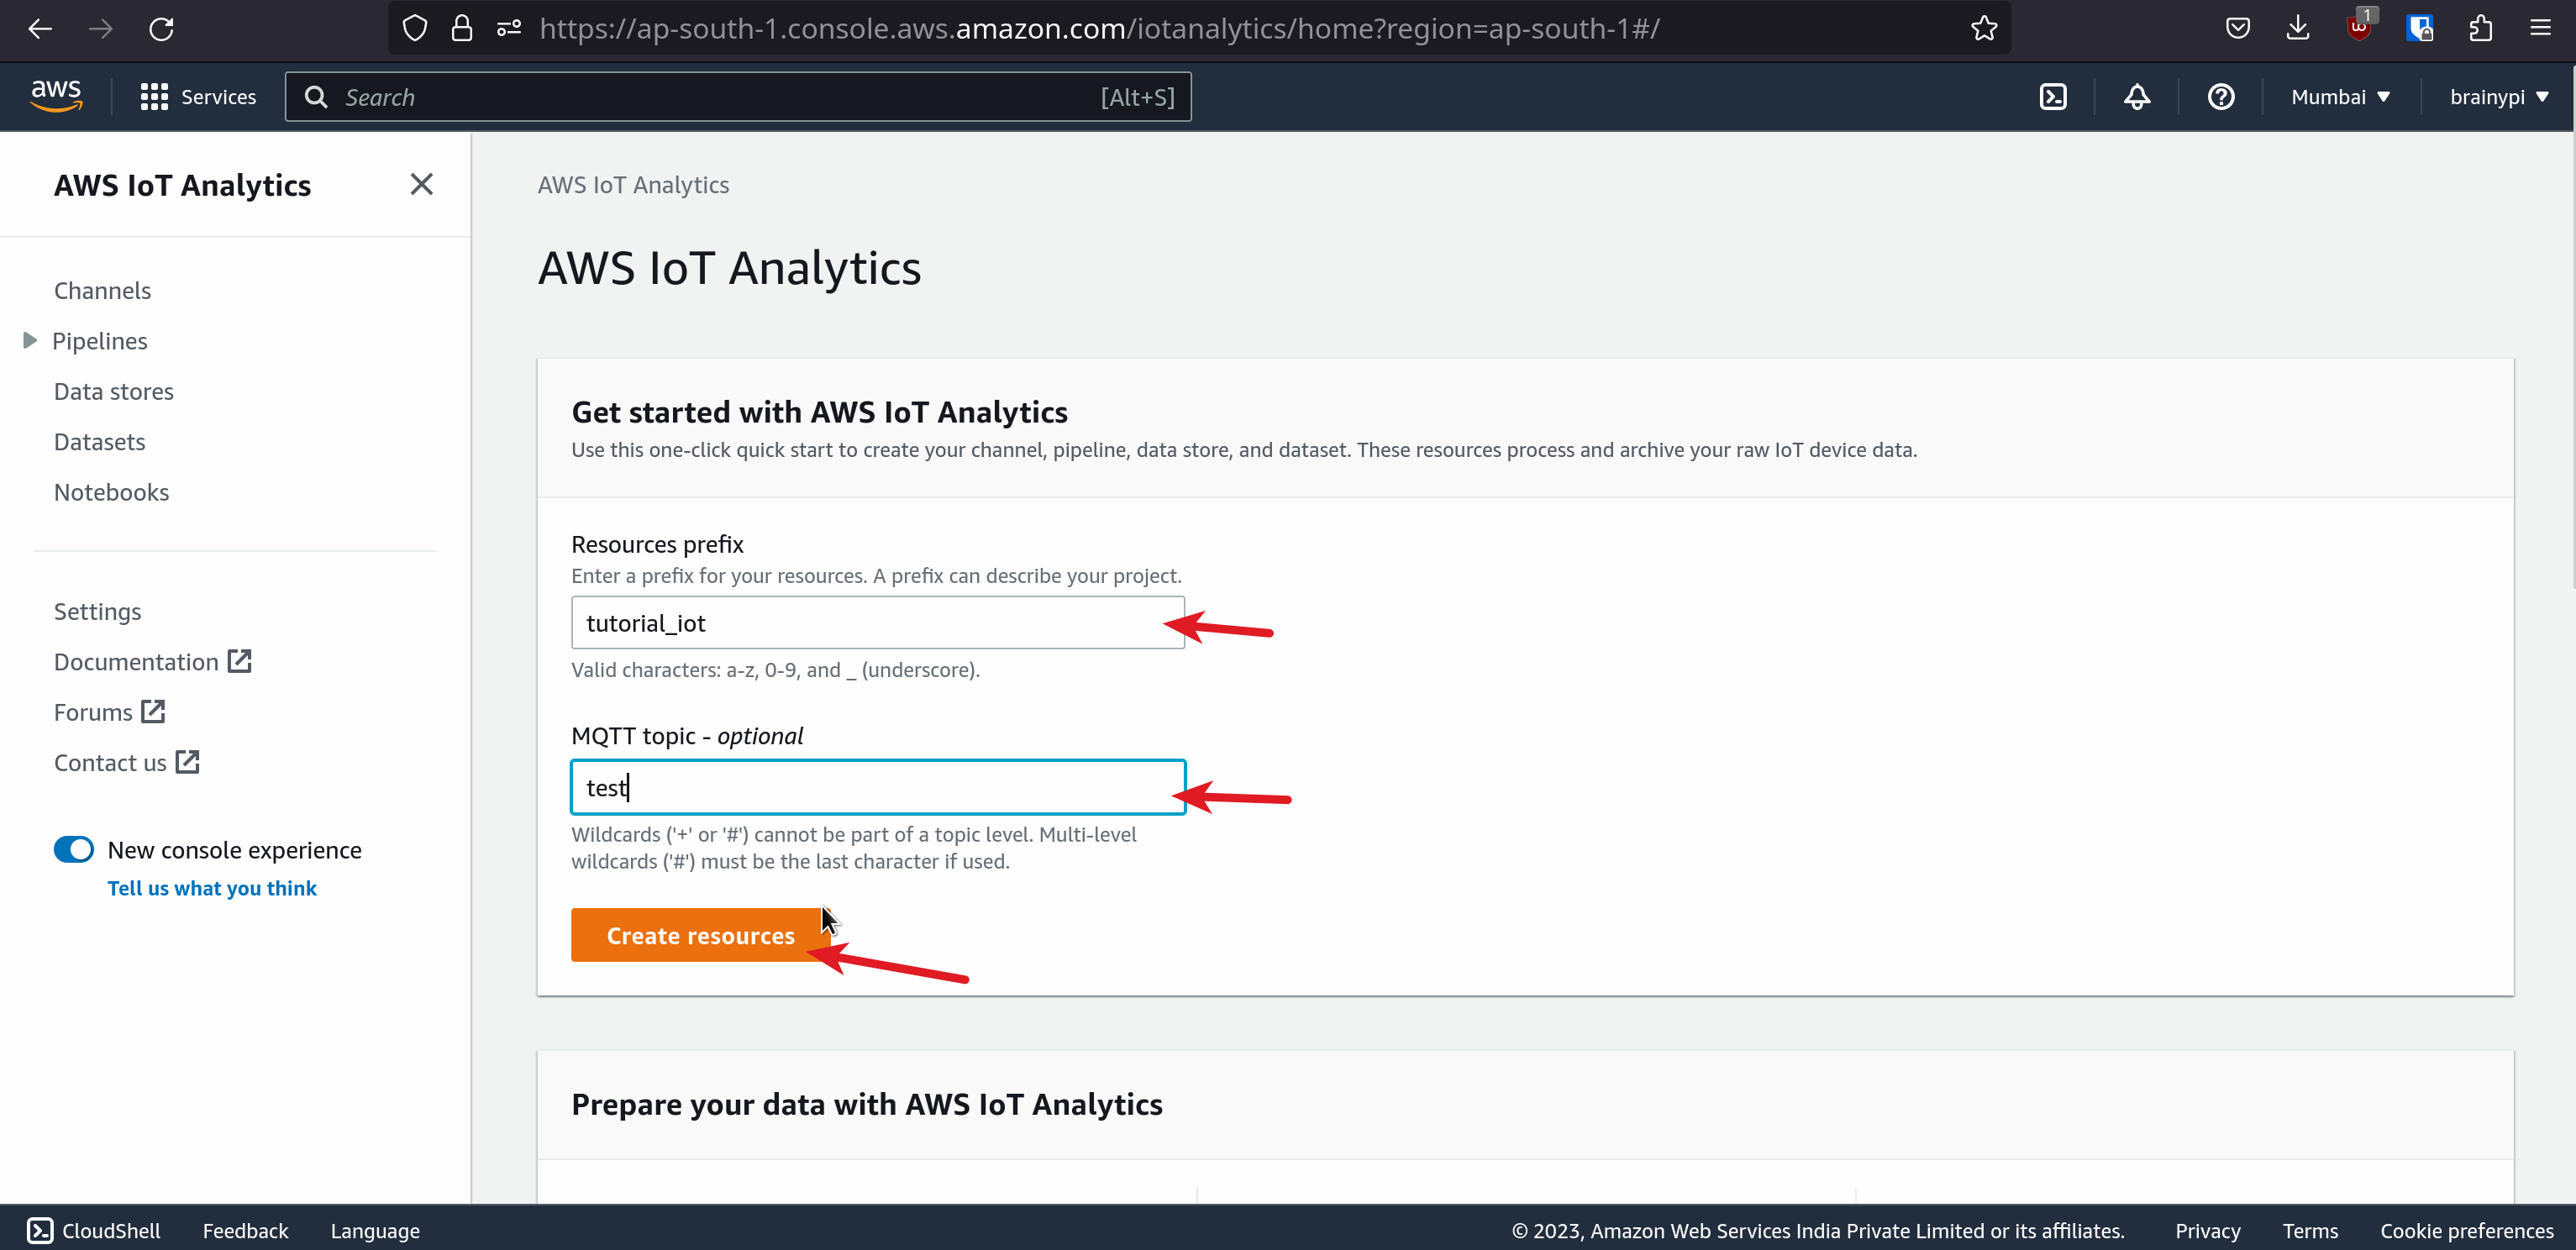
  1. Go to AWS IoT Analytics and Create a resource for the AWS IoT Analytics

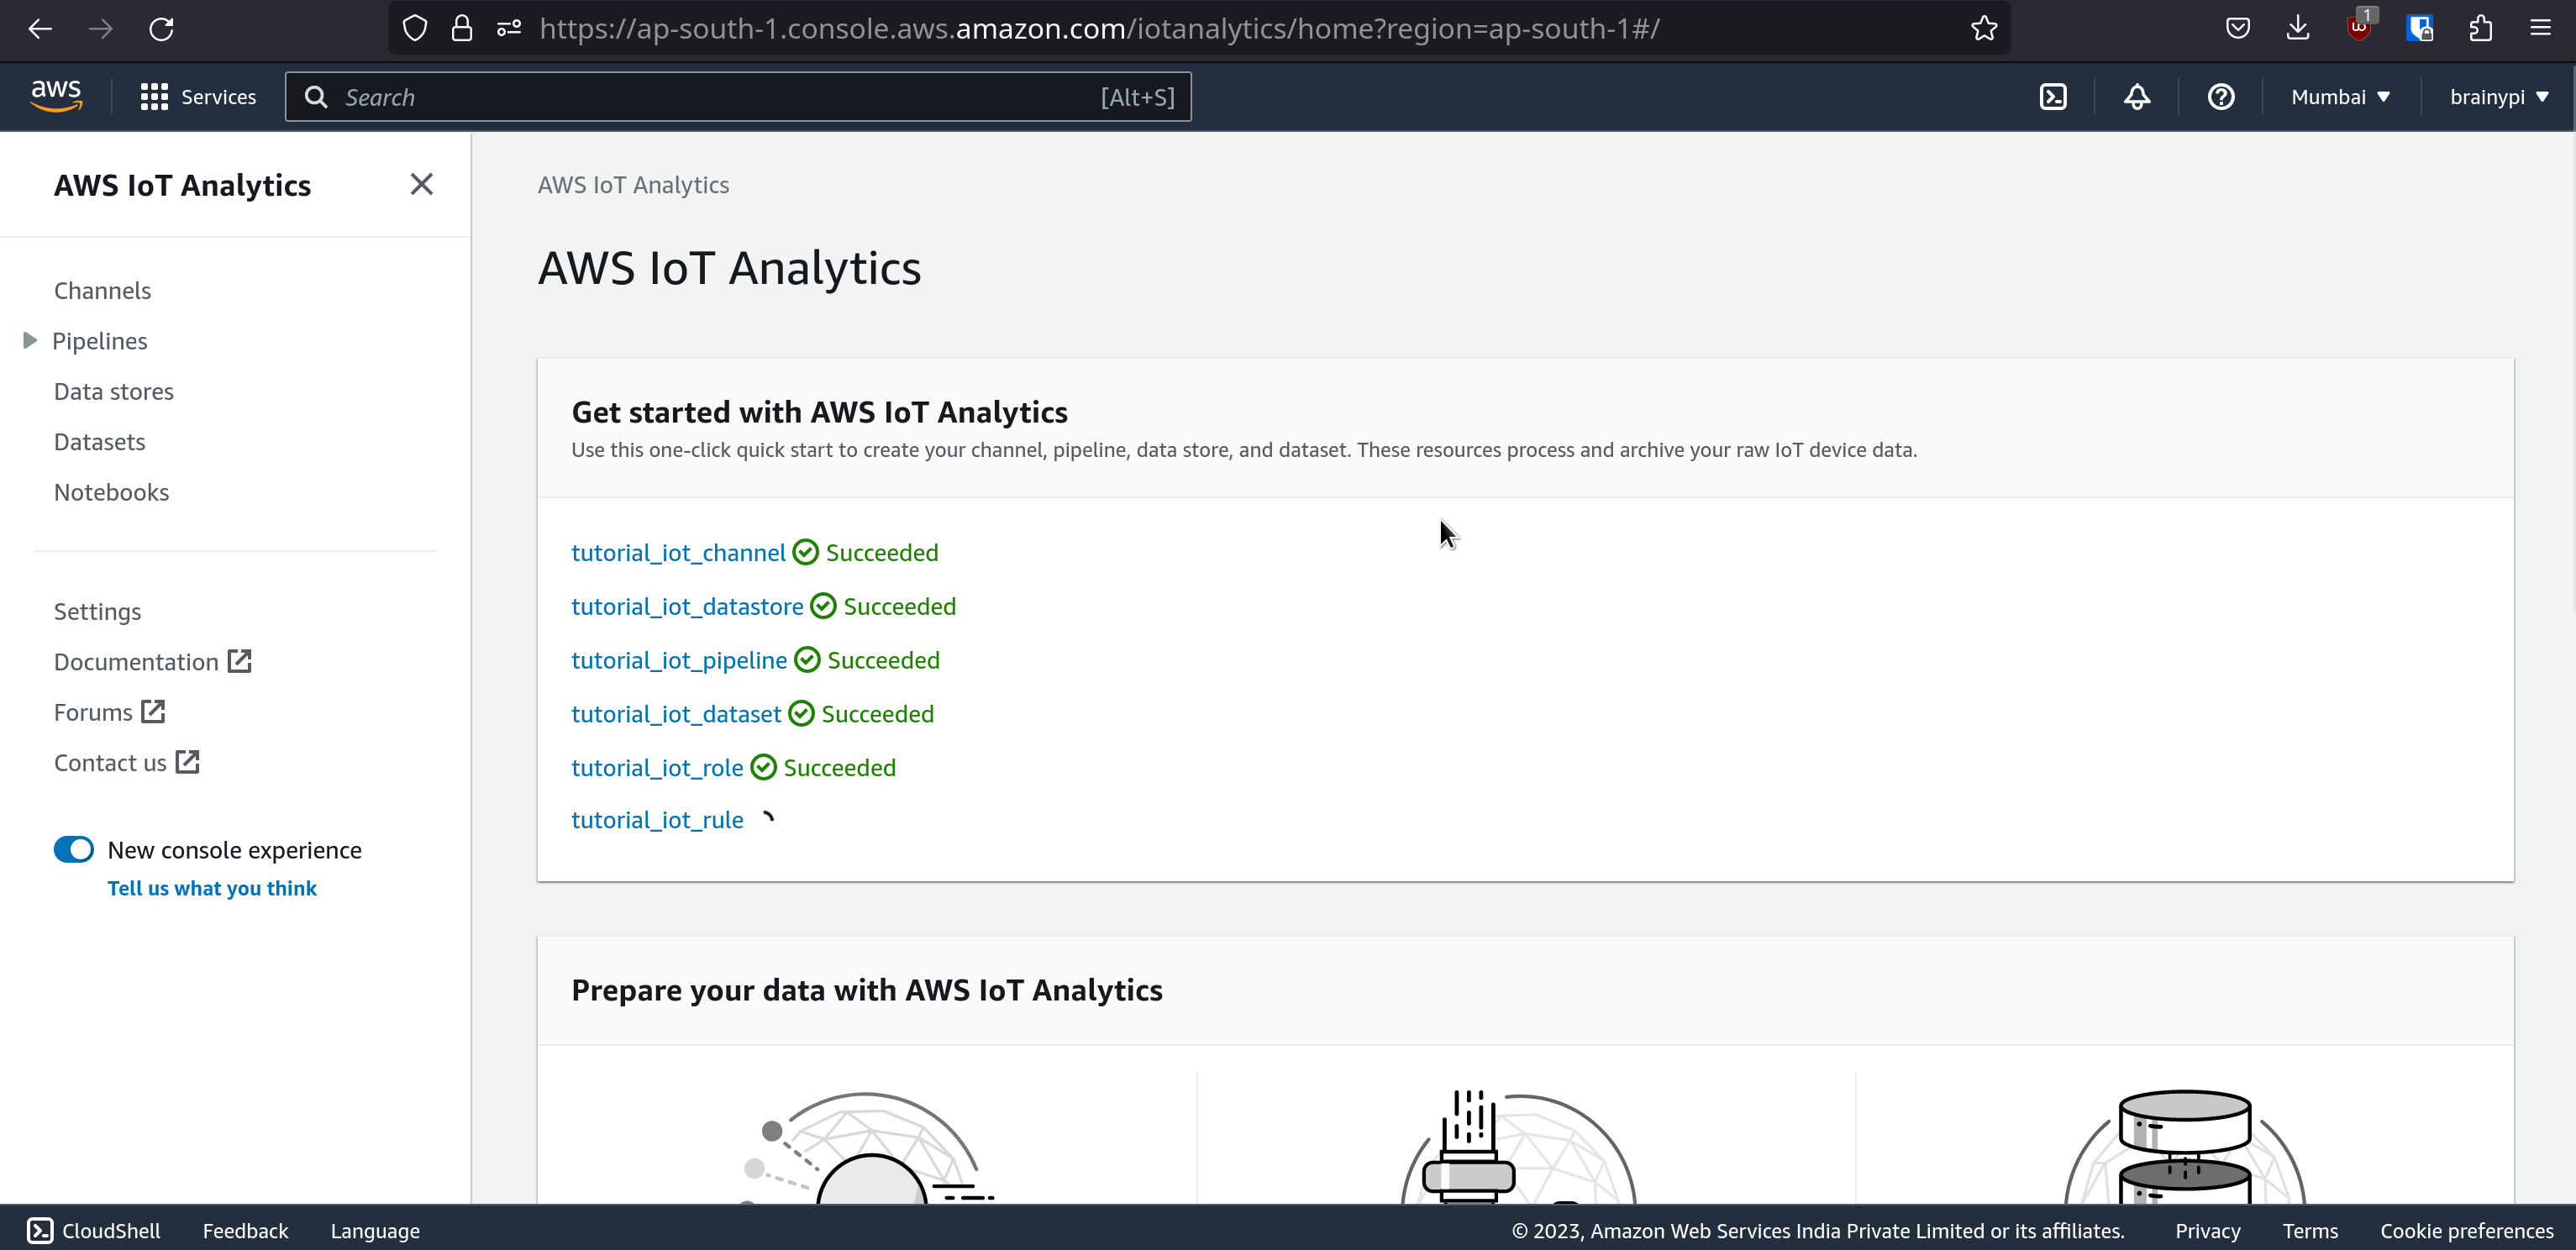
  2. So this will create all the necessary resources for analysing the IoT core data

  3. Then create an AWS IoT Rule for sending data to AWS IoT Analytics
    1. Go to AWS IOT –> Message Routing –> Rules and Create a new Rule
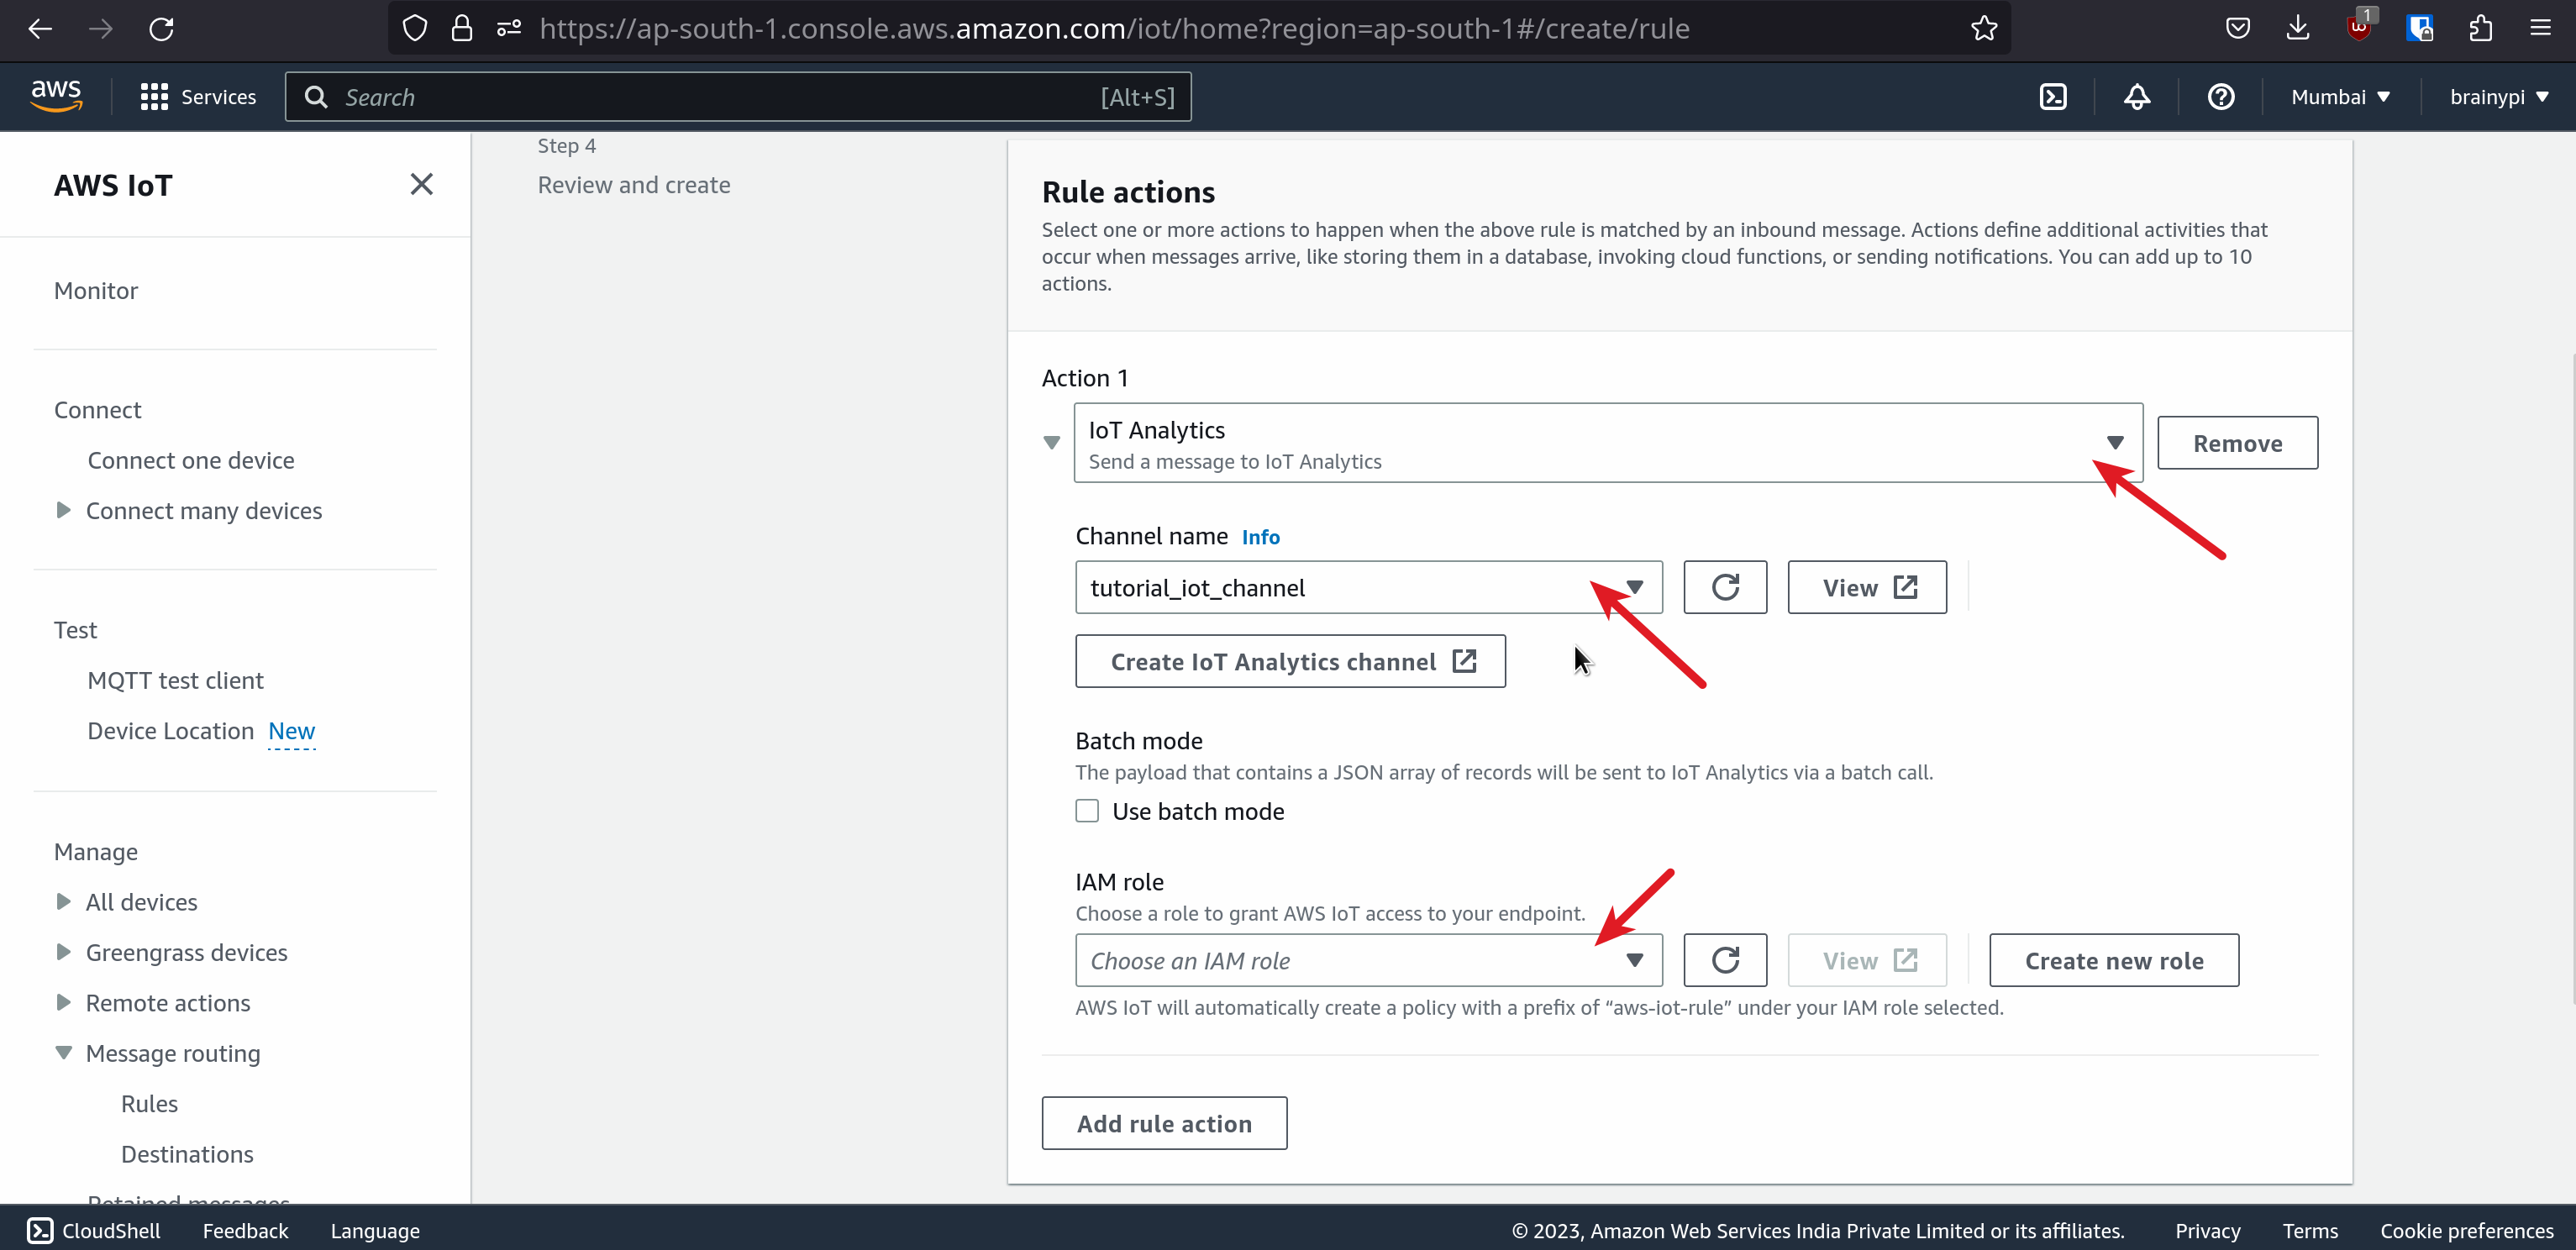
    2. On the next page, choose Action as “IoT Analytics”, choose the channel name as the channel name created in the previous step

    3. Choose the IoT Role as the role created in the previous step.
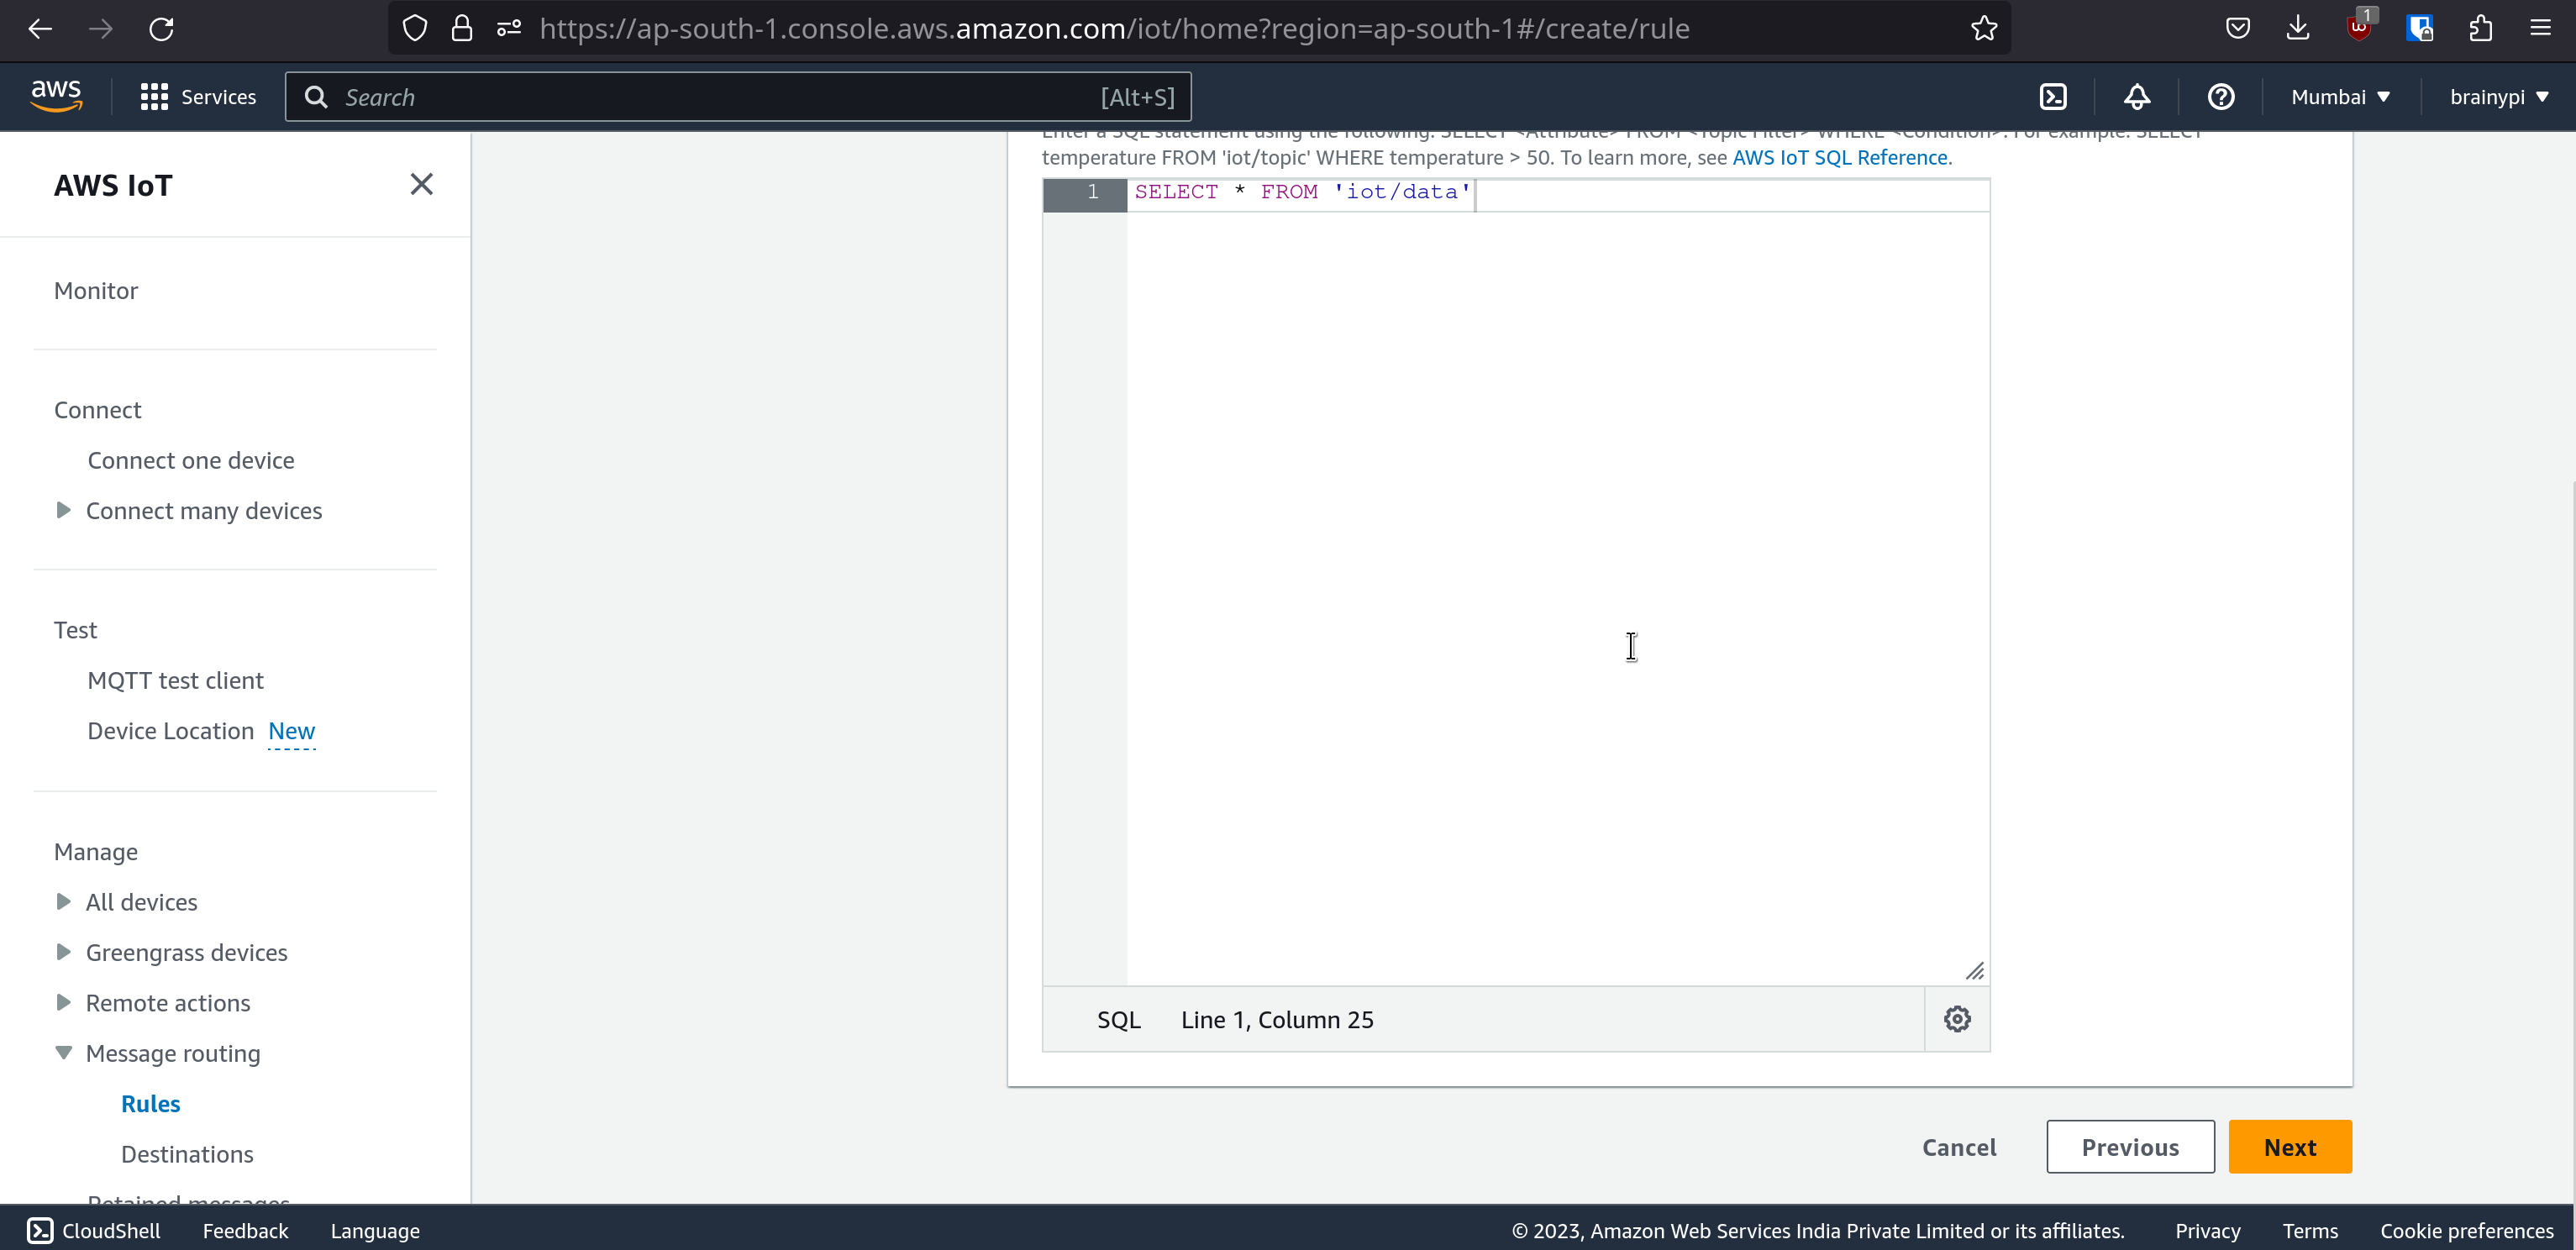
  4. On the next page, Write an SQL statement to capture all the message being sent to your topic.
    For example: if the data is being sent to the topic iot/data then the SQL statement is
    SELECT * FROM 'iot/data'

  5. Click on create so this will start sending the data from AWS IoT Core to AWS IoT Analytics.
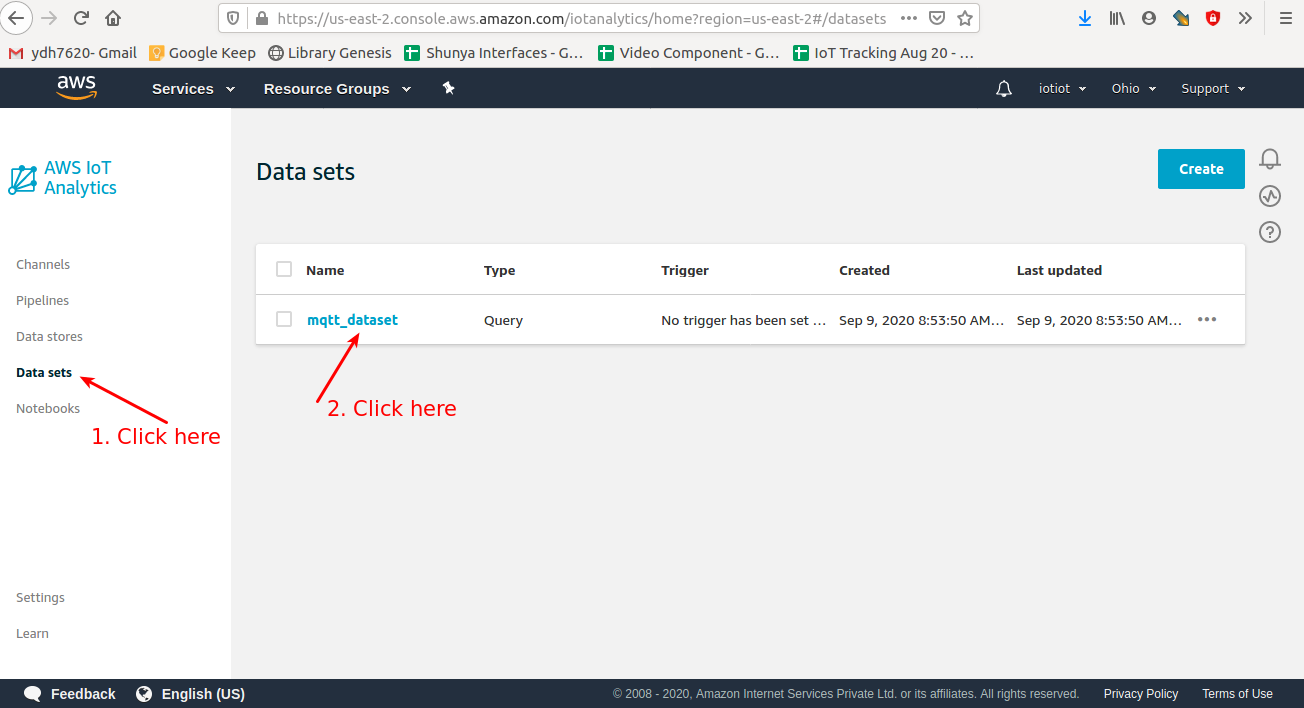
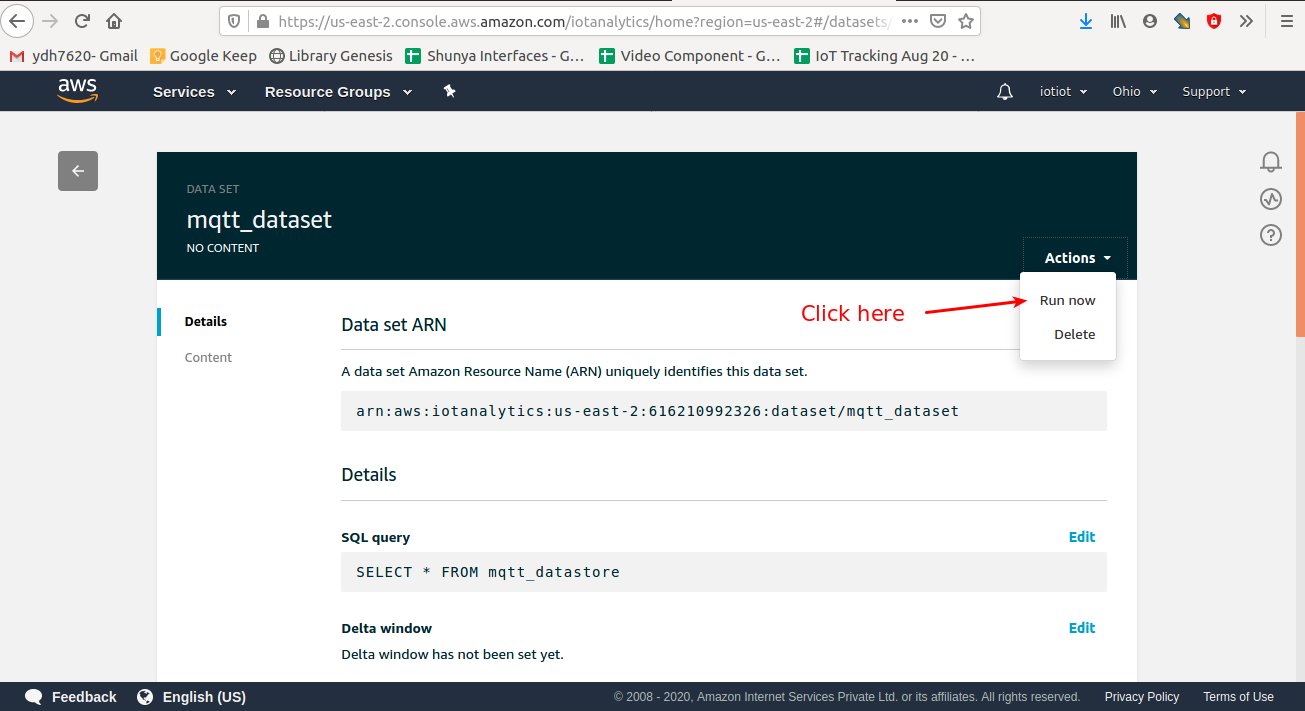
  6. Go to AWS IoT Analytics –> Datasets

  7. Then Click on Run now to, create a dataset.

  8. Now your data is ready to be imported into AWS Quicksight for dashboarding.

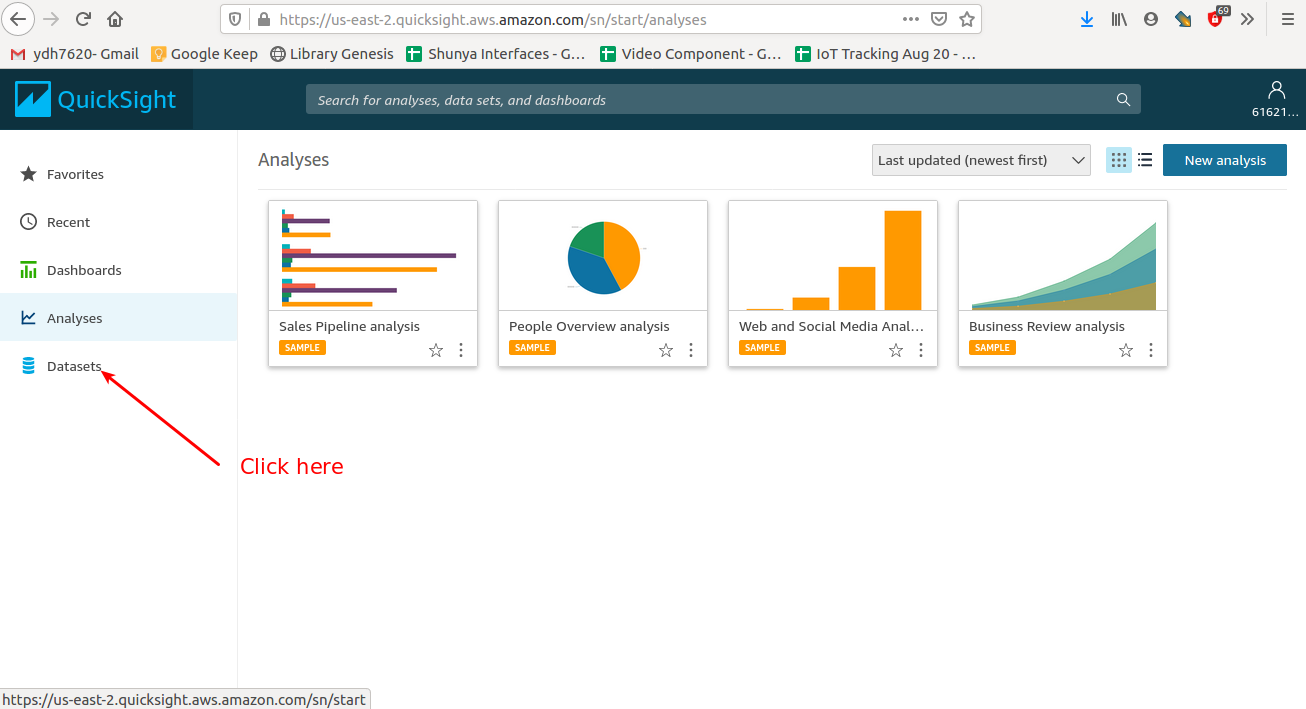
Set up an AWS Quicksight account and create a new dashboard.

  1. Go to the site https://aws.amazon.com/quicksight/ and create a Quicksight account.
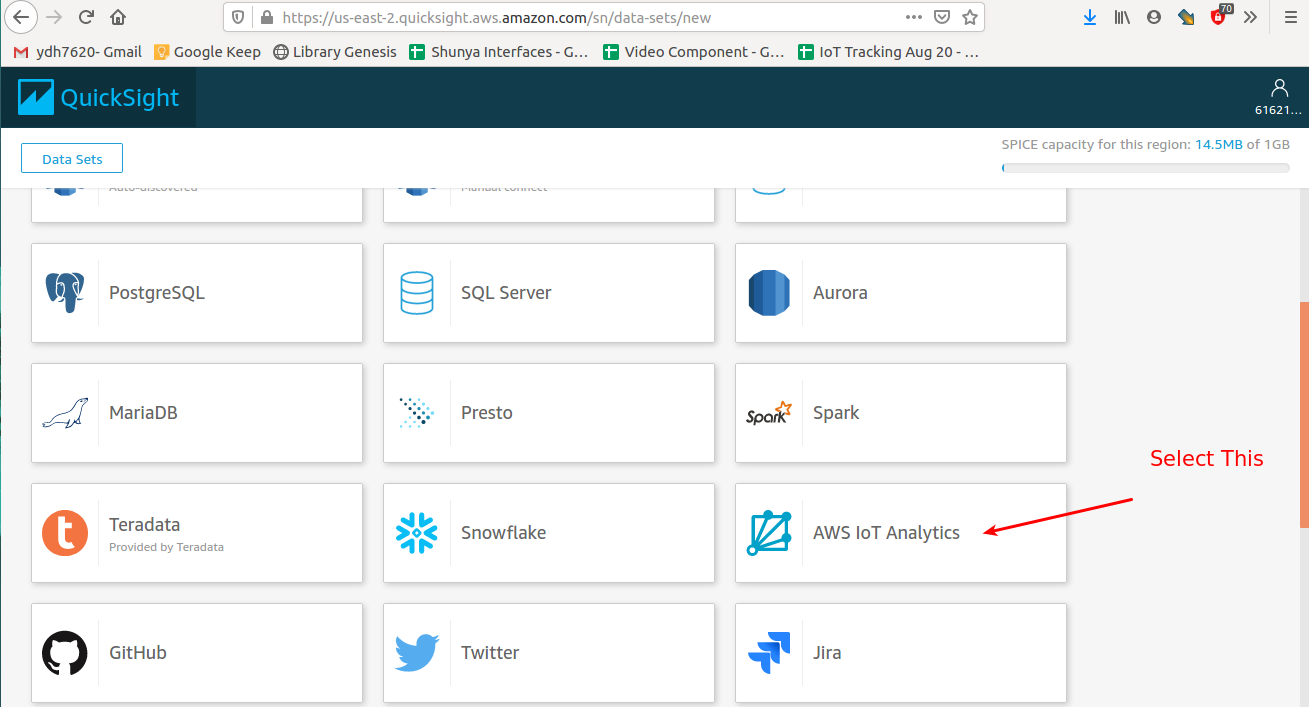
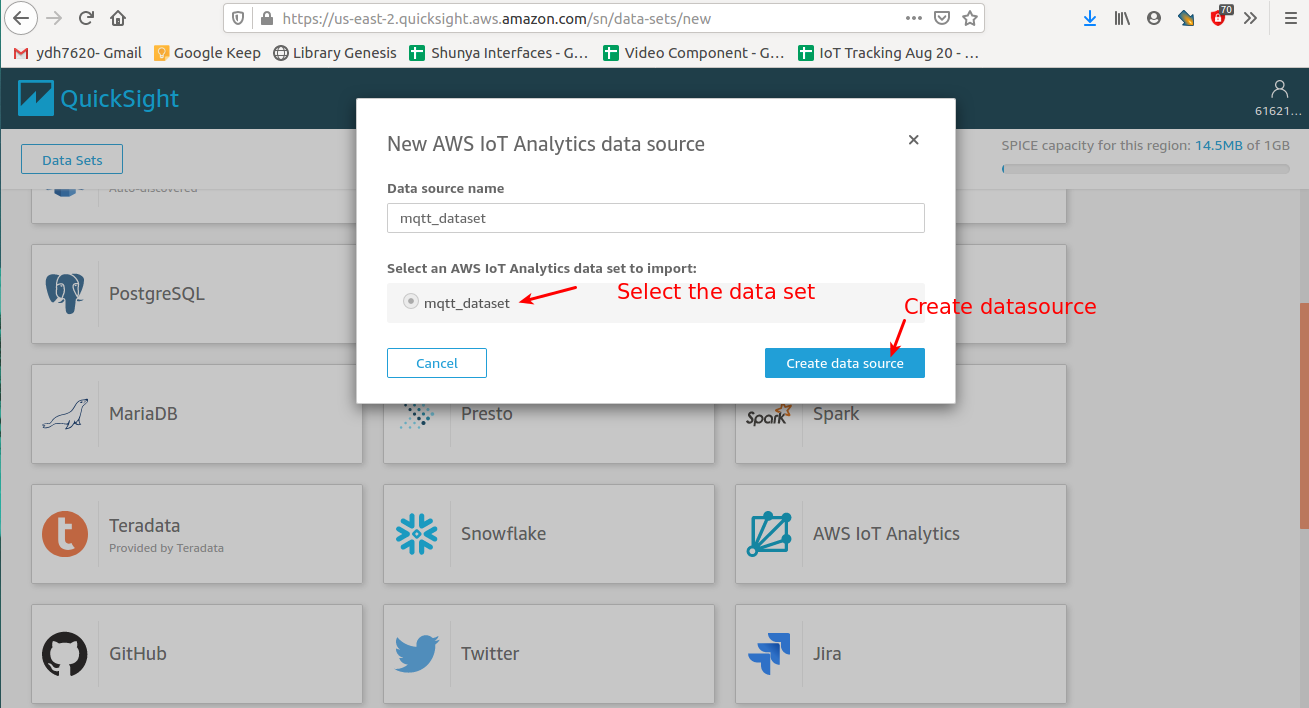
  2. Then go to Datasets and import the dataset you have created.

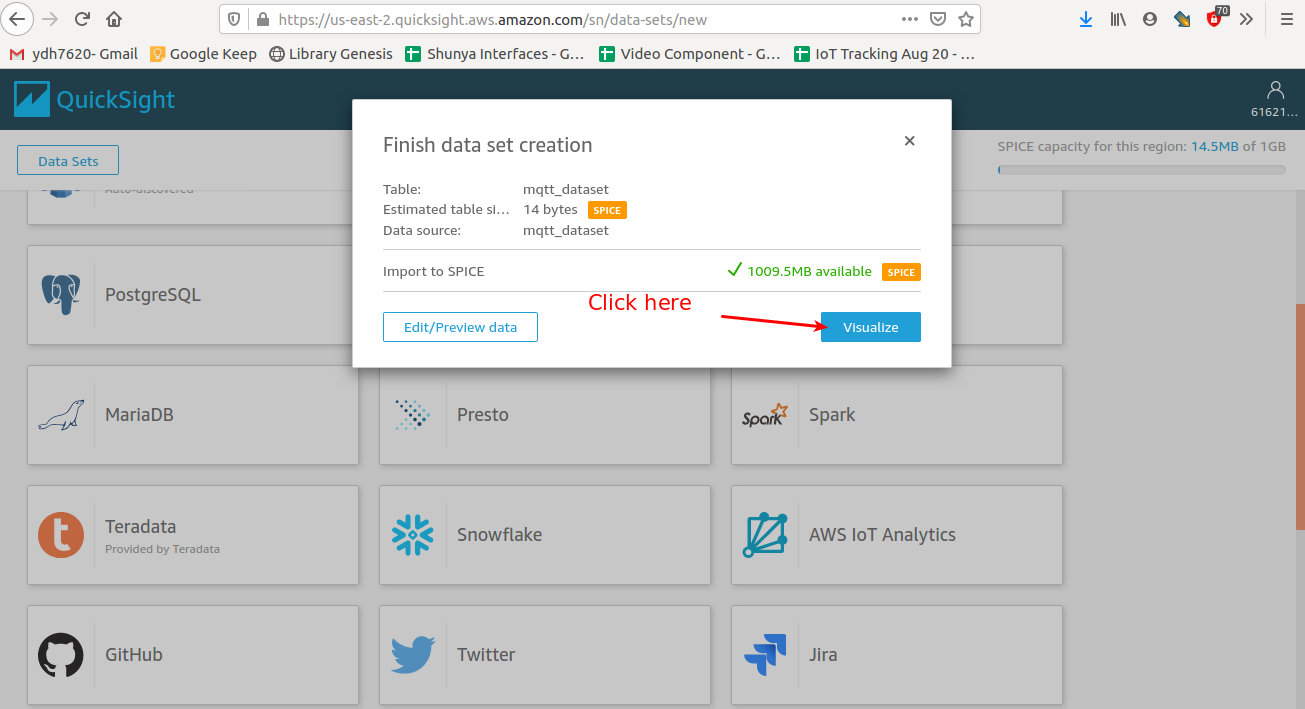
  3. Once you click on Visualize, you can create Dashboards on AWS Quicksight using your data from the device

Conclusion

By following this step-by-step guide, you can easily connect your Brainy Pi device to AWS IoT Core and start sending and receiving data from the cloud. With AWS Quicksight, you can create powerful visualizations and gain insights into your IoT data. We hope this guide has been helpful for you as you get started with  AWS IoT with Brainy Pi.
0 Comments

Leave a reply

Your email address will not be published. Required fields are marked *

*