Nagios is an open-source monitoring system that helps organizations and IT professionals monitor the health and performance of their IT infrastructure. It provides a comprehensive solution for monitoring systems, networks, applications, and services. Let’s explore Nagios on Brainy Pi.
Nagios allows you to monitor various aspects of your infrastructure, such as servers, switches, routers, databases, and more. It uses a plugin-based architecture, where different plugins are responsible for monitoring specific resources or services. These plugins collect data and report it back to Nagios for processing and analysis.
Equipment Required
Brainy Pi
Power Supply
Keyboard and mouse
Monitor and HDMI cable
Ethernet Cable or Wi-Fi
Preparing device for Nagios
Before we start, let us ensure that our operating system is entirely up to date.
To update everything, we need to type in the following two commands into the terminal.
sudo apt update
sudo apt upgrade
Once your BrainyPi has finished updating, we can now install the packages that we will be using to run Nagios.
Run the following command to install all the packages we require.
sudo apt install -y autoconf build-essential wget unzip apache2 apache2-utils libapache2-mod-php php libgd-dev snmp libnet-snmp-perl gettext libssl-dev wget bc gawk dc libmcrypt-dev
sudo a2enmod php7.4
This command installs several packages that we need. These packages include the compiler we need to compile the Nagios software. We also install the Apache web server, which is used for Nagios’s web interface.
Downloading and Compiling Nagios
To start, we are going to first change into the /tmp directory.
This directory is where we will download, extract, and compile the Nagios source code.
cd /tmp
We can now download the Nagios source code to our BrainyPi by running the following command.
wget -O nagios.tar.gz https://github.com/NagiosEnterprises/nagioscore/archive/nagios-4.4.6.tar.gzThis command will use wget to download the Nagios source code to our /tmp directory.
Once the archive has finished download, we can extract it by running the following command.
tar xzf nagios.tar.gz
Now change into the Nagios directory and configure the software for compilation.
cd /tmp/nagioscore-nagios-4.4.6/
./configure --with-httpd-conf=/etc/apache2/sites-enabled
Let us now compile Nagios by running the following command.
make all
This process can take some time as it needs to compile all the Nagios code. Running this can take approximately 5 minutes.
Setting Up Nagios on Brainy Pi
Let us make use of the make command to create the user and group Nagios needs to run.
We will also add the www-data user to the nagios group that is created by our make command.
sudo make install-groups-users
sudo usermod -a -G nagios www-data
Next, install the compiled binaries to our operating system by utilizing the command below.
sudo make installWe can also use the make command to install the Nagios service and set it up to start at boot.
Run the following command to install the Nagios core daemon.
sudo make install-daemoninit
Now we can run the following command to set up the external command directory.
sudo make install-commandmode
Our next step is to copy the sample configuration file again by using the make command.
sudo make install-config
These configuration files are needed for Nagios to operate. Without the config files, the software will not load.
Our second last step is to install the Apache configuration files.
This command will install the required configuration files to the directory we specified when we configured the makefile.
We will also use two a2enmod commands to make sure that the required Apache modules are enabled.
sudo make install-webconf
sudo a2enmod rewrite
sudo a2enmod cgi
In our final step, we will be creating an Apache user that you will use to access the Nagios interface on your BrainyPi.
The following command will create a user called nagiosadmin. You will be asked to specify a password for this user.
sudo htpasswd -c /usr/local/nagios/etc/htpasswd.users nagiosadminThe user must be called nagiosadmin to satisfy the default configuration of Nagios.
Starting Nagios on Brainy Pi
Our first step is to restart the Apache web server by running the following command.
sudo systemctl restart apache2
Restarting Apache will allow our new configuration files to be loaded in.
Next, enable the Nagios service and start it up by running the following two commands.
sudo systemctl enable nagios
sudo systemctl start nagios
By enabling the service, we will be allowing Nagios to start up at boot on your BrainyPi.
You can verify that Nagios has started on your BrainyPi by running the following command.
sudo systemctl status nagios
If everything is working as intended, you should see the following text be outputted to the terminal.
Active: active (running)
This text tells us that the service is active and is currently running.
Installing the Nagios Plugins
First change into our /tmp directory.
cd /tmp
Now that we are in the /tmp directory, we can download the Nagios plugins by running the command below.
wget -O nagios-plugins.tar.gz https://github.com/nagios-plugins/nagios-plugins/releases/download/release-2.3.3/nagios-plugins-2.3.3.tar.gzNow extract the plugin source code to our current directory by using the following command.
tar zxf nagios-plugins.tar.gz
Our next step is to change into our newly created directory and configure the plugins for compilation.
cd /tmp/nagios-plugins-2.3.3
./configure
Once the configuration process has completed, we can compile the Nagios plugins by running the following command.
make
This process can also take some time to execute.
Finish up this process by installing the Nagios plugins by running the following command.
sudo make installTo make sure Nagios loads in the new plugins, restart the software by running the command below.
sudo systemctl restart nagios
Connecting to the Nagios Web Interface
To access the Nagios web interface, you will need to know the BrainyPi’s IP address.
You can retrieve your Brainy Pi’s local IP address by running the following command.
hostname -I
You need the host’s ip for the next step.
To connect to the Nagios web interface, you will need to go to your Pi’s IP address followed by /nagios.
http://[IPADDRESS]/nagios
When you try to connect, you will be asked to enter a username and password.
The username should be nagiosadmin(specified above in the tutorial), and the password should be what you entered.
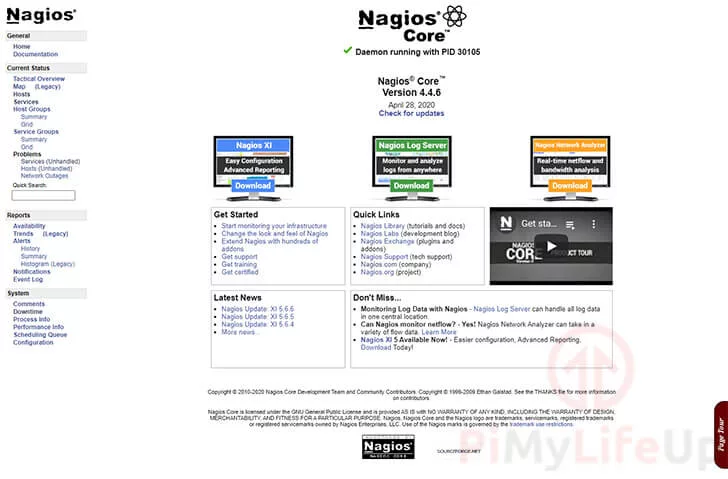
Upon a successful connection, you should be greeted by the Nagios core homepage, all running from your Brainy Pi.
