Color detection is an important problem in computer vision, and it has numerous applications, such as object tracking, image segmentation, and robotics. In this article, we will learn how to do Color Detection using OpenCV on Brainy Pi , a single-board computer.
OpenCV is an open-source computer vision library that provides a variety of tools for image and video processing, such as reading, writing, and manipulating images and videos. It is a widely used library in the computer vision community due to its efficiency, simplicity, and versatility.
BrainyPi, an innovative platform that allows developers to create intelligent systems with ease.
A little about source code
The source code contains 2 python files
colorDetection.py– file is the main file of the program. When this file runs it opens up the camera and then tries to match the color according to the filter.colorDetectUtils.py– file is where the actual color detection happens. colorDetection.py file calls the methods inside this file and then we pass the image through thedetectColorsfunction. Finally we pass the output to the colorDetection.py file and then we display the output on the screen.
Running the Code for Color Detection using OpenCV on Brainy Pi
To run the color detection program on BrainyPi, follow these steps:
Connect USB webcam to BrainyPi.
Clone the GitHub Repository
Install Required Dependencies
Run Color detection
The program will open up the camera and try to match the color in the camera to the color filter. The output will be displayed on the screen. To exit the program, press the q key.
Adapting the Code for Your Own Use
If you want to use this color detection code for your own project, you’ll need to make some changes to customize it for your specific use case. Here are some tips for adapting the code:
createColorMask()– Create color mask to detect the specified color.Inputs
inputImage ([opencv Mat]): Input image
colorLower ([opencv Mat]): Lower range of the color
colorUpper ([opencv Mat]): Upper range of the color
Outputs:
color_mask []: Contains the color mask
detectColors()– Detect color in imageInputs
inputImage ([opencv Mat]): Input image
colorMask ([opencv Mat]): Color Mask generated from createColorMask()
name ([opencv Mat]): Name of the color
Outputs
colorInfo [list]: list of colors detected in the image with bounding box info
outputImage [opencv Mat]: Output Image
Different Color Detection using OpenCV on Brainy Pi
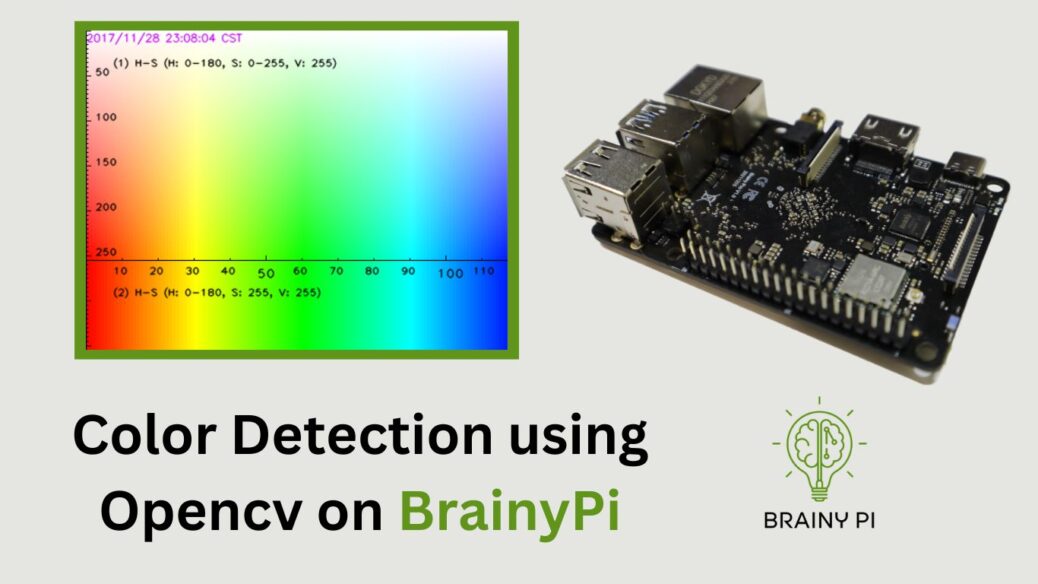
The current code is set to detect Red color in the image. If you want to change the color then you have to change the the upper limit and lower limit in the colorDetection.py file.

To change the color, first get the upper and lower H & S points in the above color chart.
For example: Let’s say we want to detect color blue, then
Create a rectangle in the color chart, marking all the blue colors that you want to detect.

Note down the lower and upper values of H and S
H_lower = 90
H_upper = 130
S_lower = 50
S_upper = 255
We will keep the V values as constant
V_lower = 20
V_upper = 255
Now we can change the upper and lower limit, in the
colorDetection.pyfile.Now your code should detect the Blue color instead of Red.


