Menu
GPIO Examples
Description
This page shows additional examples for interacting with BrainyPi GPIO.
INFO
This documentation is for Rbian OS version: 0.7.2-beta
To check the version of Rbian run the command in terminal
os-version
Note: If the command fails or gives error then Rbian version is < 0.7.2-beta.
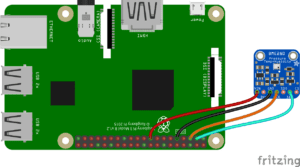
Example 1: ADXL345 I2C sensor on BrainyPi
1. Connect sensor according to the diagram below:

2. Porting I2C sensor code from RaspberryPi to BrainyPi
DIFF FROM RASPBERRYPI
To port Raspberry Pi code to BrainyPi you need to only change the I2C Port number from 1 (RaspberryPi) to 7 (BrainyPi).
3. Example code is given below. Copy the code to a file and name it adxl345.py.
					import smbus
from time import sleep

# I2C port for BrainyPi is 7. (/dev/i2c-7)
I2C_PORT = 7
bus = smbus.SMBus(I2C_PORT)

# ADXL345 constants
EARTH_GRAVITY_MS2   = 9.80665
SCALE_MULTIPLIER    = 0.004

DATA_FORMAT         = 0x31
BW_RATE             = 0x2C
POWER_CTL           = 0x2D

BW_RATE_1600HZ      = 0x0F
BW_RATE_800HZ       = 0x0E
BW_RATE_400HZ       = 0x0D
BW_RATE_200HZ       = 0x0C
BW_RATE_100HZ       = 0x0B
BW_RATE_50HZ        = 0x0A
BW_RATE_25HZ        = 0x09

RANGE_2G            = 0x00
RANGE_4G            = 0x01
RANGE_8G            = 0x02
RANGE_16G           = 0x03

MEASURE             = 0x08
AXES_DATA           = 0x32

class ADXL345:

    address = None

    def __init__(self, address = 0x53):
        self.address = address
        self.setBandwidthRate(BW_RATE_100HZ)
        self.setRange(RANGE_2G)
        self.enableMeasurement()

    def enableMeasurement(self):
        bus.write_byte_data(self.address, POWER_CTL, MEASURE)

    def setBandwidthRate(self, rate_flag):
        bus.write_byte_data(self.address, BW_RATE, rate_flag)

    # set the measurement range for 10-bit readings
    def setRange(self, range_flag):
        value = bus.read_byte_data(self.address, DATA_FORMAT)

        value &= ~0x0F;
        value |= range_flag;
        value |= 0x08;

        bus.write_byte_data(self.address, DATA_FORMAT, value)

    # returns the current reading from the sensor for each axis
    #
    # parameter gforce:
    #    False (default): result is returned in m/s^2
    #    True           : result is returned in gs
    def getAxes(self, gforce = False):
        bytes = bus.read_i2c_block_data(self.address, AXES_DATA, 6)

        x = bytes[0] | (bytes[1] << 8)
        if(x & (1 << 16 - 1)):
            x = x - (1<<16)

        y = bytes[2] | (bytes[3] << 8)
        if(y & (1 << 16 - 1)):
            y = y - (1<<16)

        z = bytes[4] | (bytes[5] << 8)
        if(z & (1 << 16 - 1)):
            z = z - (1<<16)

        x = x * SCALE_MULTIPLIER
        y = y * SCALE_MULTIPLIER
        z = z * SCALE_MULTIPLIER

        if gforce == False:
            x = x * EARTH_GRAVITY_MS2
            y = y * EARTH_GRAVITY_MS2
            z = z * EARTH_GRAVITY_MS2

        x = round(x, 4)
        y = round(y, 4)
        z = round(z, 4)

        return {"x": x, "y": y, "z": z}

if __name__ == "__main__":
    # if run directly we'll just create an instance of the class and output
    # the current readings
    adxl345 = ADXL345()

    while True:
        axes = adxl345.getAxes(True)
        print("=======================")
        print("x-axis = %.3fG" % ( axes['x'] ))
        print("y-axis = %.3fG" % ( axes['y'] ))
        print("z-axis = %.3fG" % ( axes['z'] ))
        sleep(1)
4. Run command to execute the code
sudo python3 adxl345.py
Example 2: BMP280 I2C sensor on BrainyPi
1. Connect sensor according to the diagram below:
2. Porting I2C sensor code from RaspberryPi to BrainyPi
DIFF FROM RASPBERRYPI
To port Raspberry Pi code to BrainyPi you need to only change the I2C Port number from 1 (RaspberryPi) to 7 (BrainyPi).
3. Example code is given below. Copy the code to a file and name it tempsensor.py.
					import smbus2
import bme280 as sensor
import time

# I2C port for BrainyPi is 7. (/dev/i2c-7)
I2C_PORT = 7
BME280_ADDR = 0x76

bus = smbus2.SMBus(I2C_PORT)
calibration_params = sensor.load_calibration_params(bus, BME280_ADDR)

# the sample method will take a single reading and return a
# compensated_reading object
while True:
    data = sensor.sample(bus, BME280_ADDR, calibration_params)

    print("=======================")
    print("Time:", data.timestamp)
    print("Temperature: %f deg C" % data.temperature)
    print("Pressure: %f hPa" % data.pressure)
    time.sleep(1)
4. Run command to execute the code
sudo python3 tempsensor.py
NEED SUPPORT?
First, Ensure version of OS installed and the version this document is intended for match. If they match and yet problem persists. Please use this Forum link for community help.
If you are an enterprise customer please use the ticketing system login provided to you for priority support.
Previous
<< TFLite Examples
Next
Pytorch Examples >>